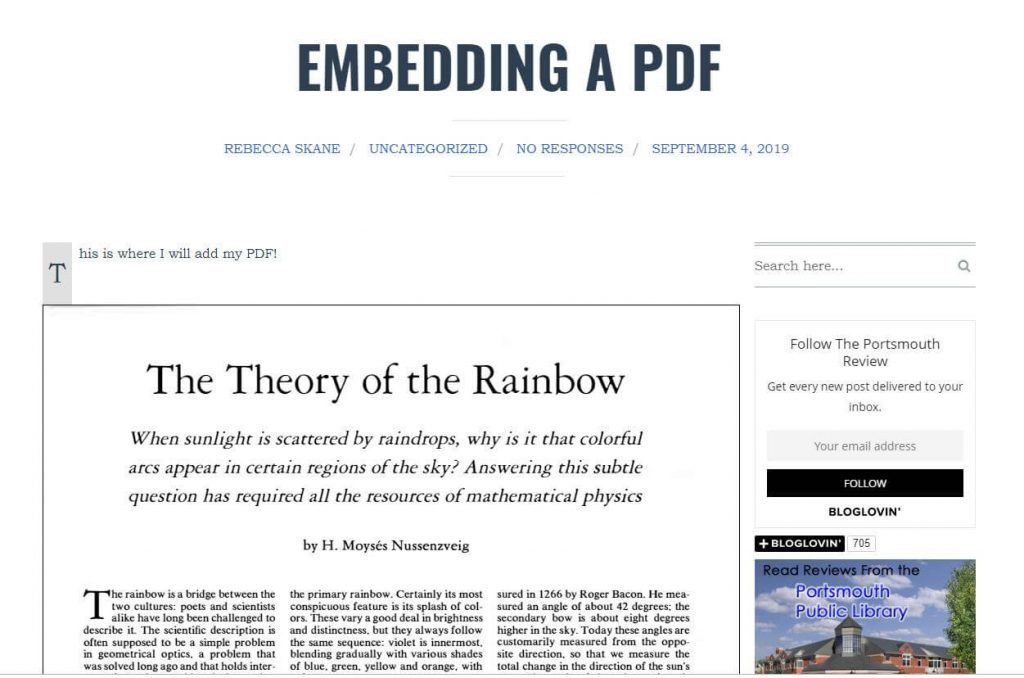
Below you will find articles for the intermediate and advanced blogger. If you are a beginner make sure to check out my easy guide to starting a blog first.
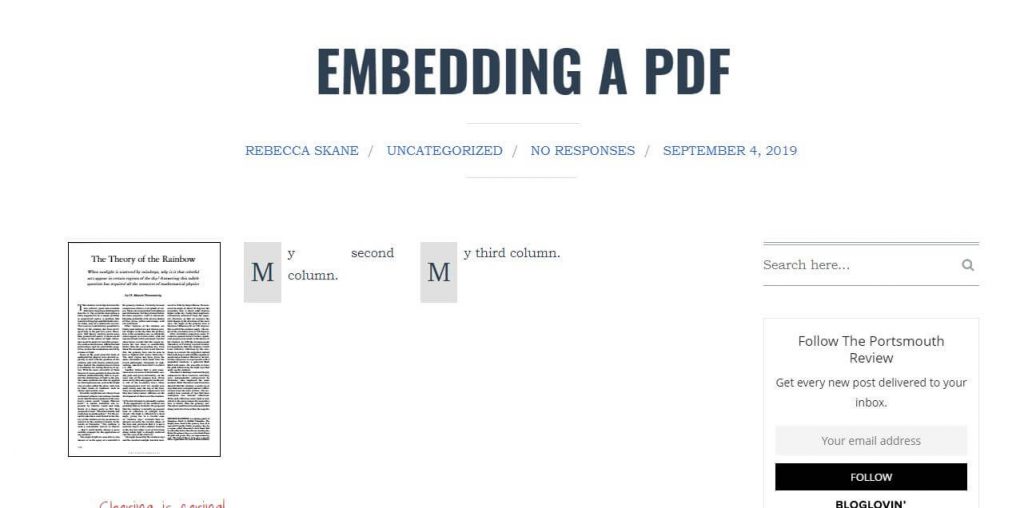
Traditionally,
PDF documents are uploaded to your media bank in WordPress and then linked
through a “Download Now” button. Because PDFs are not images, the WordPress
editor is not able to display the PDF directly on the page or post.
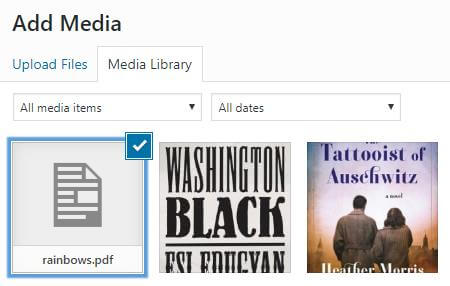
If
you try to embed a PDF by uploading the PDF into your media bank, and then
selecting that PDF to insert into a page or post, you will see a blank image
representing the PDF.
Selecting
the PDF will only provide the title in your text editor. There will be no image
and no PDF link. Simply put, it doesn’t work.
But
there is a way to display PDFs on your WordPress website with a handy plugin.
How to embed PDFs in
your WordPress Post
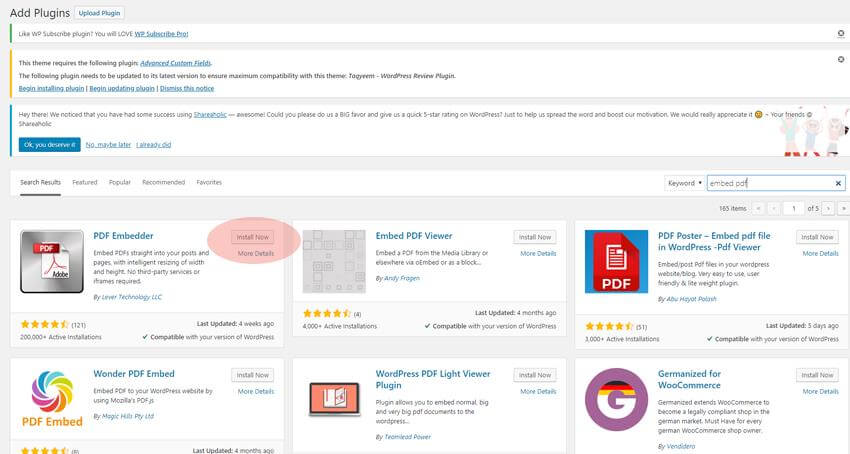
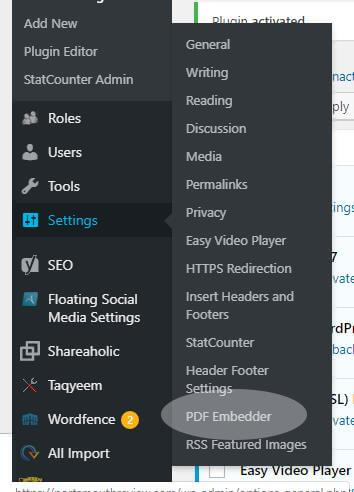
Navigate
to the backend of your WordPress dashboard and go to your plugins page. Click
“Add New” to search the WordPress repository, and conduct a search for “PDF Embedder”.
Click
the “Install Now” button next to PDF Embedder (there are other options, make
sure to select the correct title!) and after it has finished downloading,
activate the plugin.
PDF
Embedder has “Activate and Go” capabilities, meaning it isn’t necessary to edit
the settings or copy shortcode for this plugin to work. You’re ready to add
your PDFs directly to your website! And it’s as easy as adding media.
Using the embedder with
the classic editor
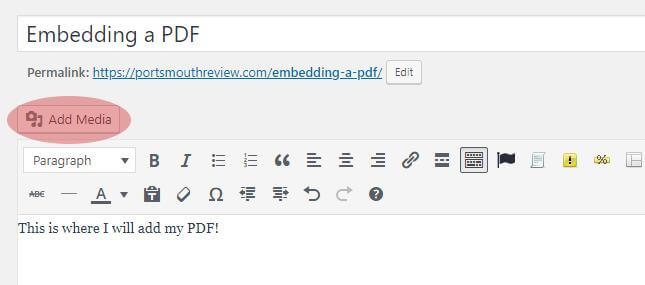
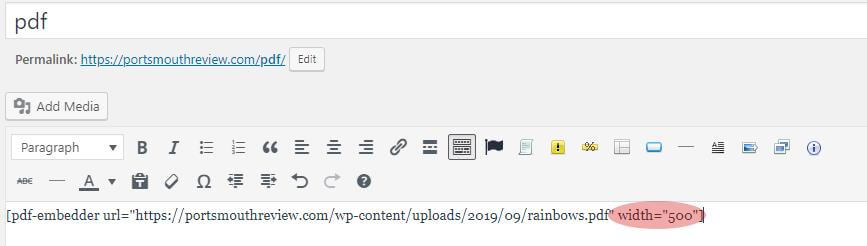
Create
a new page or post and select the “Add Media” tab.
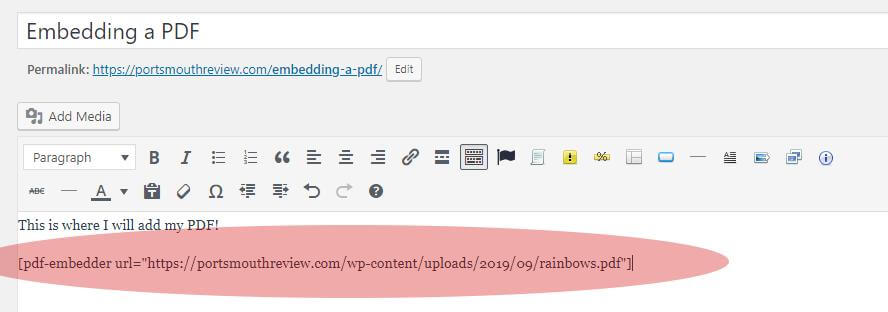
Just
as would with a normal image, select the PDF from the media bank or upload it.
When you are done with the selection, a piece shortcode will be automatically
created and populated within the text editor.
Most
likely, you won’t be able to see the image in your editor. But if you save the
post as a draft or publish it, you will be able to see it on the front end.
Voila!
The PDF will automatically resize to fit the container where it is placed.
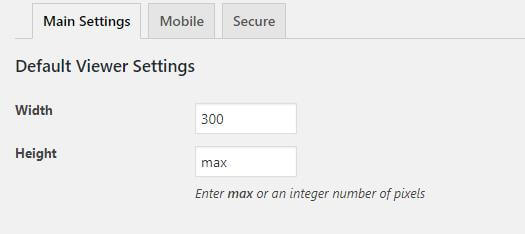
To
change the sizing, you can find the plugin’s settings in your dashboard under
“Settings”.
In
the PDF Embedder settings, you can change the width or height of the PDF
display. This will change the dimensions for all PDFs embedded with this
plugin.
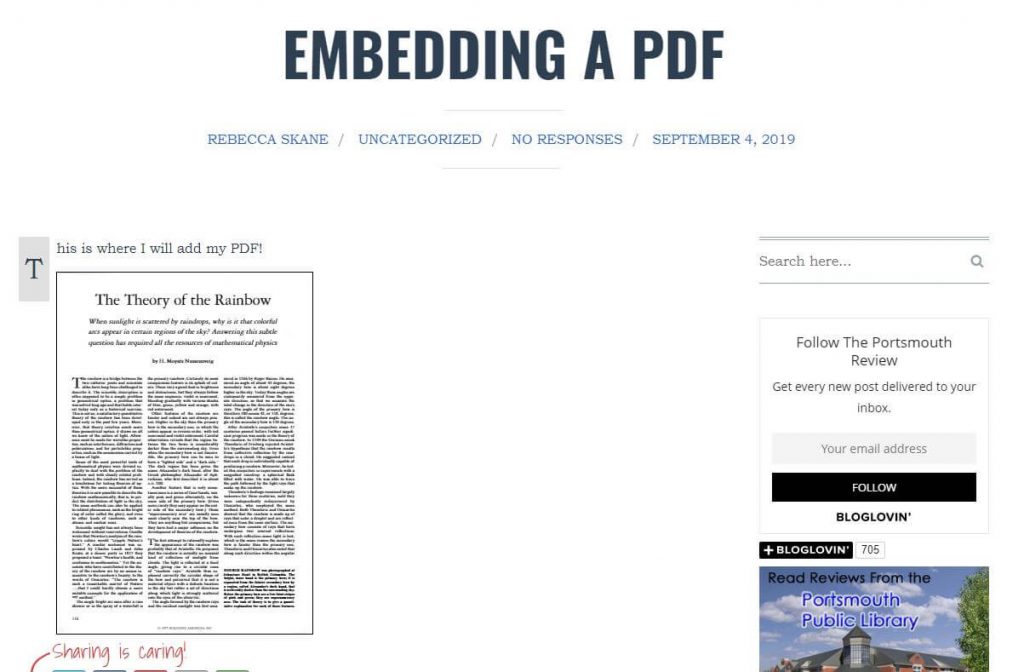
Changing
the width to 300 and keeping the height set to max will yield this result:
If
you would rather not change the universal settings, you can alternatively
manipulate height or width by editing the shortcode directly. This way, only
the PDF you’re working on is affected.
You
can find more shortcode manipulations for PDF Embedder here.
Using the embedder with
the new block editor
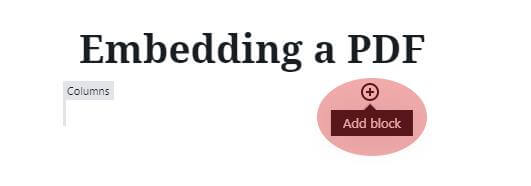
In
the new block editor or with builders such as Divi, you can create columns and
blocks with definitive widths set so that you don’t need to edit the size of
the PDF.
In
your new post, set the columns and blocks as you would like the post to appear.
Within the chosen column where you want to embed a PDF, click “Add Block”.
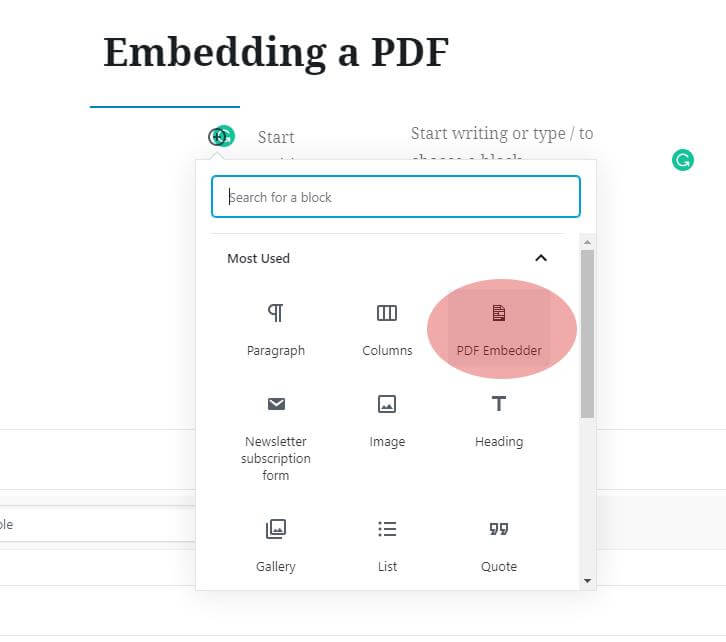
The
block editor will provide an option for PDF Embedder as its own block. Select
this option.
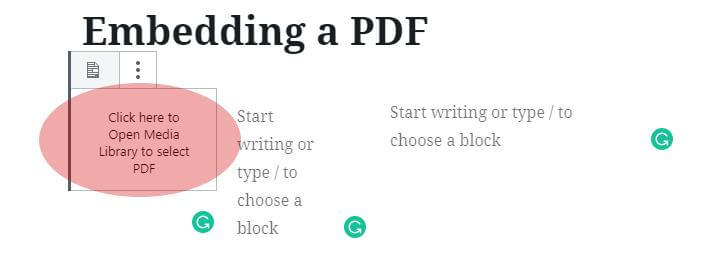
You
will then see “Click Here” text to insert your media.
The
PDF Embedder settings are set to max size, but the PDF will display perfectly
to fit the max width of that specific container.
Embedding a multi-page
PDF
The
PDF Embedder handles this for you and there are no additional steps that need
to be taken. Once the PDF has been embedded, only the first page will show. But
if you hover over the PDF on the front end, directional tabs will appear at the
bottom, enabling the user to easily flip through the pages within the
container.
And
that’s it! Not so terribly tough, is it? We hope this article helped you!
If you have your domain registered with
GoDaddy and a hosting account with BlueHost, you do not need to transfer domain
ownership to Bluehost. In fact, it’s highly advisable that you keep your
domains and hosting accounts separate in order to minimize loss in the event of
account corruption or disruption.
To use your GoDaddy domain and build
on a BlueHost hosting account, you must change the nameservers of your domain
to point to your Bluehost account.
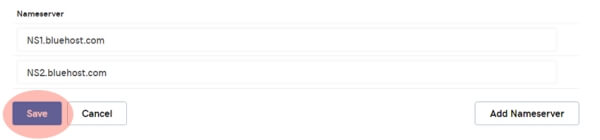
Step One: Copy and paste the
BlueHost nameserver details
Take note of the Bluehost nameservers. They
are:
NS1.bluehost.com
NS2.bluehost.com
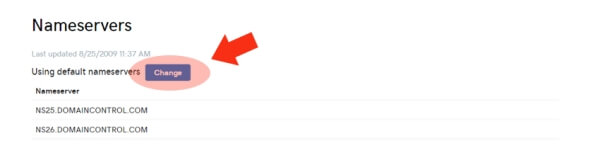
Step Two: Change the
nameservers on GoDaddy
Log into your GoDaddy account and go to your
products page. Under the Domains heading, select “DNS” next to the domain you
want to point to BlueHost.
Scroll down to the Nameservers heading and
click “Change”.
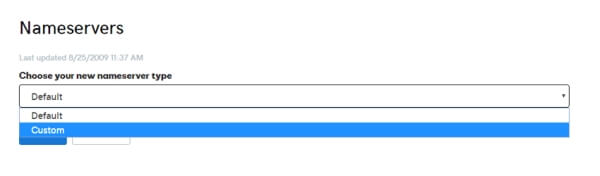
You will be given the option to choose your
Nameserver type. Default is the option set for hosting on GoDaddy. To change
your nameserver destination, you’ll need to select “Custom”.
Enter the nameservers for Bluehost, copied
from above, and then click “Save”.
Step Three: Make sure the
domain is entered in your BlueHost account
**Note** It usually takes a full
24 hours for nameserver DNS propagation from the GoDaddy servers. Therefore,
you might not be able to work with your new site under your domain for a full
day.
Option One: If you set your
up Bluehost account with the domain name in question, you won’t need to add it
again. Build your site, if you haven’t already, within the /public_html file.
Option Two: If this domain
is new to your BlueHost account, you will need to add the domain as an “Addon”
domain.
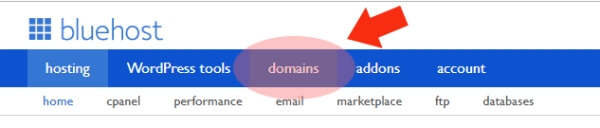
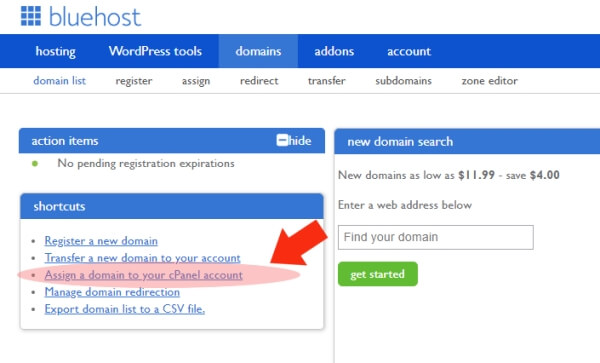
Navigate to “Domains” in your BlueHost
account.
Next, select “Assign a domain to your cPanel
account”.
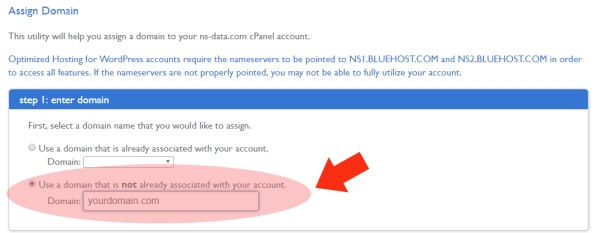
Enter the domain that is not already
associated with the account. Do not use the http:// or www headers.
BlueHost will analyze the domain and verify
ownership by checking to see if the nameservers on GoDaddy have been properly
set to the above BlueHost nameservers. Since you have done this already,
verification will be complete.
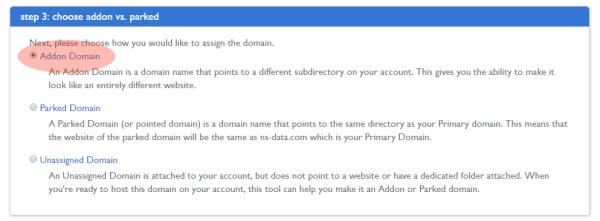
Under Step 3, make sure “Addon Domain” is
selected.
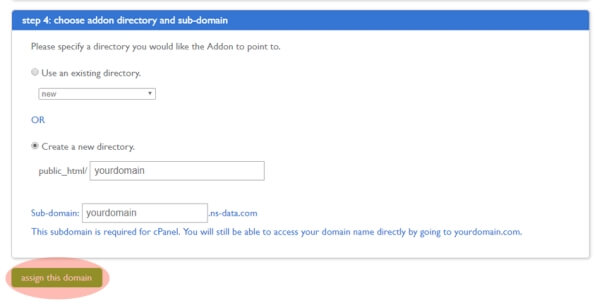
Step 4 will ask you to choose your Addon and
subdomain directories. It will automatically assign and create a directory
based on the name of the domain you entered. As long as you are okay with this
creation, click “Assign this Domain”. Otherwise, you can enter a different
folder name.
You are done! It’s a good practice to wait a
full day before beginning your build or working with the website after a
nameserver change. This is only due to the delay in full nameserver change
propagation which is typically completed in 24 hours.
With the ever-expanding reach of the Internet and an audience of web
surfers that continues to grow on a minute-by-minute basis, you can still
easily make money by niche blogging. You don’t have to start with a huge
following or be famous to attain a reasonable, money-making digital reach.
There are only three things that are required. The three Ps of
blogging:
1. Passion
2. Patience
3. Perseverance
Passion: Don’t pick a blog topic on the basis of profitability alone. Select
an appropriate niche for you. What do you love? What consumes your thoughts?
What topic do you annoy your friends with the most? If you find a niche
involving your passion, you’ll never run out of topics to write about.
Patience: Realizing profit from blogging takes time. It
will never be instantaneous. It takes time and effort to develop an audience
and organic traffic through a healthy relationship with search engines,
otherwise known as SEO.
Perseverance: Haven’t made a dime after a month? Don’t give
up! Keep developing content, keep to a regular schedule, and have fun while
doing it. If you build it, ‘they’ will
come.
So what is a blog ‘niche’, anyway?
A blog niche is a smaller, more defined category or market segment.
Examples:
Main category: Dogs Niche category: Dog training
Main category: Book Reviews Niche category: Contemporary Young Adult Fiction
Main category: Hollywood Gossip Niche category: Arrested A-listers
The perfect niche for you could be absolutely anything – the
possibilities are endless! Think about what you love, where your passion is.
Then take that idea, and narrow it down a little further. You could whittle it
down based on geography or to a subcategory within your passion, or both.
If you think there wouldn’t be any interest in your field of choice,
you would be wrong. No matter how prosaic or boring you think your passion
might be to others, there will be a surplus of web surfers out there who will
manage to find your musings. And you, in your little corner of the massive
World Wide Web, may just be the one to inspire and engage on this front.
There are also ways to organically
capture and drive traffic to your blog with surfers who wouldn’t have ended up
there ordinarily – but we’ll get into that later.
The 10 Most Profitable Blog Topics
Naturally, there are blog categories that are more profitable than
others. This doesn’t mean that you should jump into one of these categories.
However, if your passion involves any of these ‘biggies’, you might want to
consider using a part of that theme in your niche selection.
Each of these categories has a number of topics that can be
extrapolated and developed.
1. How to Make Money Online
This is the obvious number one money-making blog category, aptly and
hilariously so. This article serves as a niche in this very category: making
money from home by niche blogging.
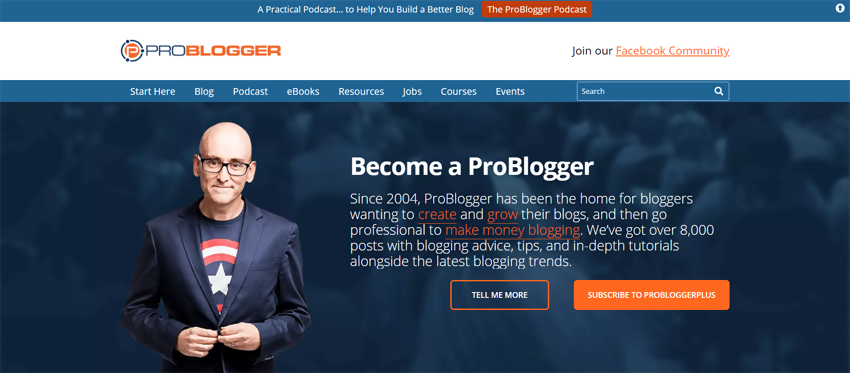
Successful Niche Example: Darren Rowse
Darren Rowse teaches people how to run a successful money-making blog on his site ProBlogger, and rakes in an estimated $40,000 per month in doing so.
Darren Rowse took the main theme of making money online and turned it into a niche by showing people how to earn an income online through blogging. His success is stunning and only proves that niche blogging certainly does pad the bank account.
2. Personal Finance
This category isn’t about making money, but about money and asset
management. It can be broken down further into investing, currency, budgeting,
saving, and other aspects of personal finance.
Successful Niche Example: Rosemarie
Groner
Rosemarie Groner’s successful money and household budgeting blog called Busy Budgeter brings in an estimated $86,000 per month, give or take.
Groner took the main category of personal finance and helmed a niche
blog on family budgeting geared toward disorganized people. It was the perfect
gap filler that she now dominates.
3. Health and Fitness
New fitness and diet fads, healthy living, and online weight loss
venues are all the rage.
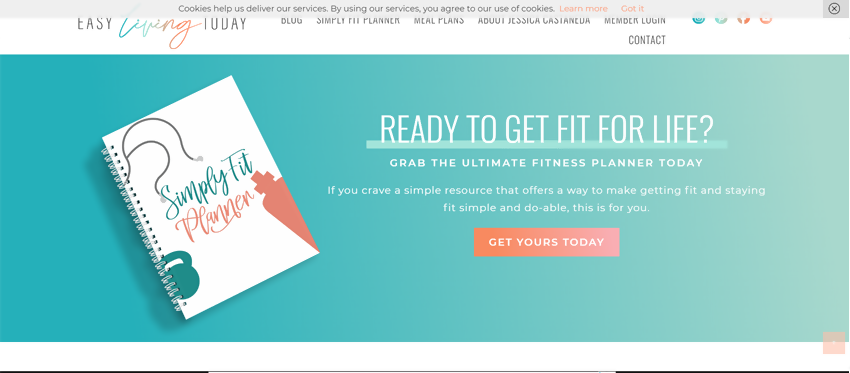
Successful Niche Example: Jessica
Castaneda
Jessica’s fitness blog Easy Living Today is positively attractive, and she’s bringing in a reported $20,000 per month by staying active in life and on the keyboard.
She began a blog within the main category of health and fitness and
narrowed it down to her niche of meal planning, especially for busy moms. It
was a home run of an idea.
4. Recipes
How many times have you looked up recipes online? A recipe site
along with its numerous recipe and food niches can bring in plenty of traffic.
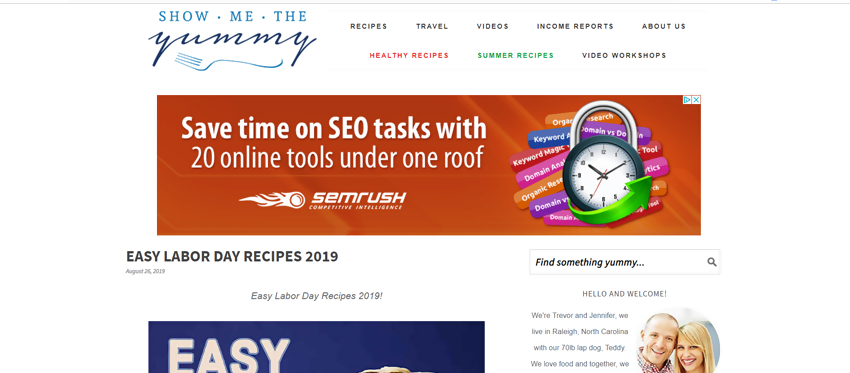
Successful Niche Example: Jennifer
Debth
Jennifer Debth’s website and blog called Show Me the Yummy pulls in a whopping $46,000 per month.
Jennifer began a blog in the main category of recipes, and then made
a niche for herself by creating and posting “easy” recipes. Because of this
strategy, she dominates the search engine results with listings for easy
recipes.
5. Beauty and Fashion
Again, the possibilities are endless. From make-up tutorials to
hairstyle directions to before-and-afters, to clothes design or reviews,
anything goes!
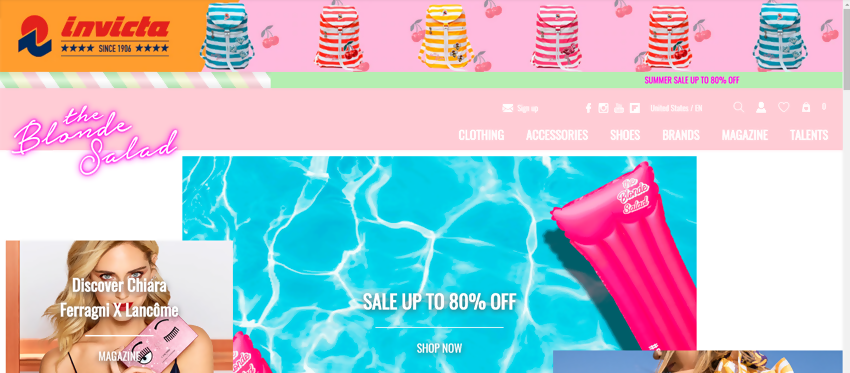
Successful Niche Example: Chiara
Ferragni
Chiara’s fashion blog The Blonde Salad has been running for ten years and has turned into a monster. Her own fashion brand and website brings in an estimated $200,000 per month.
Chiara began a beauty and fashion blog with a high emphasis on
making her own identity and brand stick out. By doing so, she became a top
influencer in fashion years ago.
6. Personal Development
Otherwise known as life coaching, this category draws in the crowds.
I’m sure you can already think of a few people off the top of your head who are
life coaches or gurus dedicated to self-improvement and achieving happiness.
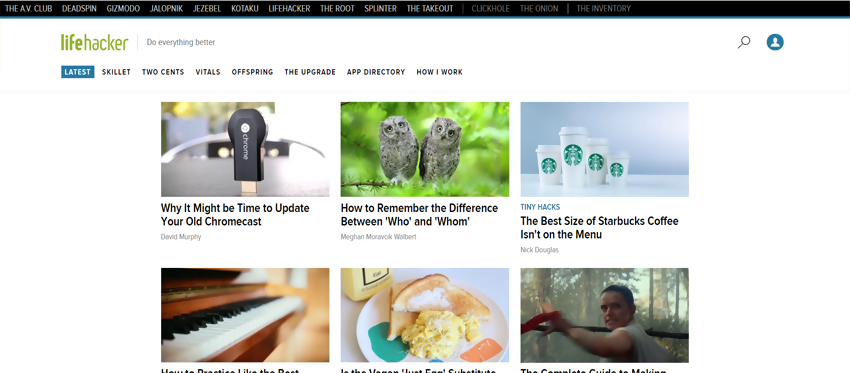
Successful Niche Example: Gina
Trapani
A simple site dedicated to life hacks, Gina Trapani’s site Life Hacker is reported to bring in $110,000 per month.
This personal development site filled a great niche with simple, fun
life hacks. These tidbits of wisdom are perfect for sharing, and she went
viral.
7. Arts and Crafts
Widely-searched and investigated, DIY arts and crafts sites score a
ton of traffic.
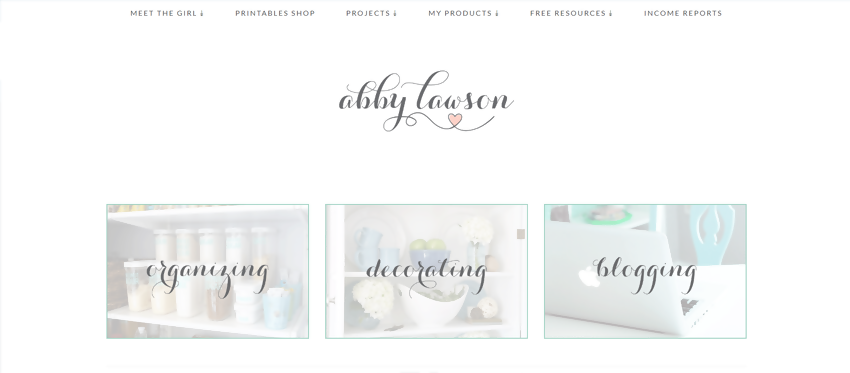
Successful Niche Example: Abby Lawson
Abby Lawson’s site is a mix of home organization and decorating that people have come to know and love. Her site brings in an estimated $41,000 per month.
Abby began a blog in the arts and crafts category but truly narrowed
it down to focus on organization and home decorating crafts for families and
moms. She owns the area now!
8. Parenting
As the population grows, so do the number of people entering
parenthood. First-timers gravitate toward parenting wisdom in droves.
Successful Niche Example: Heather B.
Armstrong
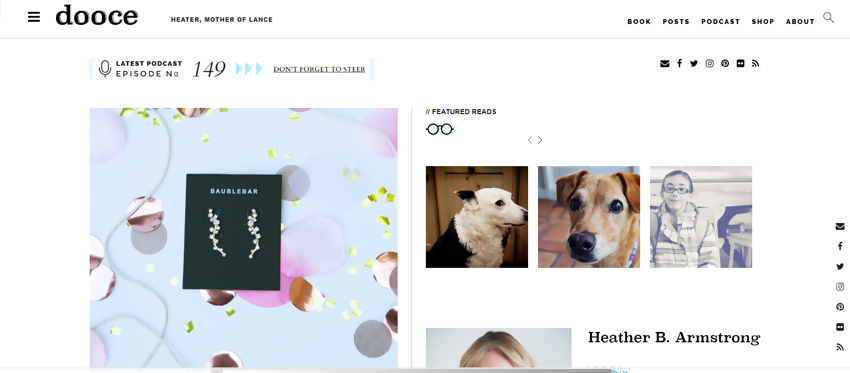
This personal blog isn’t so much about parenting but involves
motherhood with some snark and comical attitude. Heather Armstrong’s blog Dooce brings in an estimated $50,000 per month.
Armstrong began a blog in the parenting category and infused it with
her own brand of humor, distinguishing herself from other mommy blogs easily.
9. Travel
Travel blogs capture traffic from all types of users. People do
their research before taking a vacation or traveling to a location for work.
They might just find your content!
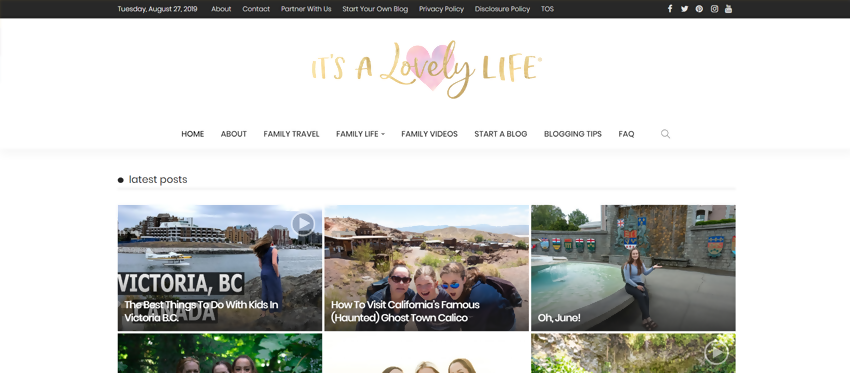
Successful Niche Example: Heather and
Pete Reese
Mr. and Mrs. Reese run a family travel blog called It’s a Lovely Life. The money they make from the blog supports their traveling lifestyle. Imagine making around $170,000 per month just from a blog – because they do!
The Reeses ventured into the travel blogging category, and emerged
with their own particular niche of traveling with the family and with kids.
10. Marketing
Advertising has primarily moved from paper to digital, with the
latter offering a larger variety of ways to market a business such as email
marketing, website design, landing pages, pay-per-click ads, and more.
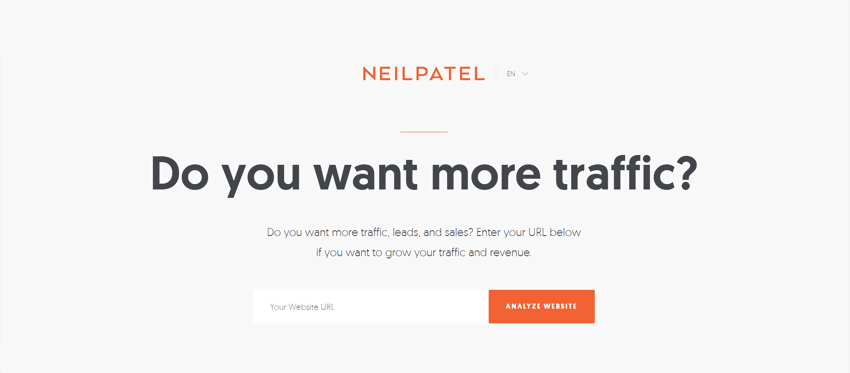
Successful Niche Example: Neil Patel
Neil Patel is one of the most prolific and successful bloggers in the history of blogging and he focuses on website marketing. He’s publicized his own earnings of over $350,000 per month.
Mr. Patel began a blog in the marketing category and owned his own
niche with online marketing. A very successful move.
How Can You Find a Great Niche?
If you’re looking to make money online, which you surely are, the
blog niche should be profitable. You
want to find a niche that has the potential for making money. At the same time,
this niche should be something you know a lot about, something you’re
passionate about and be within an area where you would contribute to the
community through depth of knowledge.
It might seem like a tall order, but we have some steps you can take
to help find your perfect blog niche.
Pick something you love to talk about
If you love to talk about it, you probably know a lot about the
subject. It is fundamentally imperative that your chosen subject is something
you love to discuss because you’ll be writing up articles on the subject on a
regular basis, hopefully daily. When people are out of fresh ideas, that’s when
they drop the ball and stop posting on their blog. And if they’re not posting,
they’re not making any money.
You don’t have to be an absolute expert by any means. The passion
you imbue into your posts is what makes the real difference. Each topic should
be something you’re absolutely excited about. Your excitement will be
contagious and your post will stimulate dialogue. That’s what you want!
Do Market Research
The subject you pick should have a steady amount of interest and
there are a few ways to determine online interest level.
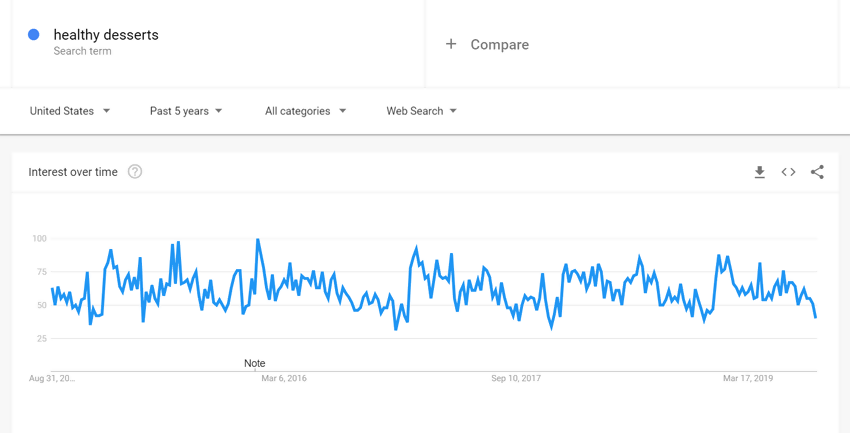
Visit Google Trends and search
for your term using a five-year analysis.
For example, let’s say you wanted to enter the recipe category and narrow it
down to healthy dessert recipes. Running a check on ‘Healthy Desserts’ yields
the type of chart you want to see.
The numbers on the left are not the number of searches completed,
but the interest level on a scale of 0-100. What you want to see for interest
is a steady interest in the middle. In this case, ‘Healthy Desserts’ provides a
great opportunity for a niche blog.
If you receive a chart that appears to be declining over time,
you’ll want to try another topic. Another type of chart to avoid is one the
varies wildly and often hits zero.
As you can see, the subject peaks regularly during the holidays but
spends most of its time near the bottom. A term yielding these results would be
difficult to monetize.
Take a look at the competition
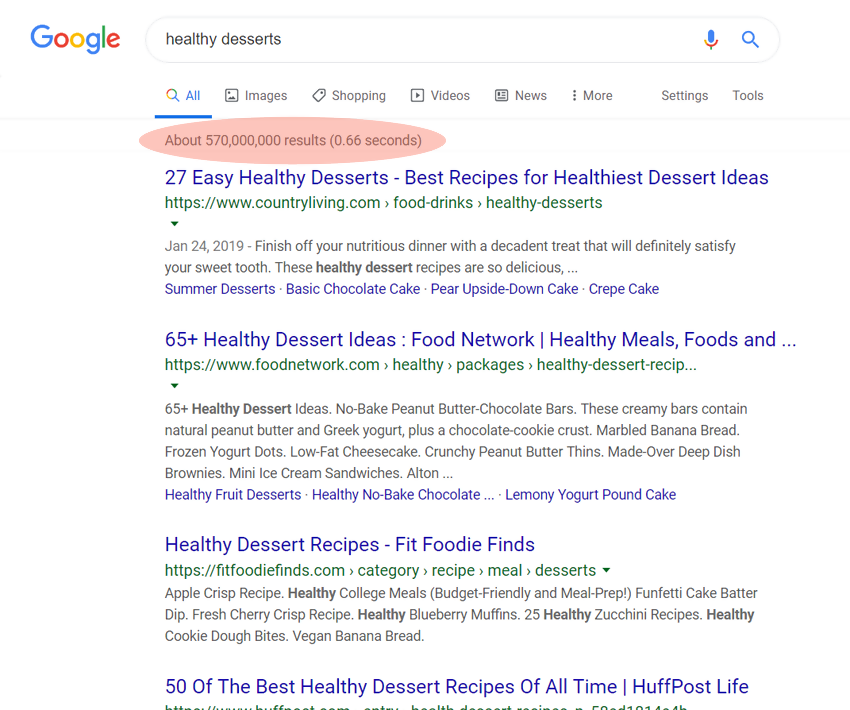
You can get a great idea of the competition you’ll face with a Google search. Conduct a search and see what results come up. Once again, we’ll use the ‘Healthy Desserts’ key term.
There are a couple of things you’ll want to take into consideration
on the search results.
The first is the number of results pulled at the very top. This
example shows 570 million results. That’s your competition and it’s quite a
large number. This doesn’t mean there are 570 million website competitors, but
rather pages, many belonging to the same website.
If you scroll down to look at the top results, we find that most of
the results reveal an article based on this topic, but not a website itself. So
if you were to start a blog called Healthy Desserts, there is potential to run
the search engine results because keywords in a domain name have more search
engine power than in an article title.
So far, ‘Healthy Desserts’ is looking good.
However, if you find too much direct competition, you can break this
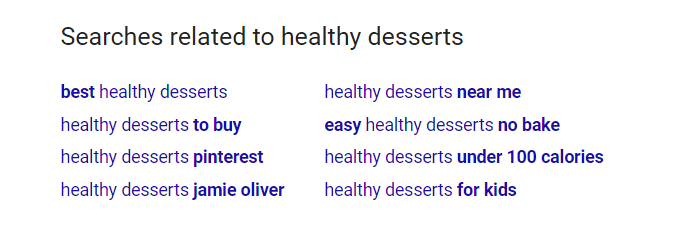
topic down even further by doing a related search. Scroll down to the bottom of
the search results, and you’ll find searches related to ‘Healthy Desserts’.
“Easy Healthy Desserts’ or ‘Healthy Desserts for Kids’ are possible
contenders.
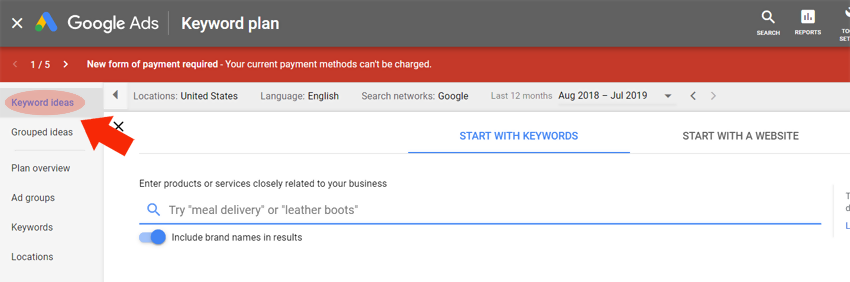
The next step is to see how many monthly searches are conducted for your search term. Head on over to Google’s Keyword Planner and navigate to ‘Keyword Ideas’.
Conduct a search for your niche idea’s key term. Again, we will try ‘Healthy Desserts’.
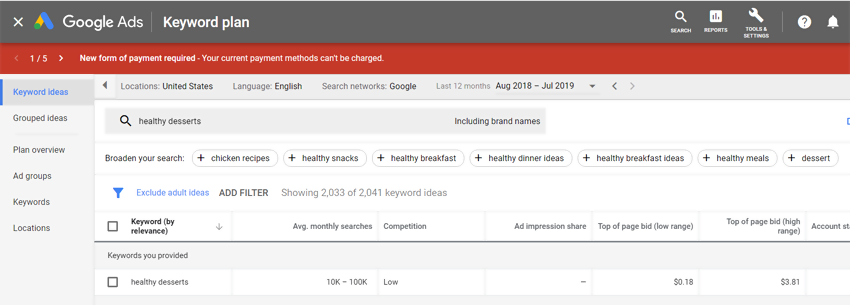
Perfect results. This is what you’re looking for. I think we may
have inadvertently discovered a blog niche with amazing potential.
The results show high monthly searches of 10k – 100k. This is an
enormous amount of potential traffic. Better yet, the competition is low. This
competition relates to PPC advertising.
Try a few different variations to find your best possible niche.
Test Profitability
The goal is to make money. You can easily see if your niche idea is
profitable by investigating ads placed for your key terms. If companies are
shelling out money to advertise on Google, the site is making money from the
placement of these ads.
Your main term may be too broad for PPC ads, but if you find ads
placed under related searches, your niche is likely profitable. Otherwise,
companies wouldn’t be paying for ads based on those key terms.
If companies are paying for ads within your niche subject, they’ll
pay for ads on your site. That’s how you monetize. That’s the end game. You can
use Amazon Adsense or profit with affiliate marketing or a combination of both.
Common Mistakes Made by New Bloggers Looking for a Topic
There are a few common pitfalls many first-time bloggers fall into
while trying to find the perfect blog niche.
Forcing or searching for your passion
Let’s face it, not everyone has something they are absolutely and
utterly devoted to. If you are not sure what your passion is, don’t force it.
Because that’s not passion.
Being passionate about something happens over the years. That
yearning and burning about a particular topic is a drive that is developed over
time, and not suddenly discovered.
While you may not have this devoted passion, you likely have a deep
interest in something. Maybe many things. Starting a blog and blogging about
that topic will help develop that passion we’re talking about.
But the wrong thing to do is go searching for it. As I said before,
it’s not something to be discovered or awakened within. It is something you
cultivate over time.
Choosing a category that is too broad
If your category is far too broad, fewer searches will find your
blog posts. You’ll be drowned in a sea of competitors and related searches. And
there will be nothing to set you apart.
If your subject material is too broad, you’ll fail to motivate a
large enough crowd. Without motivation, you won’t gather a regular audience.
This is why it is truly important to whittle down your blogging idea into a
smaller, more profitable niche.
Shying away from competition
Healthy competition is great in a free market society. Competition
keeps prices low, improves quality, provides choice, inspires innovation, and
encourages all participants to do better
in general.
Don’t be frightened of the competition. If you discover a great
niche with plenty of traffic and there is another blogging competitor out
there, don’t toss the idea simply because you think, “Oh, I’ll never capture traffic with that competitor.” If the search
traffic is there, you will capture your fair share.
You can also learn from your competition. By studying your
competitor, you can see what works and possibly improve upon the idea. This is
how competition generally makes us better.
Not blogging regularly
A profitable blog niche doesn’t pick up and fall off over and over
with days and weeks between posts. A successful blogger makes an editorial
calendar and sticks with it. You should post daily, Monday through Friday.
If you find yourself lapsing between posts and going longer and longer
between each one, your blog is going to fail. It can be difficult to find new
and interesting topics to post, but do your best. Each piece doesn’t need to be
worthy of a Pulitzer. You can throw in some light-hearted and quick posts. Just
as long as you keep blogging!
Choosing a blog niche based on profitability alone
While you want to be profitable, if you know absolutely nothing
about the topic but jump right on in for the profit potential, it’s not going
to work. For many reasons.
Your articles and blog posts need to be good. They need to be
passionate. If you know squat about the subject, it won’t do very well at all.
Readers will know that you’re a poseur.
You’ll also find it incredibly difficult to come up with topics to
write about. If you’re not knowledgable or passionate about the subject, you
won’t be inspired to write. Your blog posts will drop off and you’ll eventually
give up.
Not defining your Unique Selling Point
Your USP (Unique Selling Point) is what defines you and sets you
apart from the competition. What makes you different? What makes you special?
Why should your audience pay attention to you instead of that other guy?
Your USP can be based on a number of things. It can be based on your
credentials, your personality, your humor or lack thereof, your knowledge, and
your style.
Also, the way you deliver your information and blog posts is a large
slice of the USP pie. What’s your style?
Summary
Remember the three Ps of
blogging:
1. Passion
2. Patience
3. Perseverance
Definition: A blog niche is a smaller subcategory
within a larger, broad category. It could be a subcategory or a subcategory.
The ten most profitable
blog categories:
1) How to make money online
2) Personal Finance
3) Health and Fitness
4) recipes
5) Beauty and Fashion
6) Personal Development
7) Arts and Crafts
8) Parenting
9) Travel
10) Marketing
To find a great niche, you should pick a top you’re genuinely
excited about, one you love to discuss. Do the market research and check for
keyword trends, competition, and search volume. Also, make sure that your niche
has profit potential!
There are plenty of places you can visit online to register a domain, but it’s best to stick with one of the big ones trusted by millions. There have been hundreds upon hundreds of domain registrars over the years that popped up and fizzled out. If you purchase a domain name on a lesser known online venue, you risk the chance of losing your domain name permanently if that registrar sinks. Avoid the risk by utilizing a mainstream domain name registrar.
Bluehost is my favorite domain registrar, because when you order a web hosting package your domain registration is free. Since you will need web hosting to get your website online anyhow, you might as well take advantage of this freebie.
If you already have web hosting, or just don’t need it at this time, then
Pros
? It’s
Inexpensive. There are some domain name registrations
as low as $1.99 per year. These are variants of the .com or.net URLs. The .com
URL registrations are only $11.99 per year.
? A Free Domain! If you purchase one of their many hosting packages (which start at $2.75 per month), you are entitled to one free year of domain name registration. More info on the hosting packages here.
? Standard
Easy-to-Use Tools. The domain interface includes
domain forwarding, DNS management, and transfer lock at the click of a button.
? Auto-Renewal. Easily switch your domain to auto-renewal to prevent domain
registration lapses. You can easily change it back to manual renewal if you
would like to let the domain expire.
? Domain
Lock. This free option prevents unauthorized transfers
of your domain. Your domains are automatically set to locked upon purchase. You will need to unlock your domains in Bluehost’s domain interface in order to initiate a transfer.
Cons
? Additional Cost for Privacy Protection. Upon domain registration, there is also the added but optional cost of privacy protection for the WHOIS domain database.
? No
Free SSL. Bluehost doesn’t offer free SSL certificates
with a domain name purchase. They do, however, offer a free WordPress SSL if
you have a specific type of hosting plan. Otherwise, the SSL certificates are
the normal rates of around $75 – $100 per year.
Domain.com has been around since the year 2000 and was one of the very first registrars in existence. It holds a large percentage of the world’s registered domain names and is considered one of the safest places to register.
Pros
? It’s
Inexpensive. There are some domain name registrations
as low as $2.99 per year. These are variants of the .com or.net URLs. The .com
URL registrations are only $9.99 per year.
? Free
SSL. Every domain name registration gets a free SSL
certificate which is normally quite pricey. Most hosting companies charge $75 –
$100 for a standard SSL certificate and implementation. Be aware that the free
SSL certificate is only valid if you host on their platform.
? Standard
Easy-to-Use Tools. The domain interface includes email
and domain forwarding, DNS management, and transfer lock at the click of a
button.
? Auto-Renewal. Easily switch your domain to auto-renewal to prevent a domain
registration lapse. You can easily change it back to manual renewal and/or let
it expire.
? Domain
Lock. This free option prevents unauthorized transfers
of your domain, a classic and nefarious mode of Internet property theft. Note
that domain lock is not automatically turned on when you purchase a domain at
Domain.com. You must manually activate the product they term “NameSafe” in the security section of
your domain management console.
Cons
? Additional
Cost for Privacy Protection. Upon domain registration,
there is also the added but optional cost of privacy protection for the WHOIS
domain database. Other registrars provide this freely in their domain
interface.
GoDaddy
Ever since the infamous GoDaddy
name jumped onto the scene with its sexy and controversial ads, it became an
instant mogul in the registrar business. Since then, it has also risen to the
top for website hosting, creating a one-stop shop for website setup. GoDaddy is
another great place to call home for your domain.
Pros
? It’s
Inexpensive. While .com variations of a URL will cost
you slightly more than Domain.com at $11.99, other versions such as .online or
.club will only cost you $0.99 for a yearly registration fee.
? Domain
bundles. When you choose your URL, you’re offered
bundles of the same URL with different extensions at 67% of the cost. This is a
great opportunity for trademarked business names. This includes the .net, .org,
and .info variations – the next top three domain extensions.
? Privacy
Protection Included. Your name, address, phone number,
and email remain private in the public WHOIS directory. Extra privacy can be
purchased at an additional charge which prevents third parties from accessing
your sensitive information.
? Instant
Website Start. You can start your website for free on
a limited website builder. This a great option to have handy if you need an
immediate web presence.
? Standard
Easy-to-Use Tools. The domain interface includes email
and domain forwarding, DNS management, and transfer lock at the click of your
mouse.
? Auto-Renewal. Easily switch your domain to auto-renewal to prevent domain
registration lapses. With GoDaddy, your domains will automatically be set to
auto-renewal upon purchase. You can turn off auto-renewal to let the domain
expire.
? Domain
Lock. This free option prevents unauthorized transfers
of your domain. Your domain is automatically locked against transfer when you
purchase the domain. If you would like to transfer the domain to a new
registrar or new ownership, you will have to unlock the domain in the GoDaddy
console.
Cons
? Website Builder is Only free for a Month. The instant website builder
is only a trial and the true per month cost is not displayed upon checkout.
Thankfully, it is inexpensive with four plans to choose from starting at $5.99
per month. But if you don’t cancel or modify your order before the first month
is through, you will automatically be charged on a monthly basis.
? No
Free SSL. There is no free SSL upon domain name
registration. However, GoDaddy offers a free temporary standard URL with some
web hosting packages..
Namecheap
Namecheap is another wildly popular domain
registrar that offers domains, hosting, security, and managed WordPress
hosting.
Pros
? It’s
Inexpensive. The .com URL extensions are only $10.98
for yearly registration, sometimes coming down to $8.88 during regular
incentivized specials.
? A
Very Inexpensive Website Builder. Namecheap offers
website hosting PLUS a website builder at only $2.88 per month when you
purchase a domain through them, which is insanely cheap. Hence the name?
? Free
Privacy Protection. Namecheap touts the offer of free
privacy protection now and forever. All you have to do is visit their WhoisGuard
page and click “Activate Now”.
? Standard
Easy-to-Use Tools. The domain interface includes email
and domain forwarding, DNS management, and transfer lock at the click of a
button.
? Auto-Renewal. Easily switch your domain to auto-renewal to prevent domain
registration lapses. You can easily change it back to manual renewal and/or let
the domain expire.
? Domain
Lock. This free option prevents unauthorized transfers
of your domain. Your domain is automatically locked against transfer when you
purchase the domain. If you would like to transfer the domain to a new
registrar or new ownership, you will have to unlock the domain in the Namecheap
console.
Cons
? No
Free SSL. While the SSL certificate for your new
domain isn’t free, Namecheap only charges $3.88 per year, which is a far cry
from the “normal” price gouge of $100 per year still held by many hosting
companies.
? Email
Is an Additional Fee. Namecheap offers two free months
of private email under your new domain name. After that, you must sign up for a
subscription. Even the hosting plans do not come with included email.
We hope this breakdown of the best domain
registrars helps you make a decision. Either way, you can’t go wrong with the
top registrars in the business. Each one is unique in their own way, and each
one is affordable.
Do you have a different favorite domain registrar? Tell
us who and why in the comments below.
Registering a domain name is a simple task
that should be done prior to building your website, but it does require a bit
of thought. Your domain name should accurately reflect the name of your
business rather than using a keyphrase and it shouldn’t involve another
company’s trademarked term or name. Other than that, it’s a simple process!
Step One: Search for a Domain Name
Head on over to Domain.com, one of the largest domain registrars on the web. Directly on the home page and above the fold, you’ll find a search bar.
The background image will change regularly,
but as long as you follow the link above, you’re at the right place!
Put your company name in the search bar
without spaces and without modifiers such as LLC and press the search icon on
the right to see what you come up with.
Many common terms and phrases have already
been taken, so chances are that the URL you’re looking for might not be
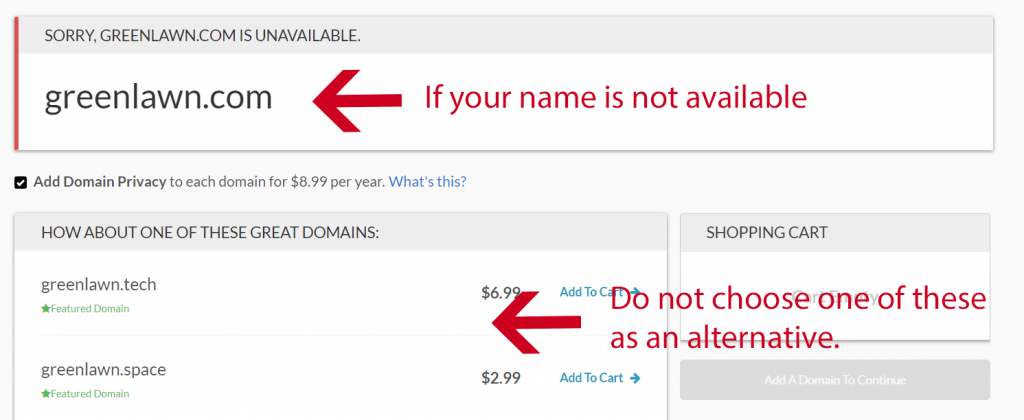
available. For example, if you have a small, local landscaping business called Green Lawn,
you’ll find that it’s not available with the traditional .com extension, and
you might be tempted to go for the same name with a different extension. Don’t do it.
The person/business who owns that domain name
in the .com version may have a trademark, and any use of the other versions
could land in a lawsuit.
So what do you do? You look for variations! Try hyphens in lieu of spaces and also try
using your town or region. It’s easy to find a domain name that will work for
your business. Simply adding NH (New Hampshire) to the end of GreenLawn yields
an available domain name.
Step Two: Make the Purchase
You can register your domain for one year or
more and also add privacy protection. Privacy protection keeps your ownership
information private from the general public. This information consists of a
name, business contact, address, and email. A benefit is spam protection, but
the choice is entirely up to you and not necessary.
Pro Tip:Google and other search engines lend more “Trust Rank” to sites that
have longer registrations. A domain that has been registered for five years
will be given a small boost in eventual rankings over a site with a domain name
that has been only registered for a year.
What
about the other extensions like .net? You don’t need
them at the moment. Once you build your web presence, and if it gives you peace
of mind, you can buy other versions of your site such as .net and point them to
your website.
Once you’ve selected your domain, privacy
options, and the number of years for registration, march on to check out.
Do I
need G Suite email? Domain.com will ask if you would
like email through G Suite. If you have hosting already set up (where you build
your website) with another company, such as BlueHost, you don’t need to set up email
through G Suite. Hosting accounts will often provide you with 5-10 free email accounts. This is up to you.
Pro Tip: G Suite email is easy to use, doesn’t involve complicated MX
configurations because Domain.com will do them for you, and is something the
layman can set up on his/her own.
Step Three: Keep records
Your domain will eventually come up for
re-registration. Make sure to use an email upon checkout that you will always
check. It is common for websites to go “down” because domain registration had
lapsed. Reminder emails went to email boxes that were no longer checked and the
contact information was no longer valid. This has happened to large and small
companies alike. Make sure to keep a record of the email address you used to
sign up with Domain.com as well as the password used, and any other pertinent
information.
Step Four: Point Your Domain
Registering your domain gives you the rights to that name, but it doesn’t get you a website. To get a website online you will need to pair your domain name with web hosting.
I personally recommend using BlueHost. They offer a free domain name when you purchase hosting, so you get everything you need to get your website up and running for $2.75 per month.
If you have hosting set up somewhere else, you will need to enter your hosting account and find your nameservers. There should be two or three nameservers used. Find and record this information. Back at Domain.com, you will need to enable the DNS service on your new domain, and then click to edit nameservers. Add your new nameserver names, and that’s it! Your domain is now pointed to your hosting provider which often takes 24 hours to propogate. You will need to add that domain into your hosting account as an add-on domain.
Selling products on your blog is one of the absolute best ways to turn your loyal audience into a consistent revenue stream. In fact, many of my readers set out to start their blogs specifically for the purpose of marketing and selling a product or service.
In this post, I will discuss how to use your blog to sell products. Whether you are selling an existing product of your own or you are using your blog as a hub to sell a product for a company in exchange for a referral fee, I recommend that all bloggers have some kind of product offering.
Whether you have a brand new blog or have already been blogging for years, you might be surprised at the revenue potential of selling products on your blog. Stop overlooking the money making potential of using your blog to sell products, and read on to learn about how simple it can be.
The Keys to Selling Products On Your Blog: Audience and Conversion Rate
The two biggest factors in how successful you can be with offering products on your blog are the size of your audience and the number of your readers that you are able to convert into paying customers (also referred to as your conversion rate). First, we will discuss how easy growing your audience can be.
Building Your Audience Means More Potential Customers
Building a bigger audience is something that every blogger should be focused on at all times. Of course, the best way to build your audience is through quality content that adds real value to the lives of your readers, and of course creating content that is easily shared among people always helps expand the potential visibility of your blog.
This is why I recommend that my readers blog about something that they are already passionate about. Being passionate about a topic makes it more likely that your readers will connect with your content, and it also helps to ensure that you will maintain interest in regularly updating your blog.
When you grow the audience of people who regularly read your blog, you also are growing your potential customer base. The more eyes that you are able to get on your blog, the more potential purchases you will be able to drive. Besides growing your audience, you should also be mindful of the percentage of them you are turning into customers.
Increase Your Conversion Rates by Keeping It Relevant
Increasing the rate of your readers that you convert into purchasers can be tricky, but the best approach is to present a real value proposition with the products you are selling. Even if you create engaging, shareable content that your readers love, offering them a product that has little to nothing to do with what your blog is about is an almost surefire route to failure.
Instead, you should focus your product offerings around things that tie in directly to your blog. If you decided to launch a blog that gives your readers advice or recommendations, find a way to drive your customers towards the products or service that you recommend in your writing. This not only makes your sales pitch seamless, it also makes it much more likely that your readers will take you up on it.
Selling Your Own Products On Your Blog: Turning Readers Into Customers
Many bloggers already have a product that they are looking to sell. This could be something as simple as selling an e-book that you have written, or perhaps selling your time as a consultant or other type of expert within your field.
I have seen many bloggers get overzealous when selling products they own themselves, to the point that they neglect the free portions of their blog that are intended to draw their customers in. My advice is to never lose sight of what brings your readers to you in the first place: excellent content.
After all, the best advertising for any product or service is to give your potential customers a taste of what you have to offer. And there is no better way to do this then in showing your expertise through the blog posts you make available for everyone to read. If you forget this point, you might find that you lose readers before you even have a chance to turn them into customers!
No matter what type of product you are offering, you can leverage your audience into lots of sales by following my advice below.
Don’t Just Sell Products, Sell Yourself
If you are trying to convince a customer to pay you for a product or for your time, showing them a clear example and explaining how this will make their life easier or more fulfilling is an absolute necessity.
Like it or not, we all encounter dozens of advertising messages each day. Because of this, most people train themselves to filter and ignore empty sales pitches that overpromise and underdeliver.
The good news is that you can separate yourself from the pack by making a well founded case for why your readers should purchase what you are offering. I recommend avoiding trying to come up with the perfect sales pitch, and instead making yourself as relatable as possible to your readers. People are more likely to buy from a trusted source, so authenticity is absolutely vital.
Selling Someone Else’s Products On Your Blog
Pointing your readers towards products being offered somewhere else can be extremely lucrative. Typically the company selling the products that you refer customers to will give you a fee in exchange for referring the customer to them. Best of all, you do not have to worry about taking on any of the risk in terms of holding the products.
Rates vary quite a bit depending on the specific product or service, so I always recommend reviewing multiple options so that you can be sure you are going with the most competitive option available. Most e-commerce sites will pay more for bloggers who send them the most customers, so I recommend not getting discouraged if you are not seeing really high conversions in the beginning.
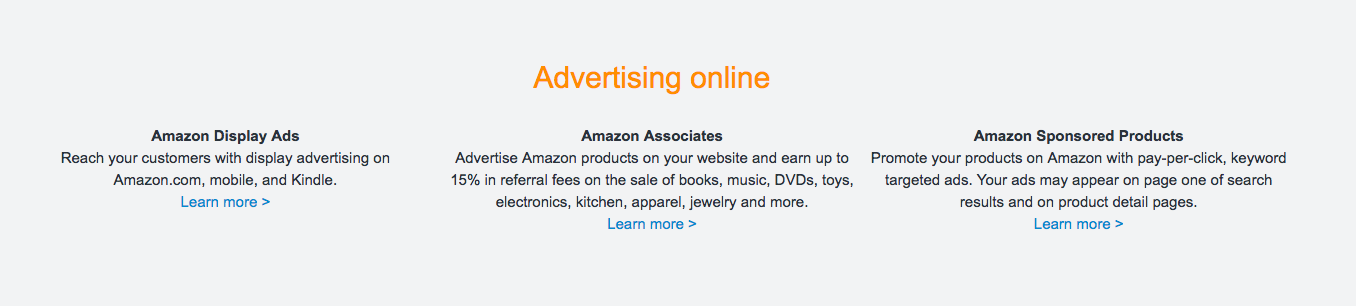
In order to sell as many products as possible I also recommend narrowing your focus to goods and services that directly tie in to what you write about in your blog. One great way to do this is to partner with a major online marketplace, such as Amazon.
Amazon offers a simple referral program that allows you to refer your readers to their products in exchange for a percentage of what your readers spend. Their program is called Amazon Associates.
I recommend Amazon Associates because of the incredible catalog of items that their marketplace has to offer. If you are interested in referring your customers to buy a specific product, odds are that Amazon already has it stocked on their virtual shelves. This also means that you can focus on recommending products that you truly believe in, which I will discuss further below.
Stand Behind Your Recommendations
This point is one that I can almost not stress enough: only recommend products or services that you believe in. There is no value in having your readers associate you and your blog with a product or service that does not work as advertised, so as you begin to offer products on your blog, be sure that you are genuinely recommending the products that you refer your readers to.
Of course, it might be tempting to recommend the product that provides you with the best commission rate, regardless of quality. However, I always advise my readers that there is nothing worth the trade off of staking your reputation behind a bad product.
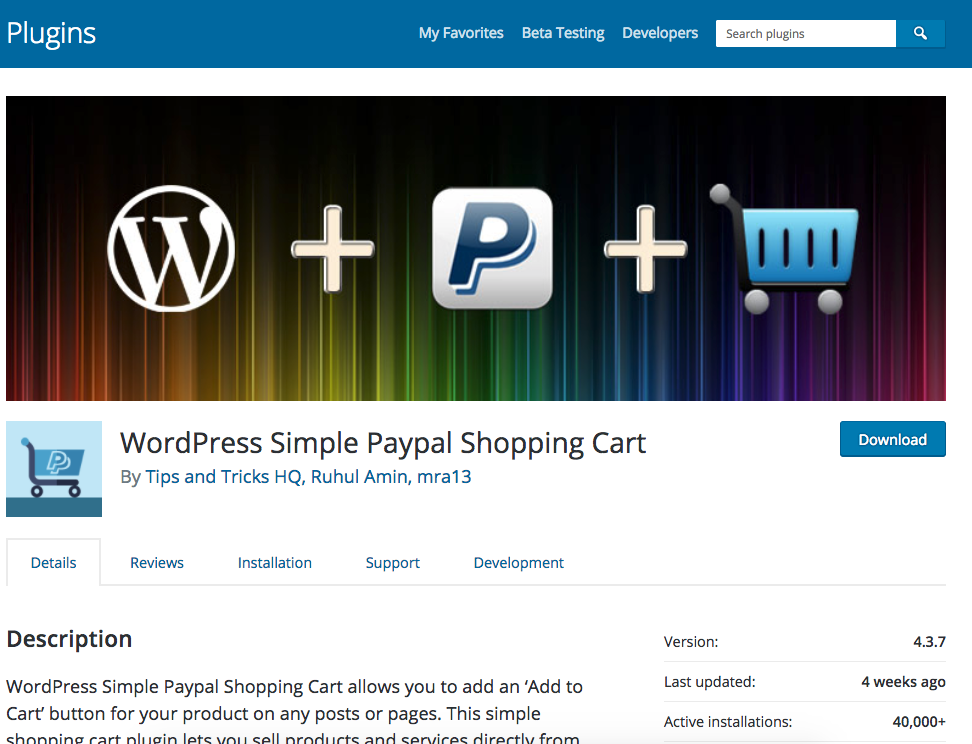
How To Process Payments
Once you decide to begin selling products on your blog, you will need to make sure that you have a way to process payments from your customers. The simplest way that I have found to process payments on your blog is through the WordPress Simple Paypal Shopping Cart.
This simple to use tool makes it simple for your customers to pay you quickly and securely. Collecting payments is often one of the biggest hurdles for bloggers to begin selling products, and this tool makes it incredibly easy to overcome that and begin collecting money from your readers.
Overall, I strongly recommend that you begin selling products on your blog, and I hope that this guide demonstrates just how easy and profitable it can be.