How to Upload Files with FTP

If you have a website on a hosted server, knowing how to use FTP to access your website files is a great tool to have for many reasons. And guess what? It’s easy!

Reasons Why You Might Need an FTP Connection

There are several reasons why you might need to use FTP to access your hosted files.

1. Upload size restrictions. The back end of popular CMS systems such as WordPress, and even on cPanel in your hosting account, have upload size restrictions. If you need to upload a large file, such as a video, you will need to do so through FTP.

2. Uploading WordPress themes and plugins. While many themes and plugins can be installed through the WordPress dashboard, if you purchase a premium theme or plugin you will need to upload it via FTP.

3. You’ve been hacked. The best way to work through a hacked site, especially when you can no longer access the site as an administrator, is to access the files through FTP and quarantine them.

4. Server migrations. There are easier ways to migrate your website to another server, especially with Content Management Systems, but having the ability to download all of your files just in case is a beneficial option.

5. You can’t get into your hosting account. FTP is your back door!

6. Backups. You can download any or all files in your server for backup purposes in case you’re planning on some big changes.

Creating an FTP Account

The first step is to create an FTP account within your hosting account, usually done through cPanel access. Every hosting provider is different. Within your hosting account and cPanel access (if you don’t have cPanel, there should be a way to access and create FTP accounts on your hosting platform), go to FTP Accounts.

Every cPanel looks different and your FTP Account section may be in a different area under a different header. Search around, you’ll find it!

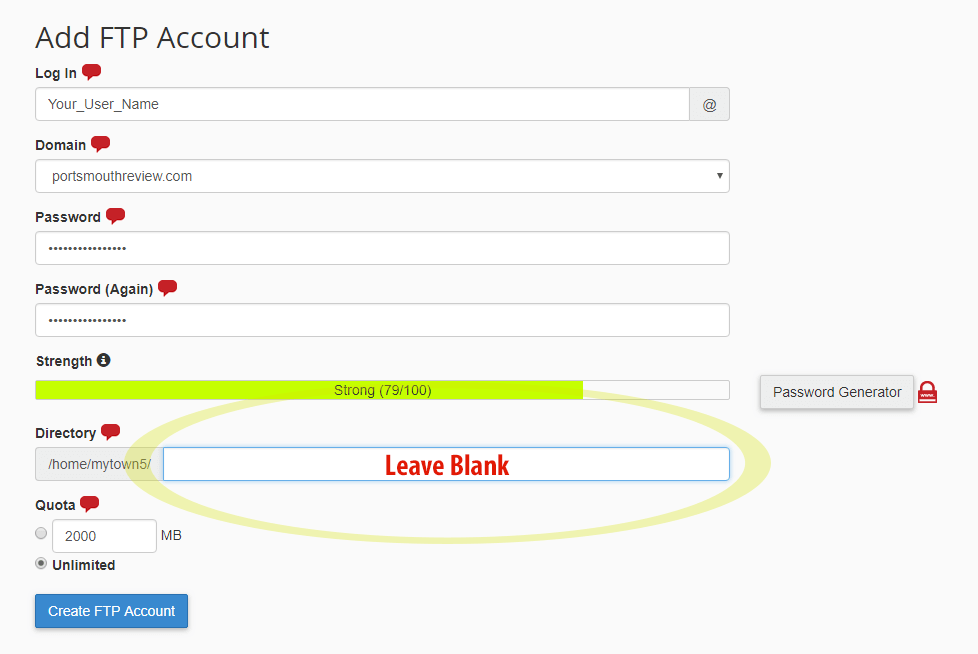
An FTP account may have been created when you first opened the hosting account. But let’s start fresh and create a new account – one that you will know the password to.

Add in a user name and a password and write them down somewhere beside you. Leave the directory blank so that your new FTP account has full root access. This is the source of confusion for many – when the FTP account is not able to access all folders because it was only given access upon setup to one folder and one subfolder.

After the account is created, it will be listed under your FTP accounts. Very often, you will find a “Configure FTP Client” selector next to your new account. If this is available, click it.

Your FTP Client is simply the software you will be using to connect via FTP.

The Configure FTP Client page provides you with three important pieces of information:

1) Your Log In Name (which you should have written down). *Note: It may include @yourdomain.com
2) Your FTP Host Name (write it down.)
3) Port Number (write it down.)

Now you have your FTP account and access and you’re ready to connect!

Connecting Via FTP

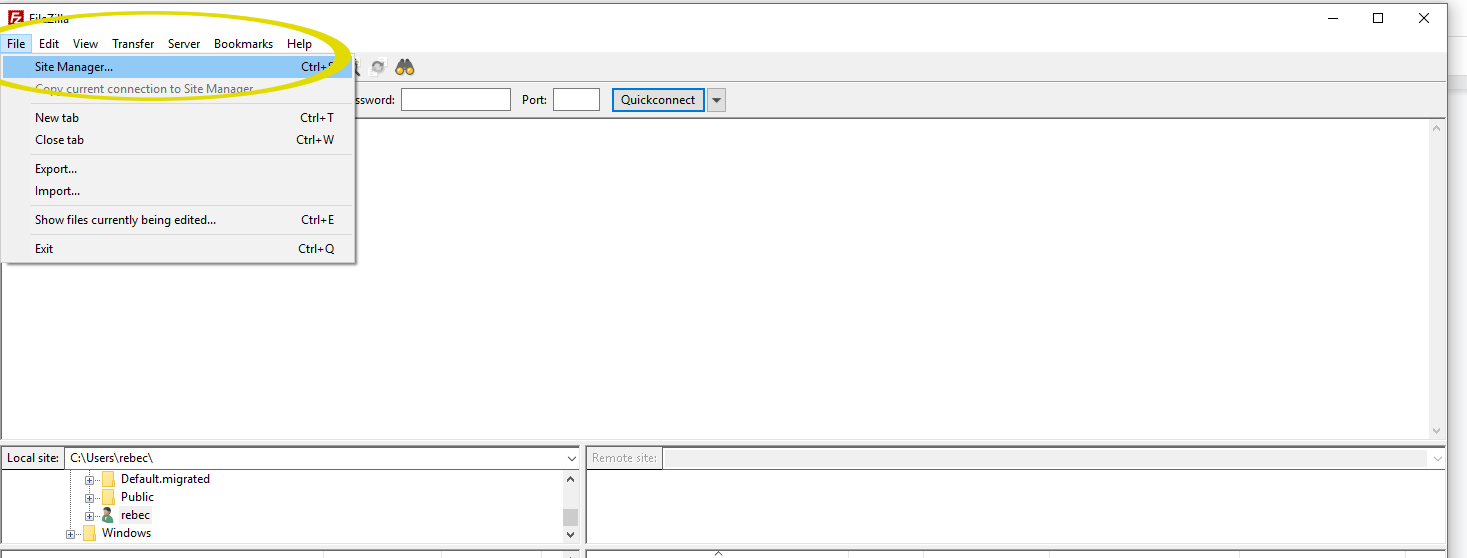
The most commonly used FTP Client is Filezilla. Don’t worry – it’s free! Simply download the latest version and the .exe file will install it for you.

Once you’ve downloaded Filezilla, open the software. To get started, click on FILE and then SITE MANAGER on the top left.

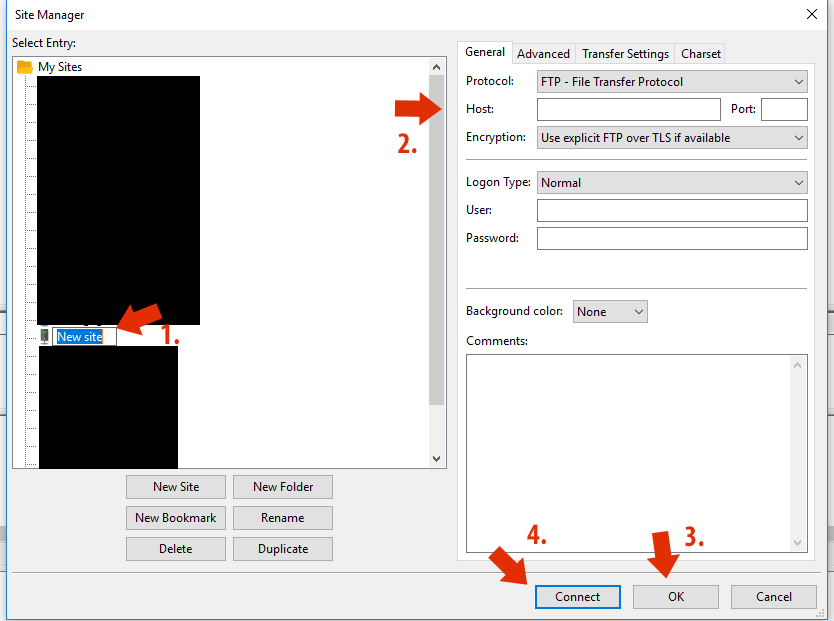
In the next screen, at the bottom, click on NEW SITE. Next, you will need to add your information in the correct order below.

1. Name your site to the left.
2. Add in the information you’ve written down. User name, password, port, and host.
3. Click OK first to save your information.
4. Finally, click CONNECT.

And now you should be in! On your right you will see your website file folders. On your left will be computer file folders. Just like any file manager, you can drag and drop folders and files from your computer to your server and vice versa.

Note: If you are not able to connect, double check the User Name. Very often, you may need to append @yourdomain.com to your user name. If that fails, search for “FTP + Your Hosting Provider” in Google to see if you can find helpful articles.

Now that you’re done with setting up your FTP account and connecting, you won’t have to complete these steps again! Filezilla will keep the account on record, and reconnecting will only take a few seconds.

Uploading Files

In FileZilla, your computer files on the left are a wee bit difficult to navigate. To find your document folders, use the top box on the left to navigate to This PC > C > Users > Your Account Name > Documents. Use the + and – symbols next to each folder to expand and contract. When you click on the folder you want, the subfolders and files will be shown in the bottom box.

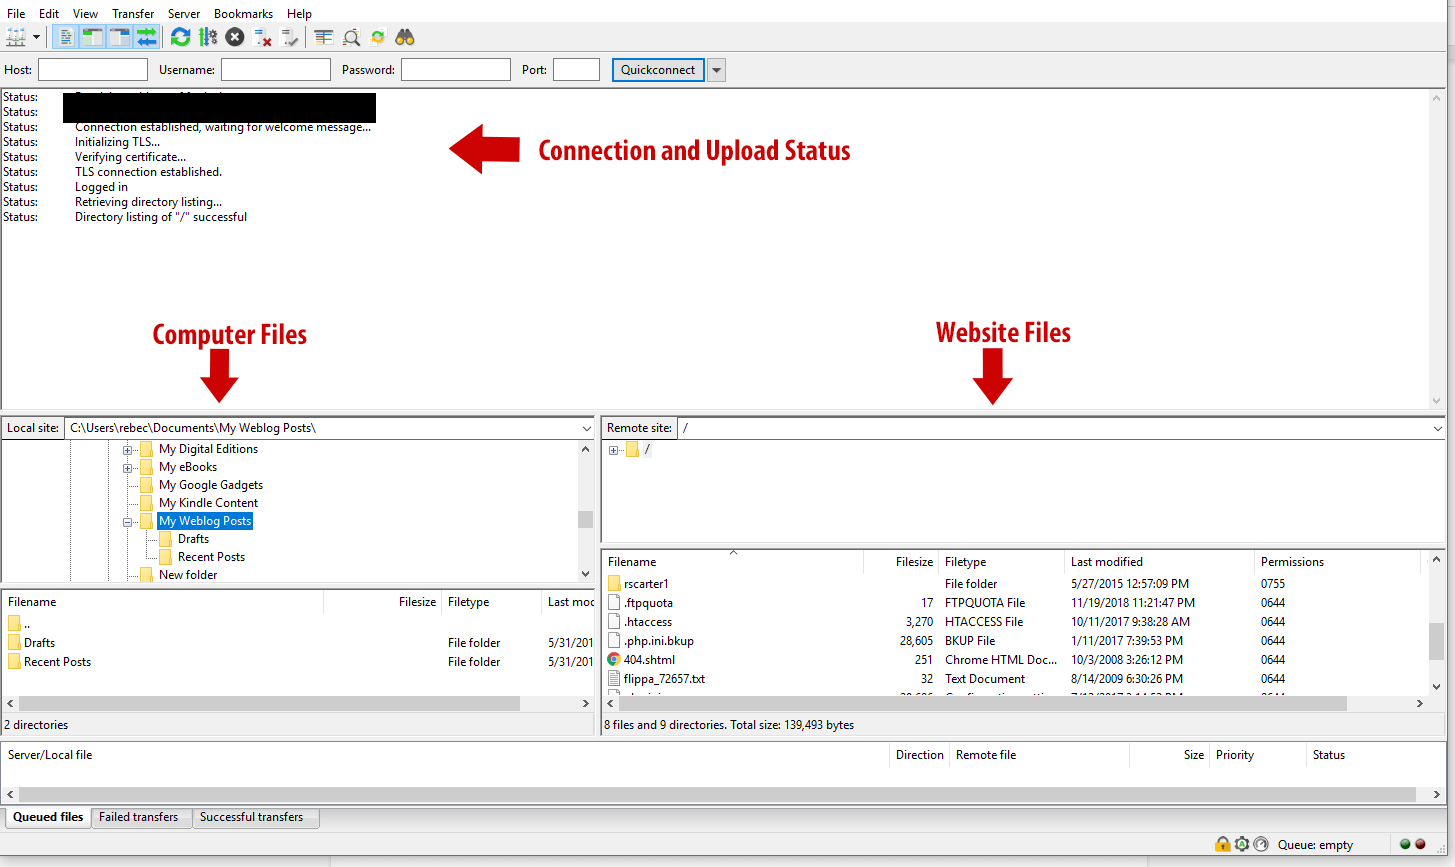
Using the same method of finding files on your server indicated on the right, you can simply drag and drop the intended file/folder from your computer on the left into a folder on the right, using either the top or bottom sections.

If you’re wondering where to upload a file to – let’s say a video – your website files which are accessible via your domain are usually listed under a folder called public_html. If you upload the video there, you’ll be able to see the video at yourmaindomain.com/videoname.mp4, for example. If you have multiple websites, look for the folder with that website domain name.

An Alternative for WordPress Users

An alternative to FTP is a plugin called File Manager. This plugin will only work for websites using the WordPress codex on a hosted server (not WordPress.com account holders).

This plugin creates an easy-to-see file manager within the dashboard. This makes it incredibly easy to upload large files and folders right in the back end of WordPress. However, there are still size limitations. For no upload restrictions, stick with traditional FTP.

How to Install AdSense on Your WordPress.org Blog

adsense
Google AdSense is the publisher’s component of the world’s most popular pay-per-click (PPC) advertising platform, and as such, it is among the most popular ways to monetize a blog. Its popularity, plus the fact that it is easy to use, is the reason it is my #1 choice for monetizing your first blog (see Step #7 of my blog tutorial).

All you need to do is use the information below to install Adsense on your blog (takes about 10 minutes), and in no time advertisers will be paying you every time one of your blog visitors clicks on an ad!

Once you have had your application approved to use AdSense, you will be provided with a small piece of customizable code for pasting into your website, allowing you to start displaying context-relevant advertisements immediately. In this tutorial, we will explain how to install the AdSense code on your self-hosted WordPress blog. If you don’t have a blog yet, start with Step #1 of my tutorial to create one, and then come back to this article once your blog is setup.

Using AdSense is completely free, but you will need to have a free Google account in order to get started. If you have a Gmail address, you’ll already have one. If not, it only takes a few minutes to sign up. Once you send an AdSense application at google.com/adsense, you should receive a confirmation email, typically within one working day, to confirm that you have passed the review process. Note that you will need to prove to Google that you have a website that follows their terms of use.


1 – Get Your AdSense Code

By creating a new ad unit with AdSense, you will be able to place advertisements on your website immediately. You don’t need to worry about understanding the code either; you can use a simple graphical editor to change the way your ads will look once they’re displayed on your site.

  1. Log into your Google AdSense account once you have been accepted, and click on the “My ads” menu item at the top of the page. Click the “+ New ad unit” button to continue.
  2. Enter any name you want for the ad unit, and choose your preferred ad size and layout from among the thumbnail previews. If you plan to display the ads in the sidebar of your WordPress blog, as most people do, you’ll probably want to choose either the “Large Skyscraper” or “Medium Rectangle” option.
  3. Click on the “Text ad style” button to customize the colour scheme and formatting for your ads.
  4. Click “Save and get code” once you have finished customizing your ads. Wait for a few moments for the code to appear before selecting it and copying it to the clipboard using the CTRL + C keyboard shortcut.

install-adsense-1


2 – Install the Code in WordPress

Although you can paste the code in just about any page element of your WordPress blog, by far the most popular option is to place it in a sidebar widget so that your ads appear in the right-hand side of your website beside your posts.

  1. Navigate to “Appearance > Widgets” in your WordPress administrator dashboard to open the widgets section.
  2. Scroll down the list of available widgets in the left-side column to find the “Text” widget, and drag it over to the preferred widget area in the right-side column. The number of available widget areas will vary depending on your theme, though most people use the Primary Widget Area to display their ads in the sidebar.
  3. Click on the activated Text widget and enter a title. Always choose a neutral title, as per Google’s terms of uses; “Our Sponsors” tends to work best. The title should never try to directly encourage people to click on the ads.
  4. Paste the AdSense code into the text box, and click “Save”. Context-relevant ads, along with the formatting and colour theme you selected previously, will appear immediately on your blog.

Note that you can have multiple instances of the text widget displayed in one or more widget areas of your WordPress site, allowing you to display multiple ads.

install-adsense-2

How to Start a Fashion Blog

fashion-bloggerIf you are passionate about fashion, but aren’t sure how to start a fashion blog, then this guide is for you!

A blog is a great way to share your personal style, as well as your take on the latest trends from established designers.  A blog that delivers quality content can be a great way to gain recognition as a fashion expert.  While only a few bloggers are seen as true fashion icons, many lesser-known fashion blogs have gained quite a bit of mainstream attention recently, effectively launching the fashion careers of the bloggers behind them.

Why Start a Fashion Blog Now?

There are a variety of reasons to start a fashion blog, but the best reason is simply because you are passionate about fashion.  I am going to assume that since you are reading this guide you are someone who is already excited about the fashion world.

With that out the way, we can turn our attention to the benefits of starting a fashion a blog.

Reason #1: It’s fun!

By starting a fashion blog not only do you get to share photos, videos, and write about fashion, but you get to connect with other people who share your interests. Communication is at the heart of blogging, so readers may leave comments on your posts.  By responding to their comments you can build a sense of community on your blog, will which will allow to develop relationships and learn what types of things your readers would like for you to post about.

Reason #2: Get noticed

As you grow your blog and build up a following you will have the opportunity to network with other fashion bloggers.  This not only let’s you meet new people with similar interests, but it also opens the door for publicity.  If you have a great blog and put in some time into networking with other fashion bloggers you can grow your blog readership and potentially become a fashion blogging celebrity!

Reason #3: The money

Even if you don’t start your blog for the purpose of making money, it’s nice to know that fashion can be a very lucrative area.  To start with, there are millions of people around the world looking for fashion and style information online, so your potential audience is enormous.  Combine that with the fact that the fashion industry is quite lucrative, and you have a “perfect storm” for making money from something you love to do.


Do You Have What It Takes to Start a Successful Fashion Blog?

Building a successful fashion blog means taking the time to create and post engaging content for your readers.  Typically you should post something new about once per week to start with, and possibly more often as your blog readership grows.

You also need to take the time to network with other blogs to build your readership.  I go into more detail on how to do that in Step #6 of my free blogging guide.


How to Start Your Fashion Blog

Perhaps the most challenging first step to starting your blog is to come up with a name.  This is known as your “domain name” (this blog’s domain name is theblogstarter.com), and it will become your online identity, so choose wisely.  You can always change your domain name in the future if you like, but it is best to get it right the first time.

Once you have a domain name picked out you will need to see if it is available to register.  You can check domain availability here.  If your domain is available then you have the green light move forward.

The next step will be actually registering your blog and getting it setup.  This free blog building tutorial will walk you through every step of the process so that you can be up and running in about 20 minutes, with no technical expertise.

Once you work through the basic steps you can turn your attention to finding an eye-catching design for your blog.  If you follow the process in the tutorial you will find that designing a blog is actually very easy.  There are pre-designed blog layouts called “themes” that allow you to change and customize your blog design with just a few clicks.  There are a thousands of these themes available, so if you are totally lost on which one to choose here are some recommendations:


Recommended Themes for Fashion Blogs


Bandana

fashion-blog-themes-bandana

Bandana is a simple yet stylish theme designed primarily for fashion and photography blogs. It provides a responsive design, custom background and header and a featured images section. The default dark design is particularly great for framing and drawing attention to visual content.


Oblique

fashion-blog-themes-oblique


Oblique is another free theme for fashion bloggers. In addition to its responsive design, it also features a parallax header for an interactive scrolling visual experience. Other features include full color controls and direct access to Google Fonts.


fFashion

fashion-blog-themes-fFashion


Another free and fully responsive theme for fashion enthusiasts, fFashion features a highly customizable magazine-style layout. One of its most important features is the scrolling header image as well as the integration of social sharing icons for all of the popular networks.


Clutch

fashion-blog-themes-clutch


Clutch is a highly original premium theme that helps to promote creativity through its interactive and responsive design. The casual layout features a slideshow-based header that also provides space for an accompanying description and a link for visitors to find out more.


Fashionista

fashion-blog-themes-fashionista


Fashionista is one of the most popular and highest-rated free fashion themes available for WordPress. It’s a bold theme featuring plenty of whitespace to draw attention to things like visual elements and stylish typography, making it particularly suitable for magazine-style blogs.


Recommended Plugins for Fashion Blogs

Plugins provide additional functions and features to your blog, and there are thousands to choose from. While there are a few plugins every blog should have, such as JetPack, others are designed with specific subject matters in mind. This section takes a look at some of the most important plugins available for fashion bloggers.


ShareThis

Every blog should integrate social networking, particularly those that deal with popular topics like fashion. ShareThis provides 120 social sharing buttons, allowing you to choose the ones that are most important for you, and adds them automatically to your posts and pages. It also provides social analytics to help you track your social shares.


Ajax Post Carousel

This plugin displays your recent posts as a carousel with a thumbnail to represent each page of content. The animated widget is particularly good for fashion blogs due to its interactive and visual nature. It is also extensively customizable thanks to the ability to select posts by category, time published or even completely custom taxonomies.


Image Zoomer

Any great fashion blog needs high-resolution images to truly shine, but making them literally jump off the page isn’t always easy. The simple Image Zoomer plugin allows visitors to zoom in on any image on the page simply by moving the mouse pointer over it.


Post Template

Many fashion blogs have one or more daily or weekly features rather like a newspaper or magazine. Post Template allows you to create templates for posts that belong in a series so that you don’t need to format each post separately.


What Now?

The first step to getting started is get your blog registered and online.

Once that is done you can focus on customizing your blog design.

When your customization is complete you will need to start creating content and promoting it.  It is important to publish new content regularly (about once per week) and to regularly promote your blog on social media and by networking with other fashion blogs.  There are some tips for promoting your blog for free here.

If you are having trouble getting started, or just have a some questions, feel free post in the comments section or contact me.


A Brief History of Blogging

The history of weblogs is often coalesced with the origins of blogs or blogging. What we know as blogs or blogging today is not the same as the original weblog. The first ever weblog was created by Sir Tim Berners-Lee, who is also the inventor of World Wide Web. The World Wide Web should not be confused with the internet, formerly known as the galactic network. The internet predates the creation of the global web by Sir Tim Berners-Lee. He coined the term in the early nineties. The internet was already nearly a decade old by then. Intranet and other forms of exclusive external networks were developed in the sixties.

The first ever website was created by Sir Berners-Lee when he was at the European Organization for Nuclear Research or CERN. This website was basically a list of new websites. The term weblog literally meant a log of the web. The first weblogs were not content driven. They were not online journals or digital versions of the traditional diary. Weblogs did lead to the evolution of blogs and blogging by the late nineties. This is when the clear distinction arose and later became more prominent as we shall explore here.

The First Weblogs

Many weblogs were created through much of the first half of the nineties. Most of them are nonexistent today and hence you would not find them. The weblogs were also not widely known because internet itself was not commonly used and the global web was still in its nascent stages. Most weblogs of the era listed links to websites. NCSA, the company that developed a browser called Mosaic, followed the initiative of Berners-Lee and came up with its own legacy of web logging. Mosaic popularized the internet and the global web in the nineties. The weblog What’s New created by NCSA eventually became the oldest archive of websites, kind of like a directory of links to different sites hosted on the web. This may be deemed as a precursor to the modern search engines like Google and Bing among others, except for the fact that they were mostly lists and not exactly content driven databases.

Gradually, weblogs lead to the evolution of blogs. The lists that only contained links to websites started having commentary. Essays and personal thoughts got added in due course of time. There were many weblogs like What’s New of Mosaic. These types of indexing sites or logs were available online but they were not accessed by common people. This was primarily owing to the technical unawareness. In the nineties, weblogs and online publishing was only accessible to those who knew how to code. It was not as simple as writing something and then pressing a button to submit the content and then hosting it on a webpage using a server that you pay a monthly fee for. People had to own servers, they needed to code to submit anything and effectively create a website.

The Transformation of Weblogs

The first major transformation of weblogs happened when Justin Hall created a website in 1994. Still a student back then, he named the website Justin’s Links from the Underground. This is widely believed to be the first ever personal weblog, the closest predecessor to what we know as a blog today. Justin Hall created the website to publish his personal musings and discoveries as he explored the internet and global web. He also wrote about himself, his family, his relationships and his emotions. He opened the website for commentary from his readers or internet users. This paved the way for the modern forums and online communities. This weblog was operated by Justin Hall for eleven years since its inception.

The Blogging Boom

The practice of web logging boomed in 1999 at the height of the dot com bubble. Pitas.com came up with a tool that enabled internet users to create their own blogs. This helped those who did not know coding or any programming language to create blogs and find a presence online. The availability of this tool made web logging a nearly global rage. People could sign up or register for free, choose a template and use a form to update the blog. Pitas did all the technical work. Blogger, which is today more popular than Pitas, was created in 1999. It was developed by Pyra Labs. Both these platforms empowered students, internet or web enthusiasts, writers and journalists as well as others from various professions to explore a completely new realm.

Weblogs simply granted everyone the right and ability to publish. As early as 2000, people who did not have any way to reach out to the world or a large audience had a simple solution and they could publish, share, connect, communicate and flourish with their unique voices. This was an unprecedented revolution that eventually transformed every industry and the lives of most people on the planet. It did not take much time before celebrities, politicians, institutions and media started using weblogs.

Interesting Facts about Weblogs

There are more than a hundred and fifty million blogs today. According to many estimates, at least one new blog is added or created every second. More than thirty two million people in America read multiple blogs a week. Weblogs are no longer directories or lists of links to websites. There are personal and professional blogs, dedicated blogs for news, hobbies, health, parenting, dating, specific businesses, social and cultural issues, finance and everything you can think of.

While Berners-Lee created the first weblog, Justin Hall created the earliest version of personal blog and Jorn Barger coined the term weblog. The term blog is credited to Peter Merholz, who had simply broken down the term weblog into we blog in 1999. The most popular open source content management system and website builder in the world right now, WordPress, was created in 2003. The program was available before that but not many people known about this. It was then called Café Log, which was basically a weblog with around two thousand blogs.

Since that time WordPress has grown and adapted to become more user friendly. It is now relatively easy to start your own blog or website using WordPress. My tutorial on starting a blog takes all the guesswork out of the equation for new bloggers.

WordPress.com vs. WordPress.org – Which is Right for You?

You might be thinking about starting a new website using WordPress, or migrating your existing website to this famous platform. You’ve heard about the SEO benefits and you know that plenty of major business brands take advantage of this amazing website backbone. But did you know there are two WordPress options?

WordPress.com is the for-profit business owned by Automattic that uses the WordPress.org open source codex.
WordPress.org offers the open source software managed by the non-profit WordPress Foundation.


The two websites are officially separate entities, but are often confused because of the similar names and because Matt Mullenweg is the founder of both entities.


The Easy Explanation in Difference


WordPress.com: A user can easily sign up and begin customizing a basic website for a web presence in less than five minutes. There is no coding knowledge needed and it is completely free for the most basic of sites.


WordPress.org: The WordPress codex is open source software and is also completely free to use. Here is where you download the software which is then uploaded to your server. A user needs a hosting account or their own server, a domain name, and the ability to upload and configure the software.


Which Should You Use?

There are many factors affecting this decision and ultimately, that choice is yours.

A quick overview is below. Or, click on the infographic to the right for a more detailed review.


No budget, no coding experience: Use WordPress.com for now. You can upgrade to either a paid plan on WordPress.com or migrate to a website using the WordPress.org software later on down the road.


A quick online presence for an individual: Either option will work to get you up and running in just a few minutes. Setting up a website with WordPress.org is as simple as clicking a mouse, choosing layouts, and adding your content.


An online store: WordPress.org is your best option. Even with the highest tier of WordPress.com’s paid plans, there are limited capabilities for online stores and selling options. Building a brand and creating a unique online shopping experience truly requires customizations that are only available when you’re in control of the code.


Large budgets: WordPress.org will provide you with limitless applications. If you have no coding experience but a large budget, hire a website developer to install, configure, and design your new website with the WordPress codex.


Membership Sites: It depends on what you want your members to be able to do, but if it’s anything more than simply contributing articles, you will need to work with WordPress.org’s software.


Three Important Factors to Consider


1) Cost


WordPress.com offers a free plan for a basic website with very limited features and design options. But they also offer three levels of paid plans. These plans cannot be broken down into monthly payments and the yearly fee must be paid upfront.


WordPress.com Free Plan: Extremely limited in design and features.

WordPress.com Personal Plan: Also extremely limited but a custom domain name is included and you can remove the branding for $48 per year.

WordPress.com Premium Plan: Better design options with unlimited premium themes, more storage, the freedom to monetize, and add simple payment buttons for $96 per year.

WordPress.com Business Plan: With this plan, you have the freedom to upload and work with any custom component, but you don’t have access to the straight code. This is an excellent choice for those who are determined to do it themselves without coding experience for $300 per year.


WordPress.org is a great solution for keeping costs down and simultaneously creating a customized website. The layman can learn to set up a blog or website with WordPress.org easily as there exists a wealth of information and numerous guides online. The only necessary costs are that of a hosting provider, which is often less than the WordPress.com Personal Plan, and a domain name which is fairly inexpensive at an average of $15 per month total. Additional costs are incurred with expensive commercial themes, paid plugins, and developer expenses – but these are not always necessary.


2) Domain Name


Take into consideration that a domain name is not included in the WordPress.com Free Plan. Instead, you receive a subdomain of your choosing, and if available, to work with.  Your website’s address will look something like this mynewsite.wordpress.com

A subdomain doesn’t negatively affect SEO but isn’t considered as professional as your own unique domain name would be.


With any of WordPress.com’s paid plans, you can pick a domain name through them and switch from your subdomain to your newly acquired domain name. If you already have a domain name, you can point it to your WordPress.com website.


If you’ve decided to work with the WordPress codex and install it on your own server, it is your responsibility to acquire a domain name. Most hosting providers will provide domain name services. Many businesses keep their domain names and website hosting separate to avoid the loss of both properties in case of server devastation.


3) Support


WordPress.org’s downloadable software is open source and free – this means there is no formal support. There is no one to call or email or chat with if your website goes down or if you’re having problems making custom changes. There is only the community forum available.


With any of WordPress.com’s paid plans, you are entitled to free email and live chat support.


Is It Difficult to Install the WordPress.org Software?


If it’s something you’ve never done before and you have no coding experience, this may seem like a daunting task. But the truth is that it is exceptionally easy and I have written guides to show you how to do it! And once you have it installed properly, your new website will have a WordPress dashboard that is easy for any layman to use.


Step One:


Purchase a hosting plan. Do your research to find out which is the best hosting provider with the best plans and rates for you. A great option is BlueHost. With BlueHost, there is no need to download the WordPress.org’s software. This hosting provider offers one-click installation. They also offer a free domain name.


Step Two:


Procure a domain name. You can purchase one through your hosting provider or another domain service. It is more efficient to buy one through your hosting provider because then you will not have to deal with pointing your new domain to your hosting account or fiddle with nameservers. Your hosting company will automatically create a folder for you and point the domain to this folder.


Step Three:


If your hosting provider offers one-click WordPress installation, you can do this now. They will install a database, the files, and connect them. Move on to the final step!


If there is no option to install WordPress, you will need to visit WordPress.org and download the file in a zip format. Unzip this main file into a new folder on your hard drive.


Step Four:


Create an FTP user in your hosting account. Find the instructions for doing so provided by your hosting company. Once the account is created, make sure to write down the host name, user name, password, and port.


Step Five:


Create a database on your server. Find the instructions for doing so provided by your hosting company. You will also need to create a user for this database. Take note of the user name, the database name, and the password.


Step Six:


It’s upload time! You can use a free FTP software solution such as Filezilla. Once you have the software downloaded, you need to connect to your site. You will need the information you took note of when setting up your FTP account on your hosting provider. Once connected, you can now transfer files to your root folder which is as simple and “dragging and dropping”. Take care here! It is important to transfer all of the files and folders into your root and not within another folder.


Step Seven:


Navigate to yourdomain.com/wp-admin/install.php. Follow the directions and input your database connection information, as well as other configuration details.


Final Step:


You’re done! Visit yourdomain.com/wp-admin to explore the back end and begin customization.


If you need more detailed help, feel free to contact me.


Other Items to Consider


Both options have their pros and cons and there are a myriad of factors to take into consideration.


SEO: Using the WordPress.org software is the best option for SEO enhancement with upload freedom and the use of SEO-enhancing plugins. The WordPress.com plans have limited features in SEO, except for the Business Plan which will allow you to upload those same helpful plugins.


Code Freedom: Only by downloading the WordPress.org do you have the freedom to manipulate the code. However, this should only be done by experienced developers.


Take a look at our handy infographic for even more differences.


How to Change Your Text Size and Color in WordPress

change-text-size-color
Please note: This tutorial is for WordPress.org blogs. If you are still using a WordPress.com blog the process may be slightly different. To utilize the full power of WordPress you may want to consider transferring your WordPress.com blog to WordPress.org.

When writing a post in WordPress you will see a few text options on the post editor screen like bold, italics, and strikethrough. But what if you want to change the size of the text? Or the color?

There is seemingly no simple solution for this on the post editor screen, so I am going to show you some workarounds to get it done. This will involve some light HTML coding, but even if you are a beginner you should be able to copy and paste the examples I give to get your desired effect.

The method I am going to show you should only be used if you want to make changes to just a few words in your post. If you don’t like the overall look of the text on your blog, it is better to just install a new theme on your blog that has a font type, size, and color that you like.


Changing Text Color

At first look you probably won’t see an easy way to change the text color. This is because, for some reason, the developers of WordPress decided to hide this feature. Here is how to get to it:

  1. In your WordPress dashboard go to the “Posts” section and click on the post you want to edit.
  2. Once you are on the post editor screen click the “Toolbar Toggle” button just about your post (circled in red below).

  1. This will bring up some extra options in the toolbar above your post. One of these options is a “Text color” drop-down box.

  1. Use your mouse to highlight the text you want to change and then click the “Text color” drop-down box. Choose whichever color you like.

  1. Once you have chosen a color you can click the blue “Update” button on the right-hand side to save your changes.


Changing Text Size

Changing your text size follows a process similar to the one we used to change the text color. This one is a little more complicated though. Here is how to do it:

  1. In your WordPress dashboard go to the “Posts” section and click on the post you want to edit.
  2. Once you are on the post editor screen click the “Toolbar Toggle” button just about your post (circled in red below).

  1. This will bring up some extra options in the toolbar above your post. One of these options is a drop-down box that says “Paragraph”.

  1. Use your mouse to highlight the text you want to change and then click the “Paragraph” drop-down box. Choose “Heading 3” to follow along with this example.

  1. Once you choose a text size you will notice that it not only changed the text you highlighted, but all of the text in that paragraph!

  1. To fix this, we need to get into the HTML code of the post. To do this, click the “Text” tab (circled below).

  1. Now that you are in “Text” view you will not only see the text of your post, but also the codes that control things like text size. Look at the paragraph where we changed the text size. Just prior to the paragraph you will see this: <h3>
  2. Just after the paragraph you will see this: </h3>

    These codes mark where Heading 3 (the text size we chose in step #4) starts and stops. In order to change this, and only change the size of the text we want, we need to move those codes to the appropriate place. Take a look at the screenshots below to see how to do this:

    Before:

    change-text-size-6

    After:

    change-text-size-7

  1. As you can see, all you need to do is copy and paste the codes to surround the text that you want to change. Once you have done that you can click the blue “Update” button on the right-hand side to save your changes.


In addition to changing text size and color, when you click the “Toggle toolbar” button you will see some other new features. These include useful things like underlined text and indentations, so keep the “Toggle toolbar” button in mind in case you need to use these features in the future.