
Updated January 1st, 2026
This free tutorial will show you how to create a professional quality website with just a few simple clicks. This guide was designed for the absolute beginner, so no prior experience is required.
If you follow this tutorial, in about 1 hour you will have a professional quality website, without having to pay a web designer thousands of dollars.
Your website will be easy to customize with a simple drag & drop website builder, which gives you a high quality, professional design that will look great and function correctly on PC, Mac, tablet, or mobile.
Here is an overview of what is in this guide:
How to Create a Website in 6 Steps
- Choose a custom domain name
- Register your domain & get web hosting
- Install your website
- Customize your website
- Add your online store (optional)
- Get visitors to your new website
You should be able to complete all of these steps in about an hour.
Let’s get started!
Step #1: Choose a domain name
The first step to setting up your website is to choose a domain name.
A domain name is something like yourwebsite.com
You will need to choose a domain extension like .com, .net, .org, .co
While .com is most preferred, one of the other extensions above will work just as well.
Once you know the domain name you’d like to use, you need to check to make sure it’s available:
If your desired domain isn’t available, try a different domain extension, or try abbreviating or rearranging words. Once you find an available domain you are ready to move forward.
Step #2: Register your domain & get web hosting
In order to get your site online you need to register your domain name and get web hosting.
Web hosting is the service that stores the content (images, text, videos) for your website and delivers it to visitors when they visit your domain name.
Where to get a FREE domain name with web hosting
I personally use and recommend BlueHost.com for web hosting and domain registration.
I like BlueHost for a few reasons:
- They will register your domain name for free when you purchase web hosting.
- They include free professional email accounts (for example:
YourName@yoursite.com) - They offer a free, automatic installation of WordPress (the free website builder I show you how to use in this guide).
- They have good customer service and offer a money-back guarantee if you are unsatisfied for any reason.
- Most importantly, they offer fast, reliable web hosting so that your website runs smoothly, without issues.
Disclosure: BlueHost compensates me when you purchase through my link, so my services are free of charge to you! In fact, if you have any trouble at all setting up your website with this tutorial, just contact me and I will be happy to help.
A BlueHost package will give you everything you need for your website. Here’s how to register with BlueHost:
1. Click here to get the $2.09 discount price on BlueHost and then click “get started now”. 
2. Choose your web hosting plan.
- The Online Store plan is best if you plan to sell products or services directly through your site.
- The Choice Plus plan is better suited for websites that don’t plan to sell anything directly through the site.
- Both include chat/phone support, free website backups, domain privacy, as well as plenty of storage space.

3. Put the domain name you want in the left box and click “next” to confirm that it’s available to register.
- If you already have a domain name that you have registered and want to use it for your website then type your existing domain in the right box and then click “next”. Note: The right box is only for those who have a domain they have already registered.

4. Now you need to put in all your details to get registered.

5. You will also need to choose some options for your hosting package.
- The 12 month plan gives you the lowest rate.

6. Now you will need to create a password for your account and move to the next step.
Step #3: Install your website & create a custom email
Now the WordPress website building platform will be automatically installed.
While there are literally hundreds of website building platforms, far and away the most popular platform is WordPress.
WordPress was first released back in 2003 as a simple platform for creating a blog. Since then it has grown to become the world’s most popular content management system for all types of websites.
Currently WordPress supports more than 60 million users, large and small, including Bloomberg, BBC America, The Walt Disney Company, and many more.
This tutorial shows you how to build a website using WordPress because it is:
- Free to use. WordPress is what’s known as “open-source software”, which means it is free to use and customize. You just need to have a web hosting account.
2. Easy for beginners. You can get a professional website up and running in a few minutes by choosing from thousands of pre-made templates and using simple drag & drop editing features. No coding necessary.
3. Customizable. No matter what type of website you are starting, WordPress is easy to customize for your needs.
Once the WordPress installation is complete you will get an email with your WordPress login information. Make sure to keep track of your login info!
Create a custom email address
While you wait for WordPress to install you can go ahead and create a custom email address to use with your website.
This will be something like YourName@yourdomain.com
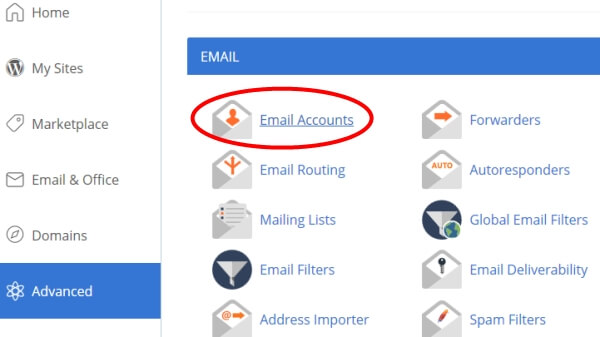
To do this, from the BlueHost dashboard, click the “Advanced” tab on the left sidebar.
Scroll down to the section called “Email” and click on the link for “Email Accounts”.
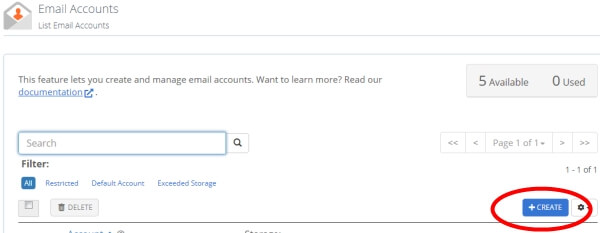
Click the blue button to create a new email account.
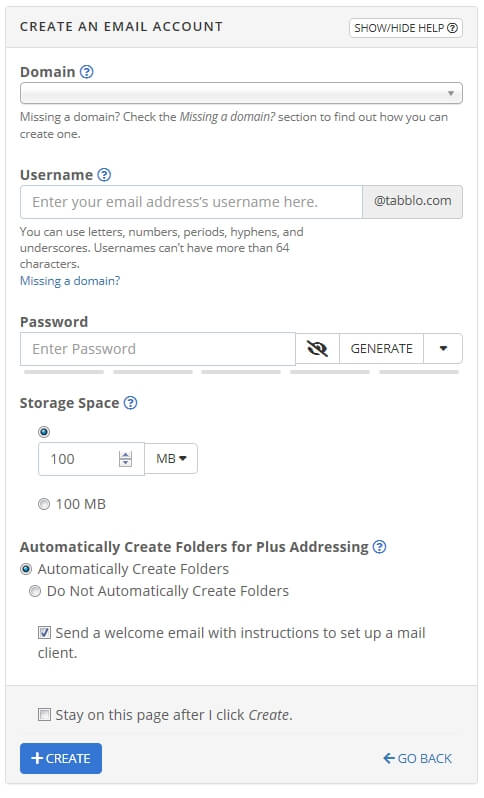
You can then fill out the details for your email account and click “Create” at the bottom.
You can login anytime to your new email account by going to Bluehost.com, clicking “Login”, and then choosing “Webmail Login”.
Step #4: Customize your website
Now it’s time for the fun part!
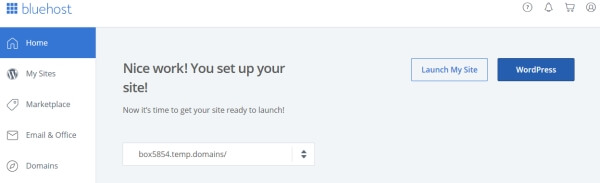
First, you will need to login to the WordPress dashboard. This is the area where you will make updates to your site.
Just click the blue “WordPress” button on the “Home” page of your BlueHost account to login to WordPress.
Choose a site design
Site designs are known as “themes” in WordPress. Changing your theme will completely change the design of your website.
Changing themes takes just a few clicks, and is the easiest way to make major changes to your website’s design.
WordPress offers thousands of different themes. You can browse the available free themes by going to the left sidebar in the WordPress dashboard and clicking on “Appearance –> Themes”
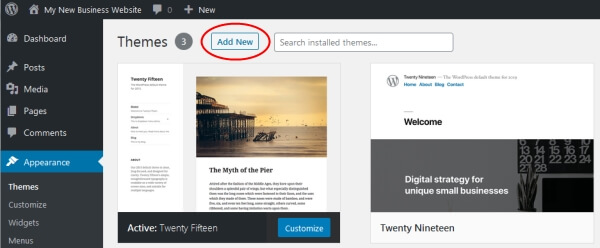
From here you can browse the available themes or search for something specific.
You are free to choose any theme you like, but I would suggest using the Astra theme, as it offers a variety of pre-designed websites that make this whole process easy.
In the search box, type “Astra”. Then click the blue “Install” button on the Astra theme.
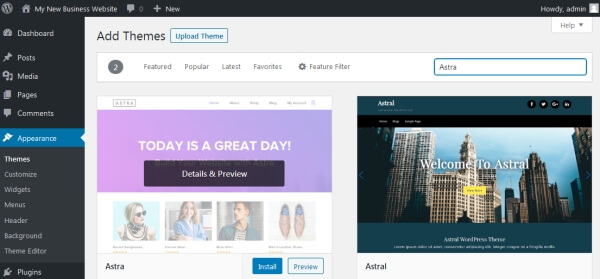
Once it’s installed click the blue “Activate” button.
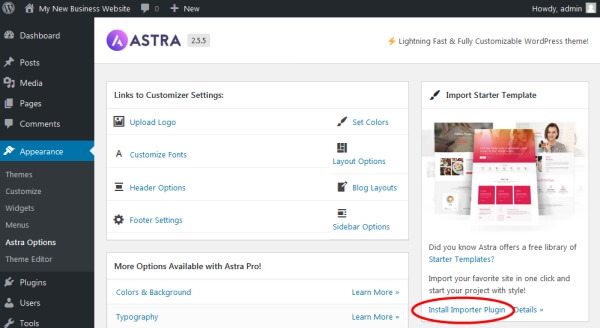
Next, on the left sidebar menu click “Appearance –> Astra Options”
Then click the link on the right that says “Install Importer Plugin”
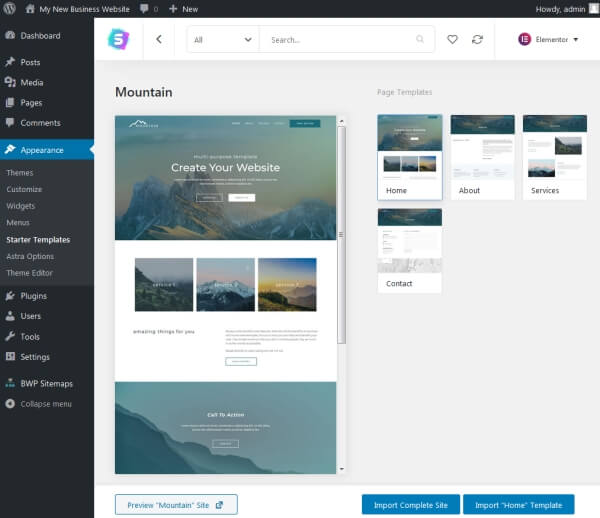
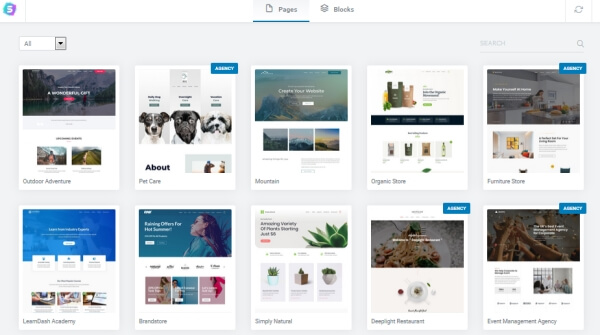
Once it has installed, you will be taken to a page with a variety of website templates to choose from.
You can browse, or search for something specific.
Be aware that some of the templates (marked “Agency”) require that you pay to use them. However, there are so many free options that a paid template is not really necessary.
Don’t get too hung-up on the names of the templates either. For example, here is a template called “Organic Store”:
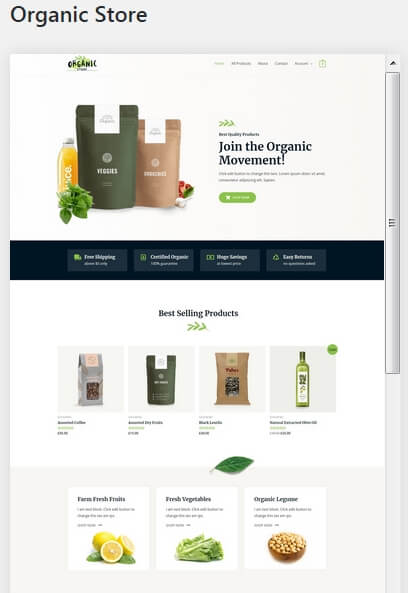
Despite the name, this template could easily be used for any kind of store. You would just add your own product images (which you will learn how to do later in this tutorial).
The pictures, content, and colors in each template can be changed, so the key to finding the right template for you is to look at the overall layout and functions.
For example, if the main goal of your website is to sell products, then any of the store templates (just search for “store”) will work for you.
Once you’ve found a template that looks good, click on it, and then click on the “Preview” button on the bottom left to get a full preview.
If everything looks good, go ahead and click the blue “Import Complete Site” button. If you change your mind later, you can always come back to this step and select a different template.
On the pop-up, make sure the bottom four boxes are checked and click “Import”.
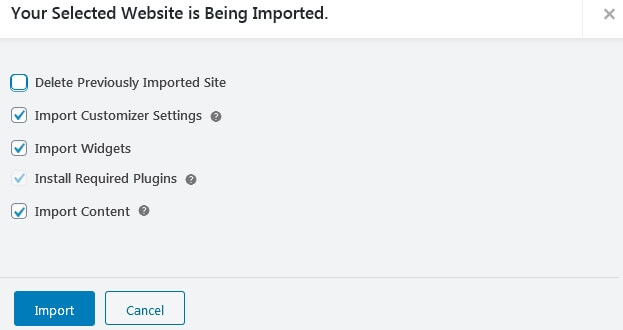
Once the import is complete you can close the pop-up window.
Add your logo
If you don’t have a logo for your site yet, that’s ok.
You can create a free logo for your website with Canva.
Once you’ve got your logo, you can add it to your website by clicking “Appearance –> Astra Options” on the left sidebar menu. Then click “Upload Logo”.
![]()
On the next screen you can click “Change Logo” to upload your new logo. Once upload, you can also use the slider to change the width of your logo.
![]()
Change your website colors & fonts
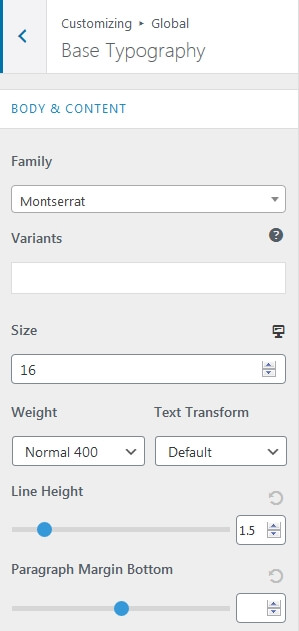
Go back to “Appearance –> Astra Options” from the WordPress left sidebar. Then click “Set Colors”
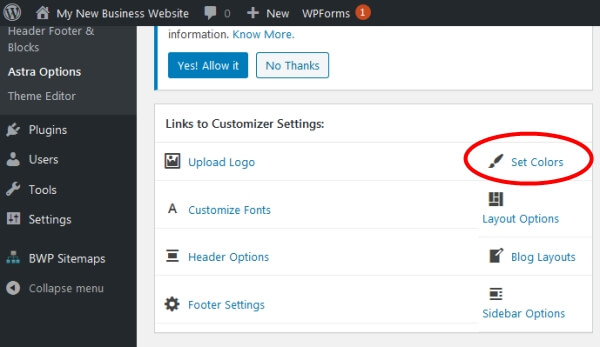
From here you can customize the colors used in your website design. There are several options here, from background colors to font colors.
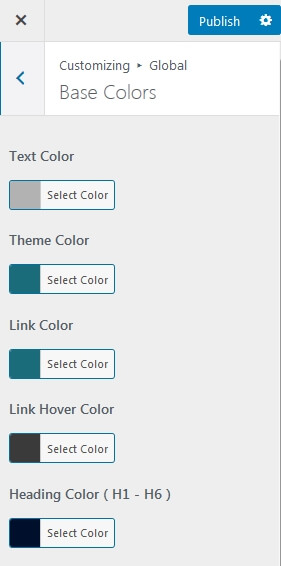
To customize your fonts, go back to “Appearance –> Astra Options” from the WordPress left sidebar. Then click “Customize Fonts”. This will give the option to change the font styles and sizes used in your theme.
Other customizations
Now you’ve seen some of the simple design changes that can be made to your website.
To see all of the options, go to “Appearance –> Customizer” on the left sidebar of the WordPress dashboard.
Feel free to experiment with the various options. They are all just as easy to change as the other options you have changed so far.
We will go over more customizations in the section below on adding content.
Add content to your website
Now that you have the basic design for your website, it time to start adding some content.
The template that you chose when you first setup your website contained various pages that you will need to edit, so let’s go over that first.
Editing existing pages
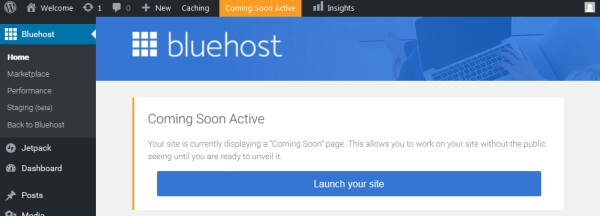
To start, you will want to remove the placeholder page that is currently displayed on your website. To do that, click the “BlueHost” menu at the top of the left sidebar menu and then click “Launch your site”.
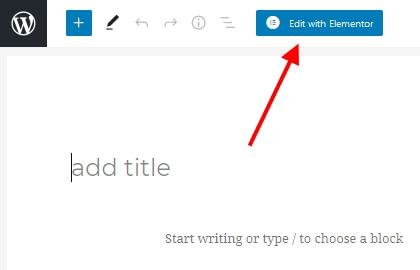
Now you will want to navigate to the page you want to edit. Let’s start with the homepage.
Hover over the home icon at the top left of the WordPress dashboard, then click on “Visit Site”.
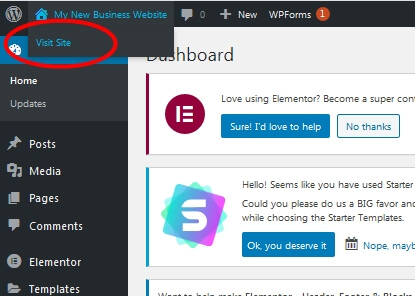
This will take you to the homepage of your site so that you can see what it looks like currently.
To edit the homepage click “Edit with Elementor” from the top menu bar. Keep in mind that only can see that top menu bar, as you are currently logged-in to your site as an administrator.
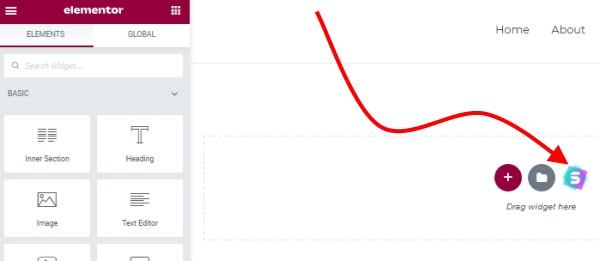
You should now see the Elementor page editor.
This is an easy to use drag & drop editor.
You will see the page you are editing on the right of the screen, and then various editing options on the left.
Click on any element on the page and the editing options that are available will show up on the left.
For example, if I click on the headline, the editor box lets me add new text, a link, or change the size of the text.
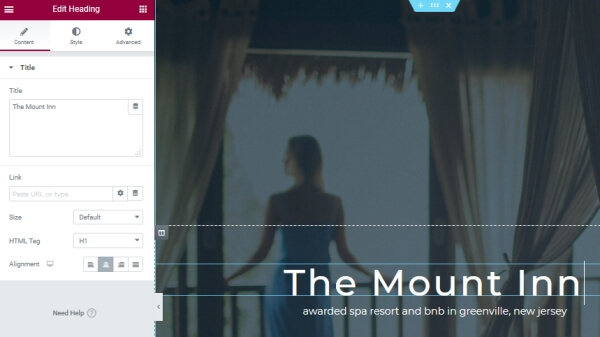
You can also click the “Style” tab at the top of the editor to bring up more editing options.
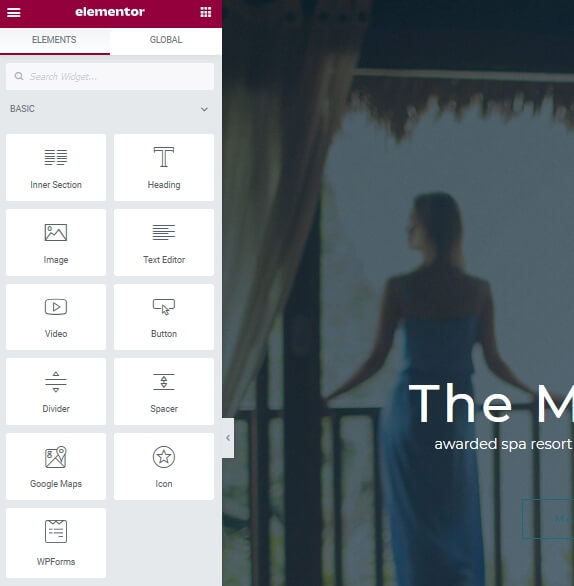
In addition to editing the elements that are already on the page, you can add new elements.
To do this, click on the dotted square at the top of the editing panel
This will show you all the different elements you can add to your page.
Adding elements is simple. Just and drag & drop the element where you want it on your page.
For example, if you want to add a Google Map to your page, just drag & drop that element to the location you want it.
Continue going through your page, editing elements, adding new elements, and deleting whatever you see fit.
Once you are done, click the “Update” button at the bottom of the editing panel to save your changes.
Creating new pages
In addition to your homepage, you should also consider adding the following pages if they didn’t come pre-installed with the template you chose:
About – This is an opportunity to give your customers the backstory on you and your project. This is also a great place to include testimonials.
Contact – Include multiple options for people to contact you, including address, phone, contact form, and social media accounts.
Services – If you are a service business then you should have at least one page describing the services you offer.
FAQ – A frequently asked questions page is a great way for people to get their questions answered without having to contact you directly.
Store – If you are planning to sell products online you will need product pages, a cart page, and a checkout page. Don’t add these yet though. Step #5 on how to add an online store will show you how to add these pages.
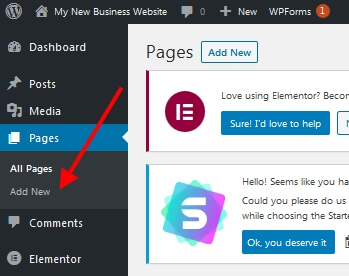
To add a new page go the WordPress dashboard click “Pages –> Add New”
Type the title for your page in the box, and then click “Edit with Elementor”
Click the Astra Starter Templates logo.
From the pop-up, select the design template that you want to use for this new page.
Choosing the same design template you used on the rest of your site is a good idea.
Click on the design template and you will be given several page layouts to choose from for this new page.
Select the one you want and click “Import Template”.
You will be taken back to the editing screen with your new template activated.
From here you can edit your new page by adding, changing, and deleting elements just as you did previously.
Editing navigation menus
Most templates come with a menu pre-installed, but if yours doesn’t it is a good idea to add one to make everything easy to find for your visitors.
To edit or create a menu, click “Appearance –> Menus” from your WordPress dashboard.
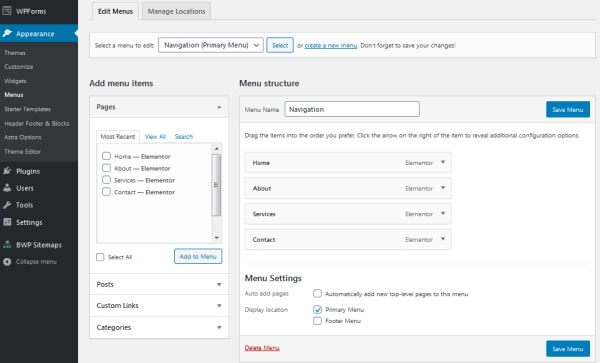
On this page you can select pages and click “Add to Menu”. You can also drag & drop menu items to rearrange them.
You can also change the location of the menu. The location option will vary slightly depending on your template.
Once you have the menu arranged like you want, click “Save Menu” to publish the changes to your website.
If you don’t want to add an online store, go ahead and skip to the next section on marketing your website.
Step #5: Add your online store (optional)
If you are planning to sell products or services online, then an online store is what you need.
Integrating an online store with your website is really simple with WordPress.
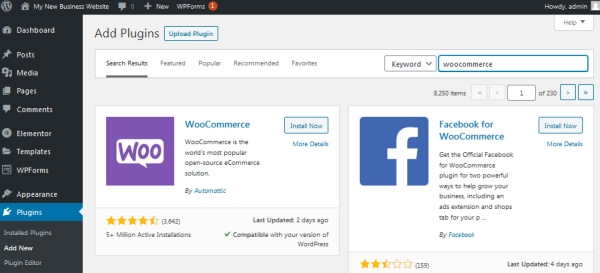
To start, we need to install the WooCommerce plugin.
From the left sidebar on your WordPress dashboard, go to “Plugins –> Add New”
In the search box, type “woocommerce”, then click “Install Now” and then “Activate”.
You will now be taken to the setup wizard, which makes the whole process incredibly simple.
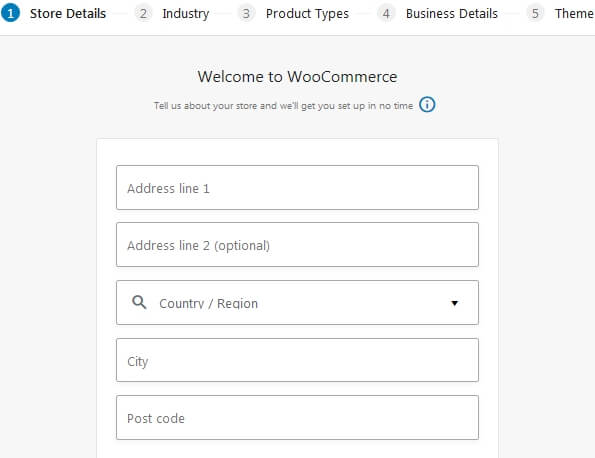
Just fill out the details in each step of the wizard.
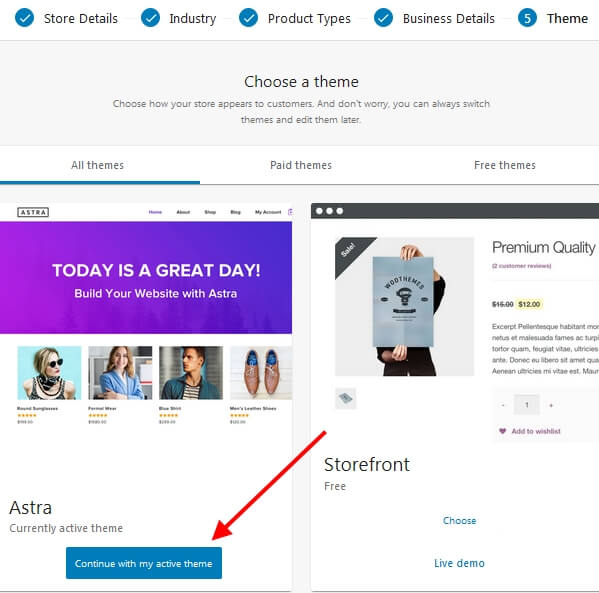
Choose your store design
The final step is to choose a design theme for your store. If you are using the Astra theme that was suggested in the earlier part of the tutorial, go ahead and click “Continue with my active theme”.
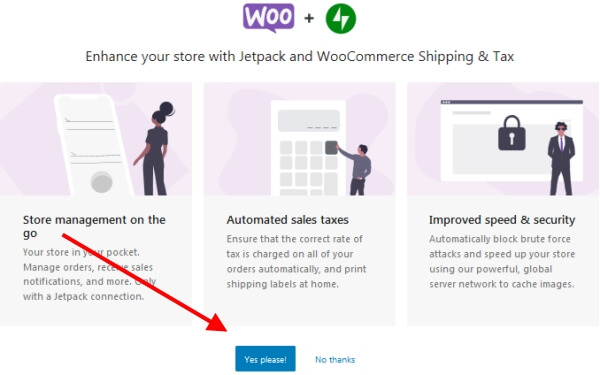
Shipping and tax options
You will now be given the option to automatically install some plugins that will help calculate shipping and tax, as well as print mailing labels. Click “Yes please!” to install these add-ons.
All of the pages you need for your store will now be automatically created.
Add products & payment options
Once everything has been installed you will be taken to the WooCommerce area of your WordPress dashboard.
Pay close attention to the “Finish Setup” section on the right.
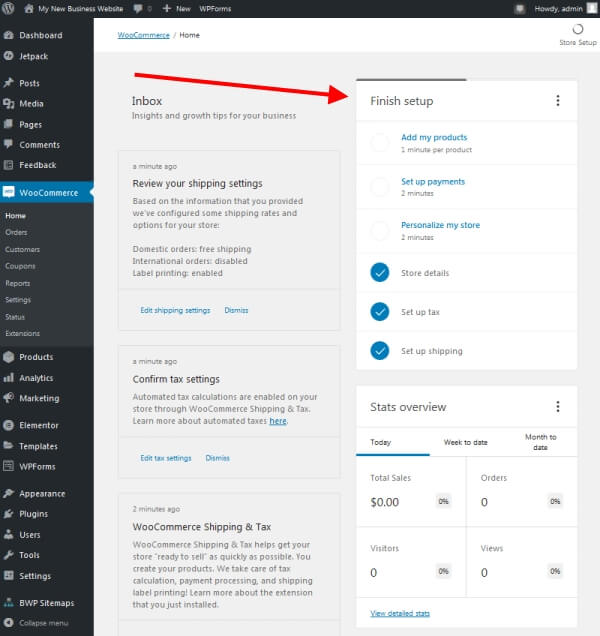
The two items you will want to pay attention to are “Add my products” and “Set up payments”.
Click on either one and you will be taken to a setup wizard that will help you get those set up.
Customize your store
You may want to make some changes to the default layout for your store.
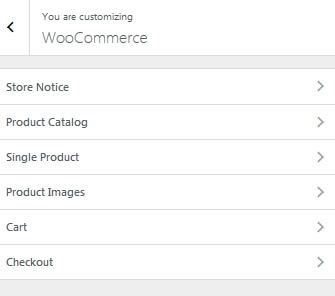
To do this, go to “Appearance –> Customize” from the WordPress dashboard sidebar.
This will take you to the theme customizer. From here, click “WooCommerce” from the left sidebar menu.
You now have options to edit the layout of the various pages in your online store.
For example, if you want to edit the options on your Checkout page, click on
“Checkout” on the sidebar.
You will then be shown the various options in the left sidebar, as well as a preview of your checkout page on the right.
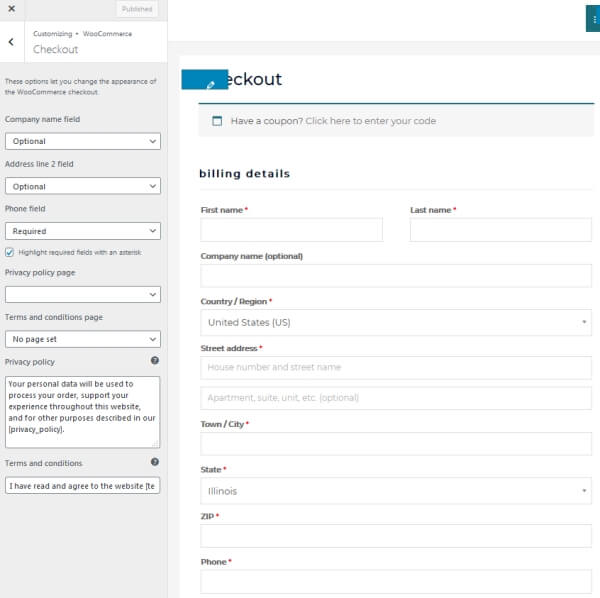
When you are happy with your changes, click the “Publish” button at the top of the sidebar.
The same process can be repeated for each of the pages in your online store.
Other settings
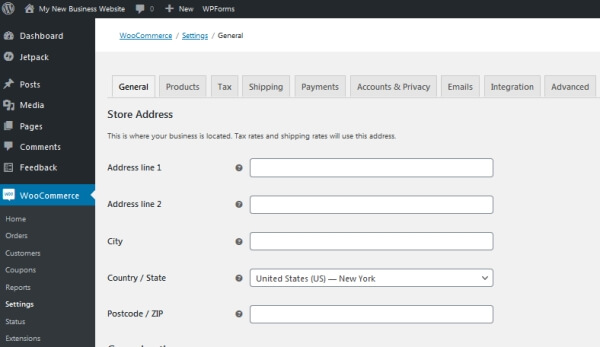
You can make additional changes to the settings of your online store by going to the WordPress dashboard and clicking “WooCommerce –> Settings” from the left sidebar.
This will bring up the setting panel, where you can use the tabs to navigate to the particular setting you want to change.
Edit your navigation menu
Earlier in this tutorial you learned how to create and edit a navigation menu.
Now that your store is set up, it’s a good idea to add a link to your shop page in the navigation menu so that customers can easily access your products.
Add additional features
You can add additional features to your store by adding WooCommerce extensions.
Here are some of the most popular extensions:
Payments – Add other payment options for your customers beyond the default options.
Shipping – Integrate your online store with your shipping provider to easily create labels and track shipments.
Marketing – Helpful tools to increase engagement and drive repeat sales.
Bookings – Let clients book appointments easily, right from your website.
Subscriptions – Set up subscription payments for products and services.
Customer Service – Increase customer engagement to reduce refunds and maintain customer loyalty.
Step #6: Marketing your website
Now that you’ve finished designing a great website, it’s time to turn your attention to getting visitors.
There are a variety of ways to drive more traffic to your website, and the best options depend on the specifics of what you are trying to achieve.
For example, if you have a local business, then business review sites like Yelp and Angie’s List can make a huge difference.
If you are selling to a national or international audience then you will need to
Add your website to your current marketing campaigns
If you are already doing any sort of marketing for your business then that is also an opportunity to bring more people to your website, which helps build trust and ultimately leads to sales.
This means adding your website to things like business cards, flyers, print advertising, promotional items, billboards, and just about anything else.
Raise awareness on social media
If you already have social media accounts for your business then it’s a good idea to notify your followers that you have just launched your new website. You can even offer a promotional deal if they book an appointment or make a purchase through your site. This is a good way to help customers build the habit of using your website.
If you don’t already have social media accounts, you will want to at least create them on the big sites like Facebook, Twitter, and possibly Pinterest and Instagram. Start by asking your friends and current customers to follow you on social media. As you continue to offer frequent updates and promotions, this will build your following and drive more traffic to your website.
Optimize for search engine traffic
Some studies indicate that 93% of website traffic originates from search engines. Tapping into this huge traffic source can lead to a large influx of new customers. This process is called search engine optimization (SEO).
Take a minute to think about what a potential customer might search for. For example, if you own a roofing company in Springfield, then people might search for phrases like “best roofing company Springfield”.
Once you have a few ideas for phrases, go to Google and start entering them into the search box. You will see other phrases come up as suggestions as you type. Make note of these.
Once you actually hit enter and do a search on Google, you can scroll to the bottom of the search results page and find a section of related searches. Make note of any of these that make sense for your website.
Once you have a list of phrases, it’s time to optimize your site so that it starts to appear in the search results. Keep in mind this process will not happen overnight, but by optimizing your site now you give yourself the best chance in the weeks and months ahead.
The good news is that by using WordPress to build your site you have already taken the first step to optimizing for search engines. WordPress is structured in such a way that is very search engine friendly.
To further optimize your website, there are a few things you should do:
- Install the Yoast SEO Plugin
While WordPress is great on its own, the Yoast Plugin takes things to the next level.
To install go to the left sidebar in your WordPress dashboard and click on “Plugins –> Add New”
Use the search box on the top right to search for “Yoast”.
Click “Install” and then “Activate” once installed.
- Change your site title
Your site title is a chance to tell search engines what your site is about.
In addition to your website name, it is a good idea to have a search phrase that you are hoping to rank well for in the title.
For example, if you have a roofing company called “Premier Roofing”, your site title might be something like “Premier Roofing – Best Roofing Company in Springfield”. Don’t overdo it here. Just one additional phrase is good.
To make this change, go to the left sidebar in the WordPress dashboard and click on “General –> Settings”
In the “Site Title” box, enter your new title. Then scroll to the bottom of the page and click the blue “Save Changes” button.
- Use keywords in your content
In addition to incorporating keywords in your site title, you also want to have them in the text on your pages.
Again, you don’t want to overdo it, but just make sure to include a phrase or two in your content.
If you want to target multiple phrases, then it may be best to do this across multiple pages.
For example, our roofing company could target “best roofing company Springfield” on their homepage, but could also create another page about their gutter services to target a phrase like “gutter repair Springfield”.
- Submit to search engines
Once you have completed the above recommended optimizations you are ready to submit your website to search engines.
This will help them find your website and incorporate it into the search results faster.
To do this, create free a Google Search Console account, and then use the “URL Inspection” tool in the dashboard to submit your site.
Consider online advertising
If you have the budget for it then online advertising can be a great source of new customers for your business.
In general, online advertising works best for businesses selling higher priced products or services, subscriptions, or those with repeat customers. These types of business make more from each customer, so they can afford to spend some money up front to acquire new customers.
There are a variety of places to advertise online, but the two big places are Facebook and Google.
Google Ads allows you to show your ad to people when they search for particular keywords. As you saw in the previous section on search engine optimization, the vast majority of website traffic comes from search engines.
With Google Ads you can pick and choose the phrases where you want your ads to show. Your ads will actually appear above the regular search results, giving you a great opportunity to reach a wide audience.
Facebook targeting is a bit different, since people are not typically searching for keywords on Facebook. Instead, you can target your ads to reach specific demographics of users. For example, you can target by location, age, income, and even interests. So if you are advertising a dog walking business, you could target people near you, with a higher income level, who also have an interest in dogs.
Time to launch!
If you’ve gone through each the steps in this guide then you now have a beautiful, customized website.
You can always go back to any of the steps in this guide to make changes to your website as you see fit.
The main work now is to continue to update and market your website to grow your traffic.
Questions?
If you have any questions, or just want to say thanks, feel free to leave a comment below or send me a message.
I am looking to add a plug in which when i post on my blog, will automatically post to the respective facebook and twitter accounts. Any suggestions??
Hi Gary,
I would suggest the Jetpack WordPress plugin, using the Publicize feature. Here is how to configure it: https://www.theblogstarter.com/how-to-use-jetpack-publicize/
Are blank pages available for home page?
Can document/text and images be uploaded simultaneously? (they have different formats)
Thanks
Hi Jon,
Yes, you can add blank pages for the homepage or any other page if that’s what you would like. From the WordPress dashboard just go to “Pages –> Add New” and you will be taken to a new blank page.
From there you can add content to the page (including text & images), as well as change the design of the page.