Below you will find articles for the intermediate and advanced blogger. If you are a beginner make sure to check out my easy guide to starting a blog first.
The current best BlueHost promo code is 92% off on the Personal plan. This brings the cost down to $1.99 per month, which includes a free domain name (limit 1 purchase per customer at this price).
The Personal plan has everything you need to start your website or blog:
Disclosure: The Blog Starter receives a commission when you purchase with the above BlueHost coupon code link.
2. Select your plan. The BlueHost Personal plan is the one I recommend for anyone starting a new website or blog. Click “Choose Plan”.
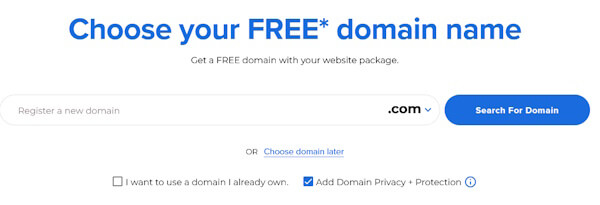
3. Type in your domain name and then click “next” to see if it is available.
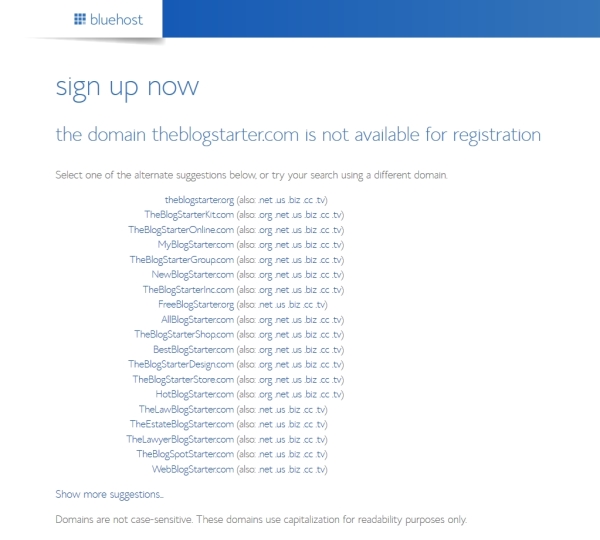
4. If the domain is unavailable you will be given a list of similar domain names that are available. You can choose one of the suggested domains or you can continue without selecting a domain for now.
5. Then you will need to choose your service term. Select the 12 month package to get the lowest up front cost. Select the 36 month option get the lowest monthly promotional price. No need to add a coupon code, as it is already applied.
Here is a full video walkthrough of the process of using a BlueHost coupon to get a discount on your hosting package:
For help installing and configuring WordPress on your new BlueHost account, you can follow one of my free tutorials here:
Creating engaging, informative, and relevant content for your website remains the ultimate way to drive traffic to your site, though it can be time-consuming. Articles should be well thought out and contain highly valuable information and not be a regurgitation of old themes that contain little value packed with keywords. If you’re going to commit to blogging, you should commit to a high level of standard.
1. Determine a Schedule
Start by deciding how frequently you want to publish new content. If your goal is to post several times a day, focus on creating short to medium-length posts. For a schedule of one to two posts per week, consider producing longer, more comprehensive articles. Keep in mind that search engines often adjust their crawl rates based on the consistency of your updates. This means if you post frequently, your site may be indexed more regularly. Additionally, search engines tend to favor longer posts, as they are often seen as more informative and valuable.
Guidelines for Blog Post Lengths and Frequency:
Short-Form
Medium-Form
Long-Form
100-800 Words
800-1,500 Words
1,500 – 5,000 Words
4-6 Post Daily
1-3 Posts Daily
1-2 Posts Weekly
By establishing a clear posting strategy, you can better plan your content creation and align it with your goals. Of course, if you prefer to post less frequently, such as once every few weeks, that’s perfectly acceptable too. Just remember that while this approach might result in less traffic, it may suit your specific objectives or target audience.
2. Choose a Topic
To maximize the effectiveness of your blog, it’s crucial to choose topics that align with both your brand and your target audience. Keeping your blog posts focused on your website’s niche helps ensure that search engines recognize and associate your site with relevant topics.
For instance, if your website specializes in French cooking, consistently writing about French cuisine and related subjects will strengthen the search engine’s association with your site. Conversely, posting about unrelated topics, such as a vacation to the Maldives, can dilute your site’s relevance and negatively impact your search engine rankings.
However, if SEO isn’t your primary concern, feel free to explore any topics that interest you.
If you ever find yourself struggling for ideas, Google Trends can be a valuable resource. By browsing trending search terms, you might discover topics that can be creatively integrated with your niche. Search engines are particularly attentive to new content related to popular trends.
3. Research
Once you have a solid idea for your blog post, it’s time to begin your research.
Start by conducting a few searches on your topic to see what similar articles are out there. This can help you determine the angle of your post and identify any gaps in the existing content that you can fill.
Including data and statistics from reputable sources can greatly enhance your article. These facts can support your arguments or provide evidence for the points you’re making. Be sure to properly cite any references and include links to the original sources.
Outbound links to authoritative sites also improve your SEO. Linking to credible sources like Wikipedia, well-known periodicals, or reputable news outlets can positively influence how search engines evaluate your content. Make a list of reliable web pages to reference when writing your article.
4. Create an Outline
I find that writing a blog post becomes much easier when you start with an outline. It helps you stay focused on the narrative you want to convey and allows you to organize your thoughts into a more cohesive and digestible format.
Begin by drafting a title and a brief introduction. This introduction can be expanded later as you flesh out the rest of your outline. Your title should serve as the preliminary hook for the article. Strive to make it exciting and alluring, something people will want to read. The introduction should also be just as captivating, encouraging readers to continue.
Next, list your main points. These will serve as the key sections of your blog post, with each main point becoming the heading for a different section.
Use subheadings under each main point to further break down the content and provide additional structure.
As you outline your main points, you’ll likely think of additional sections to add. You may also find yourself rearranging these points to create a logical flow. This process greatly aids in the overall composition of your blog post.
5. Write the First Draft
Once you’re satisfied with your outline, start writing your first draft. Expand on your introduction and flesh out each main section with detailed content.
At this stage, don’t worry about making it perfect. Focus on getting all your ideas down on paper in one go. Avoid the temptation to refine every sentence as you write; this can significantly slow down your progress. Remember, you can always edit and polish your draft later.
Once you have your content written, add a summary or a conclusion to tie all the information together in a neat little package.
It’s also advisable to write the first draft yourself, without relying on AI. Your content should reflect your own thoughts and voice. Use AI tools primarily for grammar checks and refinement, rather than for generating the initial draft.
And don’t forget to add your relevant links by selecting appropriate snippets of anchor text to use as the link. And make sure these links open in a new tab or window rather than on the same page.
6. Edit and Revise
With the main content of your article written, it’s time to meticulously review every word and sentence. Revise for clarity, correct typos, add new ideas and remove anything that doesn’t quite fit. This process may require multiple rounds of editing before you’re fully satisfied with the final piece.
A helpful tip for improving the flow of your writing is to read it aloud. Often, what sounds fine in your head may come across as awkward or unclear when spoken. Reading aloud can help you catch these issues and refine your wording.
For typos and grammatical errors, use editing tools to assist you. Grammarly is a free tool that I use frequently to help with proofreading. Additionally, AI tools can be useful for rephrasing sentences to enhance readability and improve overall content quality.
7. Add to WordPress
SEO
Before uploading your article to WordPress, ensure you have an SEO plugin installed to give your post a boost when it goes live. Log in to your WordPress dashboard, navigate to “Plugins” > “Add New,” and search for “SEO.” I recommend installing and activating “Yoast SEO,” but there are other options available. Most SEO plugins are user-friendly and easy to set up.
EDITOR
WordPress uses the Gutenberg block editor by default, but if you prefer a simpler, classic editing interface, you can install the Classic Editor plugin from WordPress. To do this, go to “Plugins” > “Add New,” search for “Classic Editor,” and install and activate it.
Next, go to “Settings” > “Writing” and choose your preferred default editor for all users. You can also enable the option for users to switch between editors. Be sure to save your settings.
USING THE GUTENBERG EDITOR
If you are using the Gutenberg editor, navigate to “Posts” > “Add New.” Enter your article’s title in the “Add Title” field. Below, where it says “Type / to choose a block,” paste your article. Use the toolbar that appears to adjust formatting as needed. When you are satisfied with the content, click “Save Draft” in the top right corner.
USING THE CLASSIC EDITOR
To add a post using the Classic Editor, go to “Posts” > “Add New.” Enter your title in the Title Bar, and paste your article into the main content area. Use the editor’s toolbar to adjust formatting if necessary. Once your post looks good, click “Save Draft” on the right.
CATEGORIES, TAGS, SEO
On the right side of the editor, you can choose categories and tags for your post. You can also add new categories if needed, but try to keep categories broad and reusable to avoid overly specific or numerous categories.
In the SEO section below the article, add an “SEO Title” if it differs from your main title and a “Meta Description” using relevant keywords. If you’re using Yoast, this section will guide you through the process.
The “Slug,” which is part of your URL, is typically auto-generated. Only change it if you know what you’re doing.
Finally, don’t forget to click “Save Draft” once you have completed all these steps.
8. Add Visuals
Start by adding a featured image, which will appear at the top of your blog post and may also be displayed in search engine results. Ideally, this image should include the title of your article embedded within it. WordPress recommends a size of 1200 x 628 pixels for featured images.
To add a featured image, locate the “Featured image” section on the right side of your draft editor and click the button to upload or select an image.
Gutenberg Editor
Classic Editor
When uploading a new image, be sure to fill in the “Alt Text” field. This should provide an exact description of the image, which is important for accessibility as it helps visually impaired users who rely on screen readers. Additionally, include a relevant keyword or phrase in the description to boost SEO.
After entering the “Alt Text,” click outside the text box to save it, then click “Set Featured Image” to finalize your choice.
Incorporate additional images throughout your blog post to make it more engaging. Use the editor’s tools to align and position these images as needed. Remember to add “Alt Text” for each image, including an accurate description and a key term to improve both accessibility and SEO.
While stock images are perfectly acceptable, it’s beneficial to customize them slightly to make them more unique. If you don’t have access to a stock photo account, Pixabay is a great resource for free images.
9. Finalize and Publish
Review your post thoroughly by going through it several times to make any necessary edits or improvements. This process ensures that your content is polished, free of errors, and presents a clear and engaging message to your readers. Take your time to refine your wording, check for grammatical mistakes, and ensure that your points are logically organized and easy to follow.
Once you are satisfied with your post and confident that it meets your standards, click “Publish” to make it live on your website. After publishing, view the post on the front end to double-check that all formatting looks good. Pay close attention to how images, headings, and paragraphs appear to ensure a seamless reading experience across all devices.
Next, share your newly published post on social media platforms to reach a wider audience. Craft compelling social media captions and include relevant hashtags to attract more readers. Engage with your followers by encouraging them to share their thoughts or share the post if they find it valuable.
Finally, track the performance of your post using tools like Google Analytics or other traffic monitoring plugins. Analyze the traffic, user engagement, and social media shares to understand how well your post is resonating with your audience. This data will help you refine future content and optimize your blog strategy for better results.
So, you’re thinking about changing your domain name, and it feels like you’re staring down a mountain? Good news—it’s more like a little hill! While it might feel intimidating if you’re unfamiliar with the process, I promise you can tackle this in less than an hour—no help needed. Even if you’re not well-versed in websites or coding, it’s completely within your reach. Just follow the steps outlined below, and you’ll be set.
I’ve handled plenty of WordPress migrations—whether it’s moving servers, changing domains, or switching platforms. While URL migrations do require some careful steps, they’re totally manageable by anyone in under an hour!
1. The Obvious: Have Full Access to All Accounts
Make sure you’ve got full access to everything you need. This means having administrative access to your WordPress backend, your hosting account, and cPanel. You’ll also need access to wherever your new domain is registered. In many cases, your domain will be registered with your hosting provider, but if it’s not, make sure you have that access as well.
Once you’re set, go ahead and log into all these accounts in separate tabs in your browser.
2. Back Up Your Website
Before diving into any major changes, like a URL switch, it’s smart to have a backup of your site—just in case something goes off track.
A) If you’re already using a backup plugin, go ahead and run a fresh backup, then download all the important files, particularly the MYSQL database backup.
B) If you’re not using a backup manager yet (and really, you should be!), head over to your WordPress dashboard, and navigate to “Plugins > Add New Plugin.” I recommend UpdraftPlus; it’s a reliable, free option. Install and activate it to get your backup secured.
In the plugin’s interface, create a new backup and download all relevant files.
3. Point Your Domain
We need to ensure that your new domain is pointing to the correct folder.
If your domain is registered with the same hosting account, follow step 3A. If it’s registered on a different account or platform, skip to step 3B.
3A. If Your Domain Is Registered with the Same Hosting Account:
Log in to your hosting account and navigate to cPanel. Once you’re in cPanel, click on “Domains.”
On the following screen, check the “Document Root” listed next to your new domain to ensure it is pointing to the correct folder. If your website is located in a different folder within “/public_html,” use the “Manage” button to adjust the settings as needed.
3B. If Your Domain Is Registered on a Different Platform:
Start by locating the nameservers for your hosting account. Typically, you can find this information by searching online for your hosting company’s name along with “nameservers.” Keep in mind that if you’re using a VPS, the nameservers you find online might differ, so it’s a good idea to consult your hosting documentation for the most accurate information.
Next, log in to the account where your domain is registered. The procedure for changing your domain’s nameservers will vary depending on your provider, but you can generally find this option in the domain settings where you manage and edit your nameservers.
Update the nameservers to match those provided by your hosting account. This change will direct your domain to your hosting account, making your hosting provider responsible for all DNS entries. After saving these changes, log back into your hosting account and follow the instructions from the previous step to add the new domain and verify that it is pointing to the correct folder.
4. Enable the SSL
If you’ve already purchased an SSL certificate for your new domain, now’s the time to install it. If not, don’t worry—most cPanels offer a free AutoSSL, depending on your hosting package. Before making any URL changes, it’s crucial to ensure your SSL is installed.
Log in to cPanel on your hosting account, then go to “Security” and click on “SSL/TLS Status.”
On the next screen, find your new domain in the list. Click “Run AutoSSL” and wait a few minutes for the process to complete. Once it’s done, you should see a green circle next to your domain name, indicating that SSL is active.
If you recently updated your nameservers, the SSL might not activate immediately. In some cases, you may need to wait an hour, or even up to 24 hours, but it usually kicks in within ten minutes.
5. Update WP-Config
Now it’s time to update your website files with the new URL. We’ll do this by editing the wp-config.php file to hardcode the new URL and file location.
In cPanel, navigate to “Files” and click on “File Manager.”
Double-click on the “public_html” folder, where your WordPress files are likely stored. If your files are in a subfolder, navigate there instead.
Scroll through the list of files until you find wp-config.php. Click on it to highlight it, and then choose “Edit” from the top menu. Note that the method to edit might vary slightly depending on your cPanel setup.
After the “@package WordPress” line in the file, add the following lines, replacing yourdomain.com with your actual domain:
Save the changes, and now you’re ready to log into your site using the new URL.
6. Log In
Now it’s time to access your site using the new URL. Head over to your new login page at https://yourdomain.com/wp-admin. Use your usual administrative username and password to log in—everything should work just as before.
7. Search and Replace
Next, you’ll need to update your database to replace all instances of the old domain with the new one. This is a straightforward and effective way to make sure everything is aligned.
In your WordPress dashboard, go to “Plugins” and click on “Add New.” Search for the “Better Search and Replace” plugin, install it, and then activate it.
Once activated, navigate to “Tools” > “Better Search Replace.”
In the “Search For” box, enter your old domain name (without https:// or a trailing slash). In the “Replace With” box, enter your new domain.
In the Additional Settings section, check the “Case-Insensitive” box and uncheck “Run as dry run.”
Very important: Before you click the “Run Search/Replace” button, double-check to ensure that the domains are spelled correctly.
If everything looks correct, proceed by running the search and replace function.
7. WordPress Permalinks
Sometimes, after a migration, your URLs might stop working even if everything else looks perfect. To fix this, go to “Settings” > “Permalinks” in your WordPress backend.
On this page, scroll down and click “Save Changes” twice, even though no changes were actually made. This action helps refresh your permalink structure.
Your website should now be up and running smoothly! However, we still have a few more steps to complete.
8. Redirect Your Old Domain
The simplest way to set up a redirect is through cPanel. Start by logging into your hosting account and accessing cPanel. Navigate to the “Domains” section and click on “Redirects.”
In the redirect settings, select “Permanent (301)” from the dropdown menu for the type of redirect. Then, choose your old domain name from the next dropdown field. Leave the third field blank to ensure the entire site is redirected. In the “Redirects To” field, enter the full URL of your new domain, including https://.
For the redirect rules, check both the “Redirect With or Without the WWW” box and the “Wildcard” box. Finally, click “Add” to implement the redirect.
Once you’ve set up the redirect, it’s important to test it to ensure it’s working correctly. Enter an old page URL (preferably an interior page, not just the homepage) into your browser and verify that it redirects to the corresponding page on the new domain. If the redirect doesn’t work as expected, make any necessary adjustments.
9. Update Affiliated Sites
With your new domain now active, it’s essential to update all associated platforms and sites. Begin by revising your social media profiles to reflect the new domain, ensuring that links and references are current. Don’t forget to update any other affiliated sites where your domain might be mentioned, such as directories, partner sites, or business listings.
Additionally, inform your customers and the public about the domain change. This can be done through an email newsletter, social media announcements, and updates on your website. Clear communication will help avoid confusion and ensure a smooth transition for everyone involved.
10. If Things Fail, Use the Back Up!
If you encounter any issues or if the migration doesn’t go as planned, don’t panic. You can always revert to the backups you created earlier. These backups will allow you to restore your site to its previous state before the changes were made. Simply follow your backup plugin’s instructions to restore from the saved backup files. This safety net ensures that you have a fallback option, giving you peace of mind and the opportunity to resolve any problems without losing valuable data.
Yes, You Can Still Make Money by Blogging. Now More Than Ever.
It’s easy to assume that monetizing through blogging is a thing of the past, relegated to the era of MySpace and AOL Instant Messenger. But you’d be wrong. Blogging remains a highly lucrative career option that writers capitalize on daily. The digital age continues to present numerous opportunities for writers to monetize their content and transform their passion into profitable businesses.
Today, four primary strategies stand out as the most effective: advertising, affiliate marketing, sponsored posts, and driving traffic to their own or their employer’s site for sales. Each of these methods offers unique advantages and can be tailored to fit the blogger’s specific niche and audience. More importantly, in the world of search engines, unique content is king—high-quality, valuable content drives traffic and boosts visibility, demonstrating that running a blog still holds significant financial potential.
Advertising
Advertising remains one of the most traditional and straightforward methods for prolific and well-known bloggers to generate income. This approach involves placing ads on a blog, with revenue generated either through impressions (CPM) or clicks (CPC). The two predominant forms of advertising for bloggers are display ads and pay-per-click (PPC) ads.
Display Ads: Display ads are banner advertisements that can be placed in various locations on a blog, such as the sidebar, header, footer, or within the content itself. These ads are usually managed through ad networks like Google AdSense, Mediavine, or AdThrive. Revenue from display ads is typically based on the number of impressions or page views. High-traffic blogs can earn significant income through display ads, making this method especially attractive for bloggers with a large audience. Additionally, bloggers with substantial reach may choose to sell ad space directly, bypassing ad networks and increasing their profit margins.
Pay-Per-Click (PPC) Ads: PPC ads generate revenue for bloggers when visitors click on the ads. Google AdSense, a widely used platform for PPC advertising, allows bloggers to integrate ads into their site. Each time a visitor clicks on an ad, the blogger earns a small fee. This method can be particularly effective if the blog’s content closely relates to the advertised products or services, encouraging more clicks. By aligning content with relevant ads, bloggers can significantly increase their PPC revenue.
While advertising can be a dependable source of passive income, it requires substantial traffic to be truly profitable. Consequently, many bloggers integrate advertising with other monetization strategies to optimize their revenue streams.
Example: Techcrunch is a highly popular blog that strategically places ads throughout its posts.
Affiliate Marketing
Affiliate marketing is another powerful way for bloggers to monetize their content. This method involves promoting products or services and earning a commission for each sale made through the blogger’s unique affiliate link. Unlike advertising, which relies on traffic volume, affiliate marketing focuses on the blogger’s ability to drive conversions.
Product Reviews and Recommendations: Bloggers often write detailed reviews or create content around products they genuinely use and love. By incorporating affiliate links within this content, bloggers can earn a commission when their readers purchase the recommended products. This method works well because it leverages the trust and authority bloggers have built with their audience.
Affiliate Networks and Programs: Many bloggers join affiliate networks like Amazon Associates, ShareASale, or Commission Junction, which provide access to a wide range of affiliate programs. Alternatively, bloggers may partner directly with companies that offer affiliate programs. These programs typically provide banners, links, and other marketing materials to help bloggers promote their products effectively.
Affiliate marketing can be highly lucrative, especially for bloggers who have a loyal and engaged audience. By promoting relevant and high-quality products, bloggers can generate significant income through commissions.
If a blogger lacks a large audience but can create compelling, high-converting articles, they often use PPC ads to promote their content in search engine results. If these blogs perform well, the income from affiliate sales can surpass the cost of the ads, potentially leading to substantial profits.
Example: The Wirecutter is a popular review site blog that utilizes affiliate ads to monetize.
Sponsored Posts
Sponsored posts are a form of content marketing where bloggers are paid to write articles or create content that promotes a brand, product, or service. This method allows bloggers to leverage their influence and reach to help brands connect with their target audience.
Brand Collaborations: Brands often collaborate with bloggers who have a strong following and high engagement rates. These collaborations can take various forms, such as sponsored blog posts, social media posts, videos, or even full-fledged content campaigns. The key to successful sponsored posts is authenticity; the content should resonate with the blogger’s audience and align with the blog’s niche.
Negotiating Deals: Bloggers usually negotiate the terms and compensation for sponsored posts directly with brands or through influencer marketing platforms like AspireIQ, IZEA, or TapInfluence. The compensation for sponsored posts can vary widely based on the blogger’s reach, engagement, and niche. Established bloggers with a large following can command higher fees for sponsored content.
Sponsored posts provide a direct source of income and can be highly profitable, especially for bloggers who have established themselves as influencers in their niche. However, maintaining transparency and authenticity is crucial to preserving the trust of their audience.
Driving Traffic to Their Own Site for Sales
Many business owners integrate a blog into their website as a powerful tool to drive traffic, enhance brand awareness, and boost conversions. Blogging attracts visitors, builds a loyal audience, and creates a sustainable business by leveraging content to showcase their expertise and offerings.
Blogging helps increase sales for businesses by providing valuable, relevant content that engages potential customers. High-quality blog posts improve search engine rankings, making it easier for customers to find the business online. By addressing customer pain points and offering solutions through blog content, businesses can establish themselves as industry authorities, fostering trust and credibility with their audience.
Moreover, consistent blogging keeps the brand top-of-mind for consumers, encouraging repeat visits and fostering a community around the business. This increased engagement often translates into higher conversion rates, as visitors who frequently interact with the brand are more likely to make a purchase.
Driving traffic to their own site for sales involves a strategic approach to content marketing and SEO. By consistently creating high-quality content that attracts and engages their audience, businesses can enhance visibility, build brand loyalty, and drive conversions, proving the enduring financial potential of blogging.
Example: Etsy has an extremely successful blog that they utilize to drive traffic and increase sales.
Bloggers have multiple avenues to monetize their content and turn their passion into a profitable venture. Advertising provides a steady stream of passive income, while affiliate marketing leverages the blogger’s influence to drive sales and earn commissions. Sponsored posts offer lucrative opportunities for brand collaborations, and driving traffic to their own site for sales allows bloggers to retain full control over their revenue streams. By combining these methods and tailoring them to their niche and audience, bloggers can create a diversified and sustainable income model. The key to success lies in providing valuable, authentic content consistently and regularly, which resonates with the audience and builds long-term trust and engagement. It takes time and persistence, but the rewards can be substantial.
In this guide, I assume that you have already set up your new domain name and installed WordPress.org. If you haven’t done that yet, please follow my free guide on how to set-up WordPress.org to see exactly how to get a free domain name and install WordPress.org. I can even do the install for you for free, just submit a blog install request here.
If you already have a blog on WordPress.com and would like to move it to your own self-hosted domain using WordPress.org, this tutorial will show you how.
WordPress.com has several inherent issues that make it less desirable for many bloggers. The main issues are the lack of control and security, along with the inability to profit from your blog. If you have run into these issues, it is time to move from WordPress.com to WordPress.org.
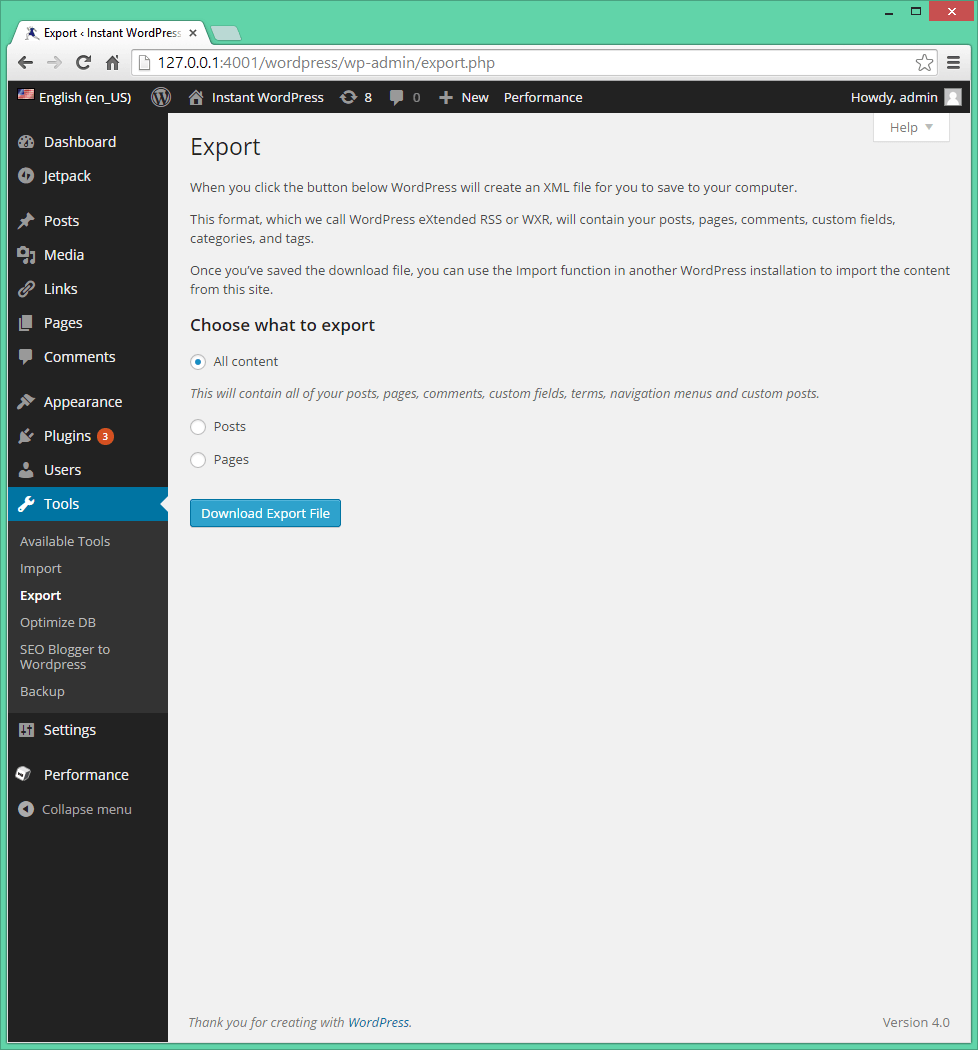
1 – Export Your WordPress.com Blog
Although you cannot install third-party plugins using a free blog hosted at WordPress.com, there is an export tool included with the platform that allows you to download all of your posts and comments to make it easy to transfer from WordPress.com to WordPress.org.
Navigate to “Tools > Export” in your wordpress.com blog, and click on “Export”.
Choose the content that you want to export. Most likely, you’ll want to stick with the default option, “All content,” to export all of your posts, pages, comments, navigation menus and other content.
Click “Download Export File” to download your content to your computer in the form of a single XML file.
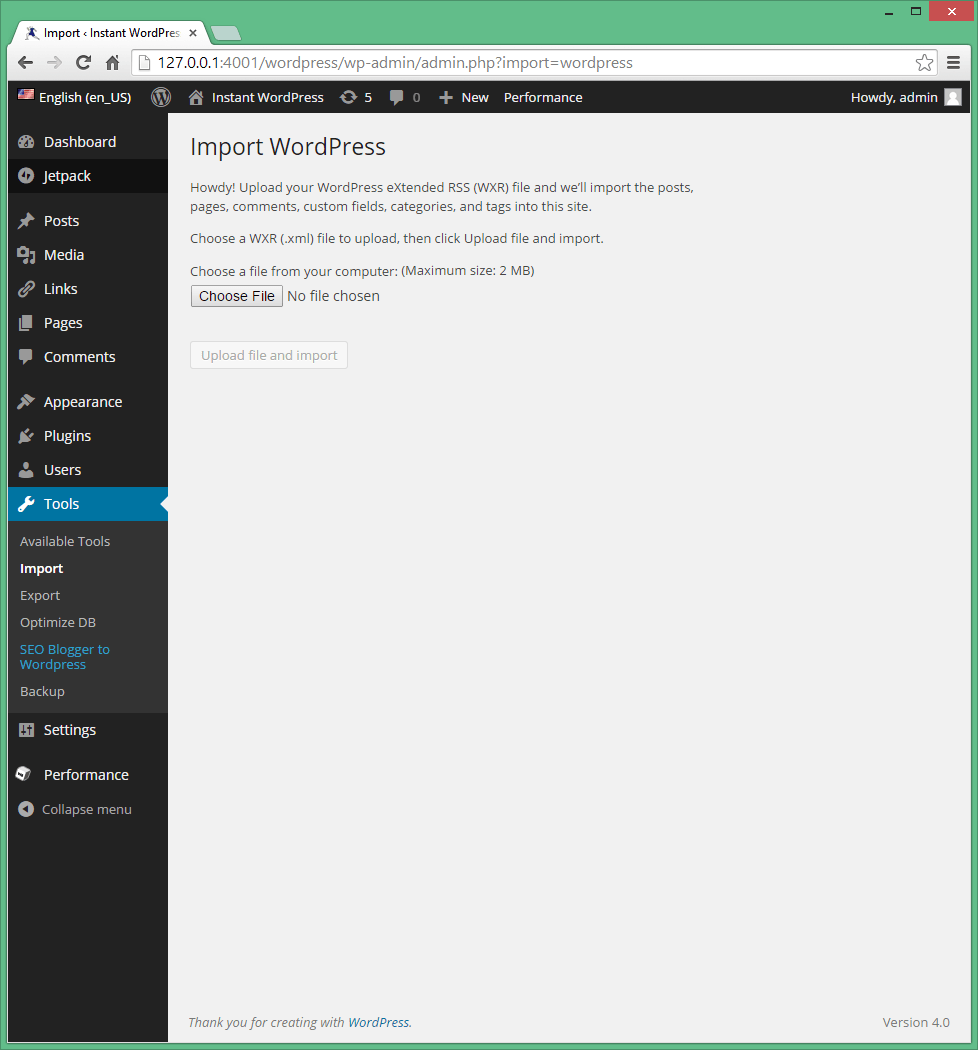
Navigate to “Tools > Import” in your new self-hosted wordpress.org blog, and click the last option “WordPress”.
Click “Choose File” and navigate to the XML file that you downloaded in the previous step. Click “Upload file and import,” and wait for WordPress to transfer your content to the new site. The transfer may take a while depending on your Internet connection and the size of the XML file.
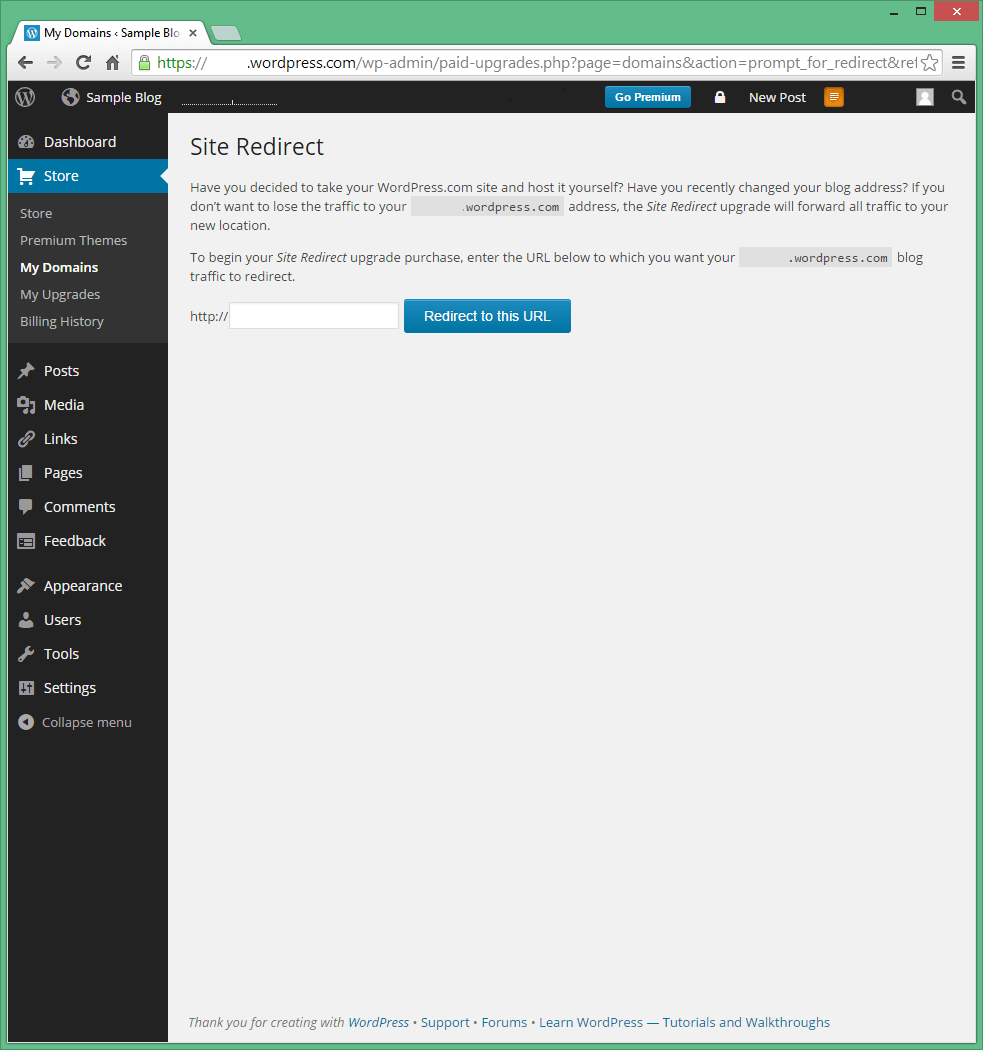
3 – Set up a Redirect
Since your visitors won’t know that you have moved to a self-hosted blog, they’ll still be visiting the old one for a time, so you’ll need to have them automatically redirected to the new domain. The easiest way to do this is to use the Site Redirect service from wordpress.com, which costs $13 per year.
Open the “Store” menu item in your old wordpress.com administrator dashboard and search for “Site Redirect”.
Click “Buy Now,” and click “Buy Now” again to confirm. Enter the address of your self-hosted wordpress.org blog, and click “Redirect to this URL”.
Confirm the purchase, and enter your payment details to complete the process.
With the redirect set up, you will be able to manage your site redirects from the “Store > My Domains” menu item in the wordpress.com administrator dashboard. In order for the redirect to work correctly, the permalinks on your new site will have to match those used on your wordpress.com blog. You can change the redirect at any time you want, and for best results, you’ll probably want to use the service for a year or two until your visitors come to memorize your new domain and it takes precedence in the search results.
One of the benefits of having your own domain for your blog is that you can setup a custom email address with your domain name. So if your domain name is “PatsBlog.com” you can create an address like pat@patsblog.com or info@patsblog.com. This is a professional email address that is great for all bloggers, but especially those looking for a business email address to give to customers.
If you used the process I outline in Step 2 to setup your blog, you can create personalized email addresses for no additional charge. Here’s how to do it:
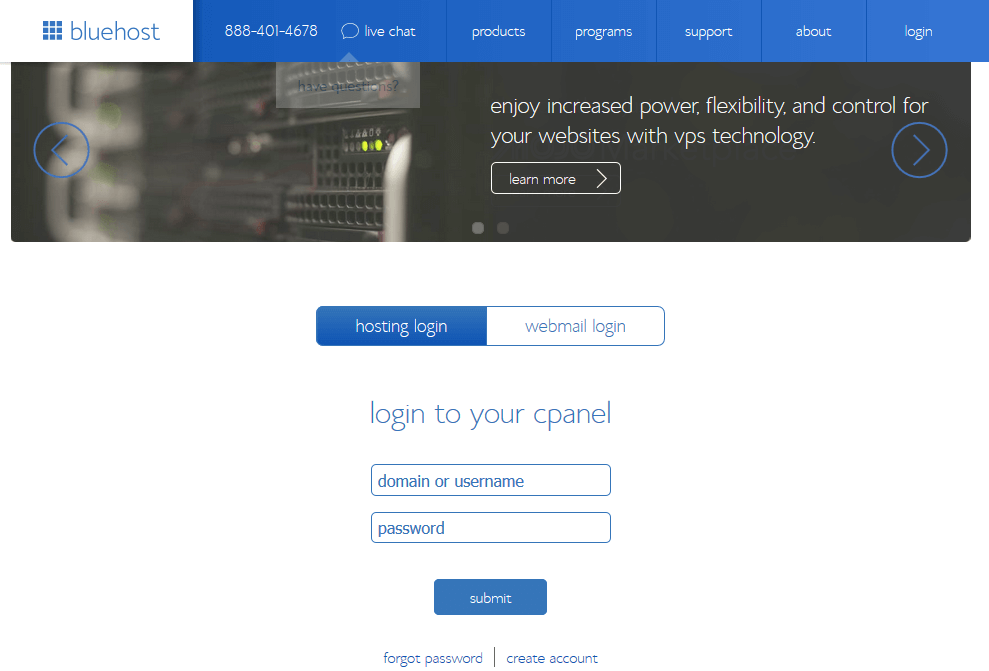
1. Go to the BlueHost homepage and click the “Login” tab on the top right.
2. Enter your details to login to your BlueHost cPanel.
Keep in mind that your password for your BlueHost account may be different than for your WordPress blog.
If you don’t remember your password you can always use the “forgot password” link on this page to reset it.
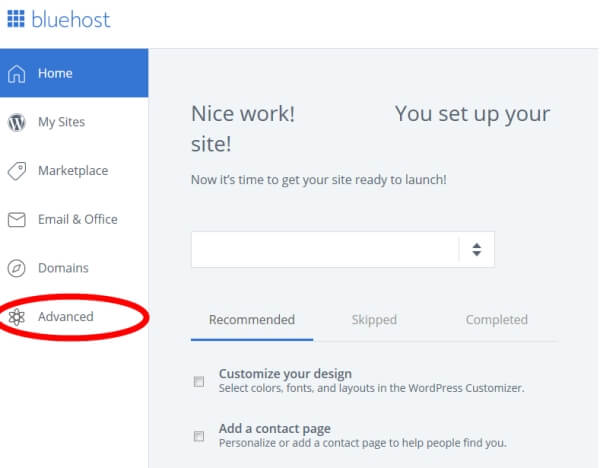
3. Once you are logged-in click the “Advanced” tab in the left sidebar.
4. Scroll down and click “Email Accounts”
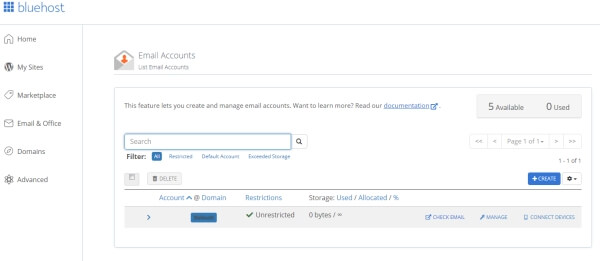
5. Click the blue “+CREATE” button on the right.
6. Enter the details for your new email account and click the “+CREATE” button at the bottom of the page.
100MB storage space is enough to start, and will last you awhile unless you are getting lots of emails with large attachments.
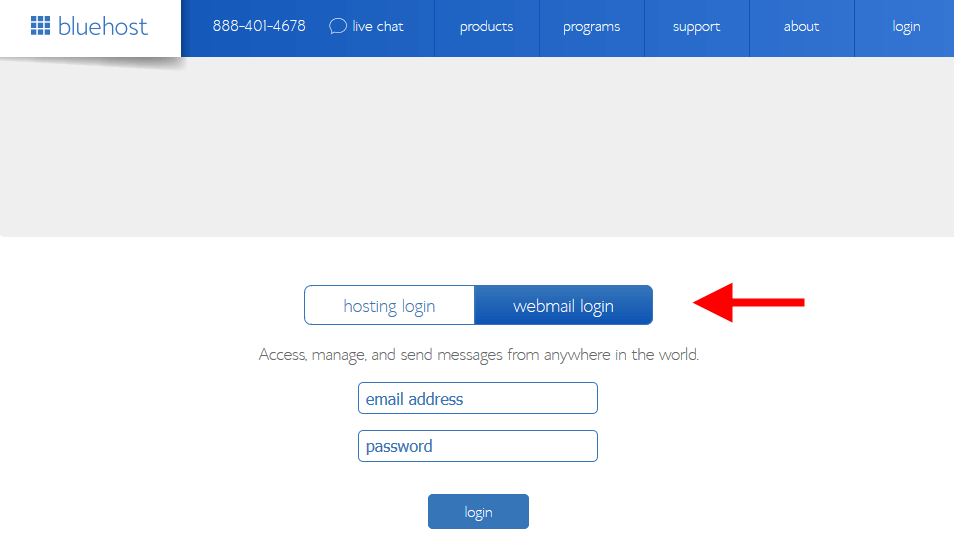
7. Now that your account is created you can login to start using it.
The easiest way to do that is to go back to the BlueHost homepage. Just click the login tab at the top right, and then choose the “webmail login” option.
If you are feeling more technically adventurous, you can also checkout the “forwarding” and “autoresponders” sections in the BlueHost email manager. These are very useful tools that I will go over in a future blog post.