
Google AdSense is the publisher’s component of the world’s most popular pay-per-click (PPC) advertising platform, and as such, it is among the most popular ways to monetize a blog. Its popularity, plus the fact that it is easy to use, is the reason it is my #1 choice for monetizing your first blog (see Step #7 of my blog tutorial).
All you need to do is use the information below to install Adsense on your blog (takes about 10 minutes), and in no time advertisers will be paying you every time one of your blog visitors clicks on an ad!
Once you have had your application approved to use AdSense, you will be provided with a small piece of customizable code for pasting into your website, allowing you to start displaying context-relevant advertisements immediately. In this tutorial, we will explain how to install the AdSense code on your self-hosted WordPress blog. If you don’t have a blog yet, start with Step #1 of my tutorial to create one, and then come back to this article once your blog is setup.
Using AdSense is completely free, but you will need to have a free Google account in order to get started. If you have a Gmail address, you’ll already have one. If not, it only takes a few minutes to sign up. Once you send an AdSense application at google.com/adsense, you should receive a confirmation email, typically within one working day, to confirm that you have passed the review process. Note that you will need to prove to Google that you have a website that follows their terms of use.
1 – Get Your AdSense Code
By creating a new ad unit with AdSense, you will be able to place advertisements on your website immediately. You don’t need to worry about understanding the code either; you can use a simple graphical editor to change the way your ads will look once they’re displayed on your site.
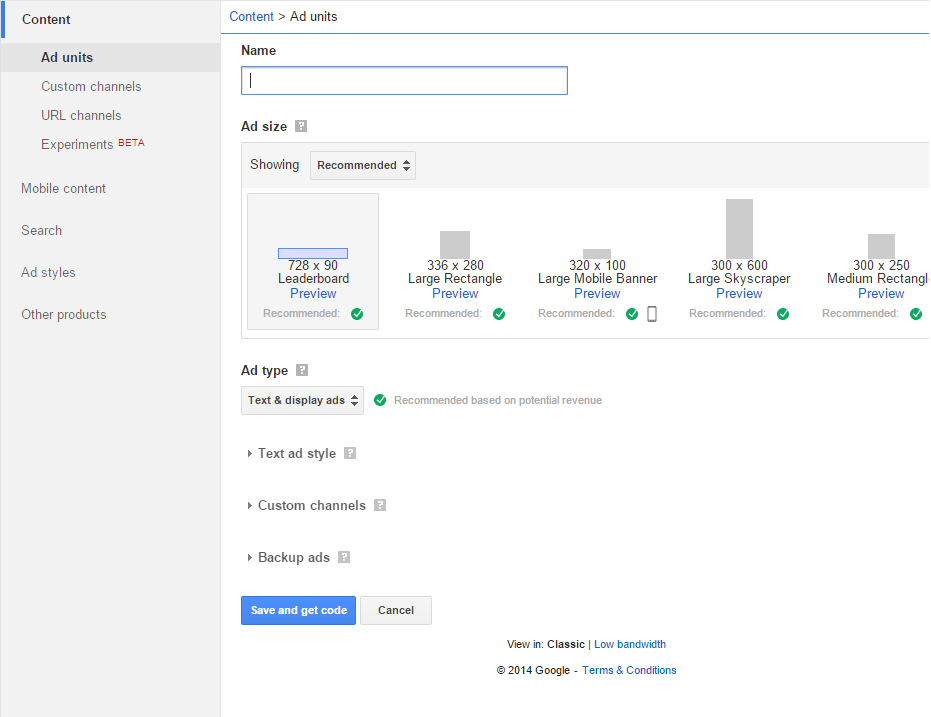
- Log into your Google AdSense account once you have been accepted, and click on the “My ads” menu item at the top of the page. Click the “+ New ad unit” button to continue.
- Enter any name you want for the ad unit, and choose your preferred ad size and layout from among the thumbnail previews. If you plan to display the ads in the sidebar of your WordPress blog, as most people do, you’ll probably want to choose either the “Large Skyscraper” or “Medium Rectangle” option.
- Click on the “Text ad style” button to customize the colour scheme and formatting for your ads.
- Click “Save and get code” once you have finished customizing your ads. Wait for a few moments for the code to appear before selecting it and copying it to the clipboard using the CTRL + C keyboard shortcut.
2 – Install the Code in WordPress
Although you can paste the code in just about any page element of your WordPress blog, by far the most popular option is to place it in a sidebar widget so that your ads appear in the right-hand side of your website beside your posts.
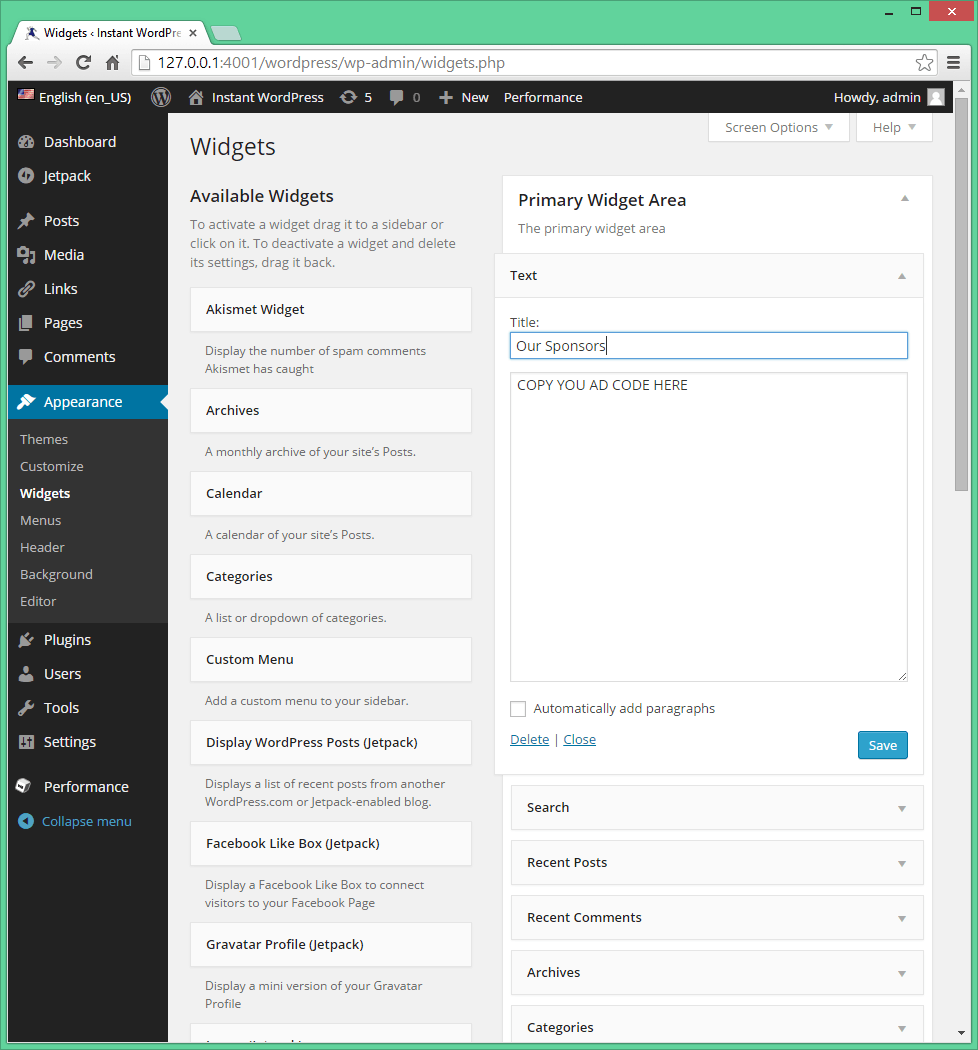
- Navigate to “Appearance > Widgets” in your WordPress administrator dashboard to open the widgets section.
- Scroll down the list of available widgets in the left-side column to find the “Text” widget, and drag it over to the preferred widget area in the right-side column. The number of available widget areas will vary depending on your theme, though most people use the Primary Widget Area to display their ads in the sidebar.
- Click on the activated Text widget and enter a title. Always choose a neutral title, as per Google’s terms of uses; “Our Sponsors” tends to work best. The title should never try to directly encourage people to click on the ads.
- Paste the AdSense code into the text box, and click “Save”. Context-relevant ads, along with the formatting and colour theme you selected previously, will appear immediately on your blog.
Note that you can have multiple instances of the text widget displayed in one or more widget areas of your WordPress site, allowing you to display multiple ads.
Such a great article. I will be signing up for AdSense today.
Hi Mr. Scott. I started my own blog 2 days ago, thanks to your help. I did encountered a few hiccups however, I do really appreciate the customer service of blue host. They helped me through it and I just has my first post. I’m again reading steps 5 & 6 (promoting my blog and making money out of it)! Again thank you very much. God Bless you
I have learned a lot from you site, and continue too, thanks Scott!
Do you offer a live chat or phone line assistance?
Hi Jane,
I don’t offer phone or chat support, but feel free to contact me here: https://www.theblogstarter.com/contact-me/
Very detailed and easy to use instructions. I am looking forward to getting started. Your information is a great resource!
Thanks for the tutorial… It was very helpful.
Thank you Scott. For long I have been wondering how to do blogging and earn money out of it. With your article it looks so easy.
Hi Scott,
Thank you for the information. But I am afraid to say that Google Adsense no longer supports free version of WordPress which is wordpress.com. I think now you need to pay hefty amount of 90 dollars to go to WordPress premium which has lots of critics.
What would be your advice? Since I saw that you updated your main post on May 2018 but did not explain in the part how to make money.
Many thanks in advance.
Hi Matthew,
I don’t recommend using WordPress.com, as WordPress.org is a much better choice and will allow you to use Google AdSense. You can see how to set up a WordPress.org in my main tutorial on the homepage of this site.
My blog is yet under process. I have read about Adsense and it is easy to follow. Thanks so much.
hi I already have Google Adsense account approved for my youtube channel.The channel was shut down but account is still operatioanl .account is showing open account after months.can I use this google Adsense account for my blog……….
Yes, you should be able to use that account.
Thanks Scott. I love your articles; they are to the point with lots of simple explanations.
Hi I was finally accepted into having an Adsense account but now its asking to connect my site to Adsense and its asking me to copy a code into my wordpress HTML. I have a problem. I dont know where that wordpress HTML is so I dont know how to link my site to Adsense. Please help! Thanks for your very useful tutorials from where I created my blog.
Hi Gabriela,
Step #2 in the guide above shows you how to copy and paste the AdSense code into a text widget, which will connect your blog with AdSense.
I went to Google AdSense and signed in and things are a bit different than your instructions. But, I got the code and inserted it in Widgets and then I got a response from Google AdSense that says:
We’re reviewing your site.
Reviewing your site will take up to 3 days. We’ll email you when we’re done.
So I guess now I wait.
I got the same message as Vanessa a week ago. When I check my Adsense account “my ads” is blurred out, I’m unable to access it. Any guidance would be appreciated as to what I should do from here.
Hi Brenda,
Sometimes it can take them awhile to get approved. Just keep adding blog posts and make sure your blog design looks good to avoid any issues getting approved.
Excellent as usual,Perfect guidance.
Thank you. The article is really nice. It is very easy to understand and follow. I took a course on WordPress overview in a community college, but yours has given a clear overview/picture of what a blog/website is. In fact I liked the ‘Adsense’ portion of the article relating to monetization of the blog.
fantastic explanation. Thanks for this. great simple step by step process for a beginner.
I appreciate your work.
Thank you! I now have a blog set-up, and I have made my first post. I flipped between your tab and the ones you sent your readers to read. I actually did go step-by-step through your directions. I really appreciate your help.
Nice and straightforward. Thank you
Very nice n thank you
I have to thank you for helping me create and get my blog started. It’s still in it’s very early stages and I am excited to see where this takes me. I already have a store but a blog just intimidated me. Thank you again for all your advice.
Scott, you are amazing! Thank you!
Thank you for your help. Your site is really excellent for newbies like me.
Thanks!!! For sharing your knowledge and experience about blog-creation.
On point. Thanks
just excellent..
Amazingly worded Scott Chow… Answered more than all the questions that I had in mind about starting a blog… Great information… Thank you…
very useful in formations about blogging.Thanks a lot of for being so kind & generous.
This is all helpful, putting me right on a fast lane to starting my blog. Thanks.
Dude thanks. Nice and awesome
Thank you very much for the valued information and the way you show us step for step.
Thank you very much for the detail explanation.
Thank you for sharing your knowledge. you are awesome!
Your explanations was just too awesome!
Thanks you for the info and help
Love how everything is laid out perfectly. Thank you .