Registering a domain name is a simple task that should be done prior to building your website, but it does require a bit of thought. Your domain name should accurately reflect the name of your business rather than using a keyphrase and it shouldn’t involve another company’s trademarked term or name. Other than that, it’s a simple process!
Step One: Search for a Domain Name
Head on over to Domain.com, one of the largest domain registrars on the web. Directly on the home page and above the fold, you’ll find a search bar.
The background image will change regularly, but as long as you follow the link above, you’re at the right place!
Put your company name in the search bar without spaces and without modifiers such as LLC and press the search icon on the right to see what you come up with.
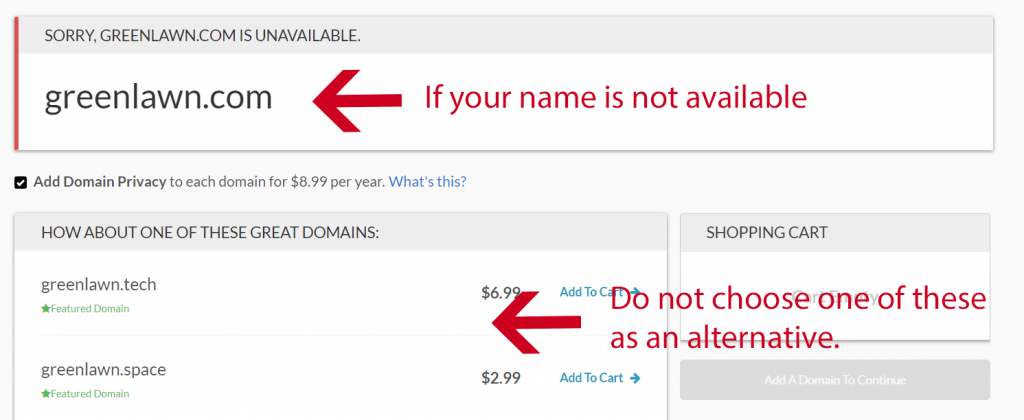
Many common terms and phrases have already been taken, so chances are that the URL you’re looking for might not be available. For example, if you have a small, local landscaping business called Green Lawn, you’ll find that it’s not available with the traditional .com extension, and you might be tempted to go for the same name with a different extension. Don’t do it.
The person/business who owns that domain name in the .com version may have a trademark, and any use of the other versions could land in a lawsuit.
So what do you do? You look for variations! Try hyphens in lieu of spaces and also try using your town or region. It’s easy to find a domain name that will work for your business. Simply adding NH (New Hampshire) to the end of GreenLawn yields an available domain name.

Step Two: Make the Purchase
You can register your domain for one year or more and also add privacy protection. Privacy protection keeps your ownership information private from the general public. This information consists of a name, business contact, address, and email. A benefit is spam protection, but the choice is entirely up to you and not necessary.
Pro Tip: Google and other search engines lend more “Trust Rank” to sites that have longer registrations. A domain that has been registered for five years will be given a small boost in eventual rankings over a site with a domain name that has been only registered for a year.
What about the other extensions like .net? You don’t need them at the moment. Once you build your web presence, and if it gives you peace of mind, you can buy other versions of your site such as .net and point them to your website.
Once you’ve selected your domain, privacy options, and the number of years for registration, march on to check out.
Do I need G Suite email? Domain.com will ask if you would like email through G Suite. If you have hosting already set up (where you build your website) with another company, such as BlueHost, you don’t need to set up email through G Suite. Hosting accounts will often provide you with 5-10 free email accounts. This is up to you.
Pro Tip: G Suite email is easy to use, doesn’t involve complicated MX configurations because Domain.com will do them for you, and is something the layman can set up on his/her own.
Step Three: Keep records
Your domain will eventually come up for re-registration. Make sure to use an email upon checkout that you will always check. It is common for websites to go “down” because domain registration had lapsed. Reminder emails went to email boxes that were no longer checked and the contact information was no longer valid. This has happened to large and small companies alike. Make sure to keep a record of the email address you used to sign up with Domain.com as well as the password used, and any other pertinent information.
Step Four: Point Your Domain
Registering your domain gives you the rights to that name, but it doesn’t get you a website. To get a website online you will need to pair your domain name with web hosting.
I personally recommend using BlueHost. They offer a free domain name when you purchase hosting, so you get everything you need to get your website up and running for $2.75 per month.
For a step-by-step tutorial on creating a website check out my complete guide here.
If you have hosting set up somewhere else, you will need to enter your hosting account and find your nameservers. There should be two or three nameservers used. Find and record this information. Back at Domain.com, you will need to enable the DNS service on your new domain, and then click to edit nameservers. Add your new nameserver names, and that’s it! Your domain is now pointed to your hosting provider which often takes 24 hours to propogate. You will need to add that domain into your hosting account as an add-on domain.
Questions? Let me know in the comments below…