If you have your domain registered with GoDaddy and a hosting account with BlueHost, you do not need to transfer domain ownership to Bluehost. In fact, it’s highly advisable that you keep your domains and hosting accounts separate in order to minimize loss in the event of account corruption or disruption.
To use your GoDaddy domain and build on a BlueHost hosting account, you must change the nameservers of your domain to point to your Bluehost account.
Step One: Copy and paste the BlueHost nameserver details
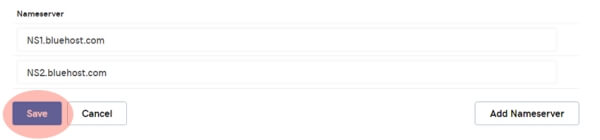
Take note of the Bluehost nameservers. They are:
NS1.bluehost.com
NS2.bluehost.com
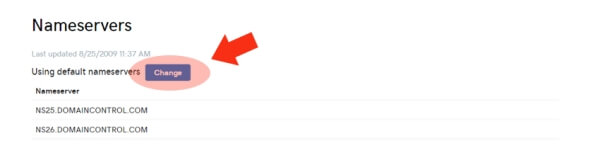
Step Two: Change the nameservers on GoDaddy
Log into your GoDaddy account and go to your products page. Under the Domains heading, select “DNS” next to the domain you want to point to BlueHost.

Scroll down to the Nameservers heading and click “Change”.
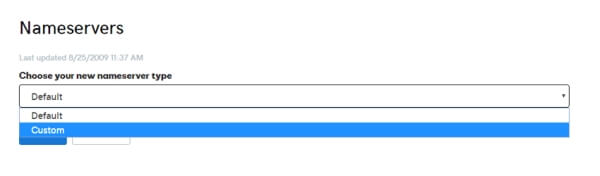
You will be given the option to choose your Nameserver type. Default is the option set for hosting on GoDaddy. To change your nameserver destination, you’ll need to select “Custom”.
Enter the nameservers for Bluehost, copied from above, and then click “Save”.
Step Three: Make sure the domain is entered in your BlueHost account
**Note** It usually takes a full 24 hours for nameserver DNS propagation from the GoDaddy servers. Therefore, you might not be able to work with your new site under your domain for a full day.
Option One: If you set your up Bluehost account with the domain name in question, you won’t need to add it again. Build your site, if you haven’t already, within the /public_html file.
Option Two: If this domain is new to your BlueHost account, you will need to add the domain as an “Addon” domain.
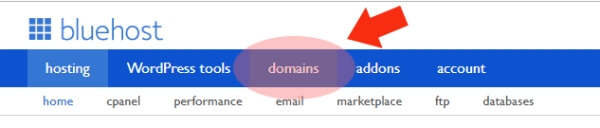
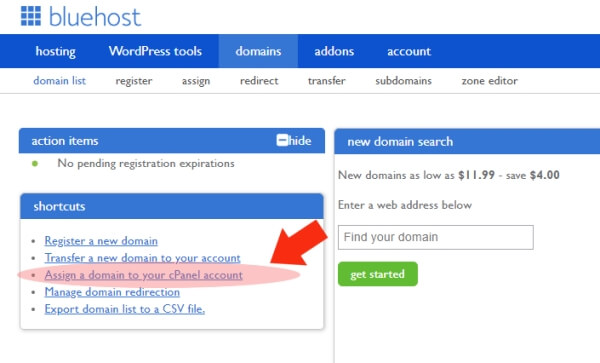
Navigate to “Domains” in your BlueHost account.
Next, select “Assign a domain to your cPanel account”.
Enter the domain that is not already associated with the account. Do not use the http:// or www headers.
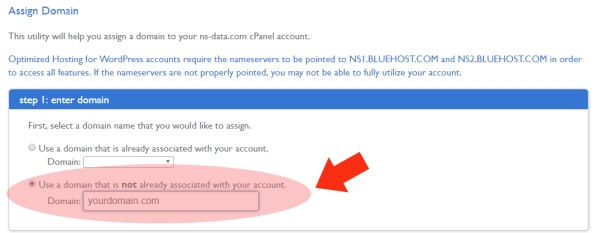
BlueHost will analyze the domain and verify ownership by checking to see if the nameservers on GoDaddy have been properly set to the above BlueHost nameservers. Since you have done this already, verification will be complete.
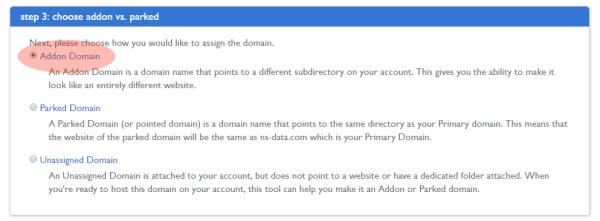
Under Step 3, make sure “Addon Domain” is selected.
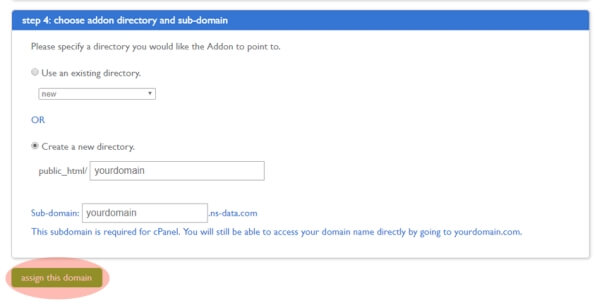
Step 4 will ask you to choose your Addon and subdomain directories. It will automatically assign and create a directory based on the name of the domain you entered. As long as you are okay with this creation, click “Assign this Domain”. Otherwise, you can enter a different folder name.
You are done! It’s a good practice to wait a full day before beginning your build or working with the website after a nameserver change. This is only due to the delay in full nameserver change propagation which is typically completed in 24 hours.
Thank you so much! I bought a domain on a GoDaddy auction and thought I needed to either wait 2 months to transfer it to bluehost or pay to host on GoDaddy when I already have a multi-site Bluehost account!
You saved me quite the headache!
Thanks for this blog. It really help me get things started in blue host. Your instructions were clear and concise.