When the internet was experiencing its first big boom back in the 1990s, building a website required serious technical knowledge. At a minimum, you needed to be fluent in programming languages such as HTML, CSS and Javascript just to build a simple website. These days, almost anyone can create a beautiful and fully functional website with little or no technical knowledge using a content management system (CMS).
A great CMS choice for both first-timers and experienced web developers is Joomla, an award winning open-source CMS that has been in development since 2005. It currently powers over 2 million websites in 68 different languages, and is managed by a team of more than 1000 dedicated volunteers. Joomla is a stable and secure platform that is so easy to set up even the most inexperienced users can have a fully functional website up and running in less than an hour. Joomla comes with more than 10 thousand free templates and extensions, so whether you’re looking to build a personal blog, a company website or an e-commerce store, it’s easy to create a website tailored specifically for your needs.
This guide will provide you with simple instructions for setting up your own Joomla website. It will show you how to install Joomla on a hosted web server, how to create a blog, how to make your first blog post, and how to customize your site using templates and extensions.
Getting Started
Before you install Joomla, you’ll need two things – an address for your site (a domain name) and somewhere to install the Joomla files (a web hosting service).
If you already have a domain name and hosting service, feel free to skip straight to step 4.
Choosing A Domain Name
Choosing an appropriate domain name is an important step in creating your Joomla website. If you’re just creating a blog to share with friends and family, your choice of domain name doesn’t matter so much. However, if you’re planning to create a site for your business or are hoping to attract visitors through a search engine, it’s important to choose a domain name that reflects your brand, has the right keywords, and is easy for people to remember.
Here are some tips for choosing a great domain name:
- Keep it as short and simple as possible. Longer domain names are usually harder to remember. Long domain names also increase the risk of misspellings and mistyping.
- Avoid words with multiple spellings as they can confuse your visitors. For example, if you’re creating a blog about socks, topwoolsocks.com is a much better choice than topwoolsox.com.
- Try to include keywords in the domain name to help improve search ranking and make it easier for visitors to find your site. For example, if you’re creating a blog for your car washing business, try to include the phrase “car washing” as well as the location of your business (eg. atlantacarwashing.com).
- If possible, choose a .com top level domain (TLD) extension. You might be tempted to choose one of the new TLD extensions such as .club, .tips or .online, but these extensions will often make it harder for visitors to find your site. Most people are so used to .com extensions that they’ll type .com without thinking.
Before registering a domain name, you need to make sure it’s available. There are a number of domain name search engines that show you available domain names, available extensions, the cost of registering the domain, and suggestions for similar domain names if the one you want is already taken. A popular domain name search engine can be found at Name Fresh.
Once you’ve found a great domain name, you’ll need to register that name with a registrar. Registering a domain name is like renting a house – you’ll never actually own the domain, but as long as you keep paying the yearly registration fee you can keep using the name indefinitely.
Many web hosting companies offer domain name registration as part of their service. Registering a domain name with your web hosting company is usually the easiest option as the domain should be automatically configured for use with your site.
Finding A Web Hosting Service
Every website on the internet is simply a collection of code stored on a server somewhere in the world. When you visit a website using a browser, you’re actually connecting to that server to read and interact with the code stored there.
To create your own Joomla website, you’re going to need a place to store your code, and that’s where a web hosting service comes in. There are hundreds of web hosting companies offering similar services including shared hosting, VPS hosting, dedicated servers, unlimited disk space, unlimited email addresses, free domain names for the first year, and easy setup. Hosting fees usually start at just a couple of dollars per month for the cheapest plan, which should be more than adequate for the average user.
Here are a few tips for choosing a web hosting service:
- Look for a company that offers 24/7 dedicated customer support. If your site suddenly goes down, you want to be able to get it back up and running as quickly as possible. It’s a good idea to check customer reviews and feedback to make sure their support performs as advertised.
- Choose a company that guarantees at least 99.9% uptime. If you’re running a web based business, every second your site is down could lead to lost revenue.
- Check that the company has an easy to use control panel with an Auto Script Installer such as Softaculous, Installatron or Fantastico. As you will see below, it’s not impossible to install software without an auto installer, but it definitely makes it much easier.
If you’re not ready to pay for web hosting, Joomla offers a free, slightly modified version of the CMS at the joomla.com website. They will host your site for free and give you a free subdomain. Users are limited to a small selection of extensions and themes, and have limited mailing functionality. This free service is a good starting point for beginners wanting a simple, personal site.
Installing Joomla
There are two main ways to install Joomla – one-click installation using an auto script installer, or downloading the Joomla source files and installing them manually.
If you have an account with one of the major web hosting services, you should have the option to automatically install Joomla. This is the option we recommend as it makes installation much easier.
If you don’t have this option, don’t worry – we’ll show you step-by-step instructions for manual installation.
NOTE: The screenshots you see here may be slightly different from yours depending on which web hosting service you use, but the installation process should be almost identical.
One-Click Installation
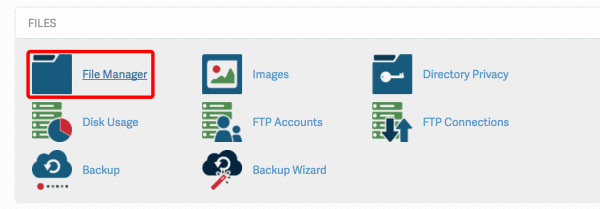
The first thing you need to do is log into the control panel for your web host. Your hosting company should be able to provide you with the address, your username and your password.
For this example, the web host is using the popular cPanel control panel.
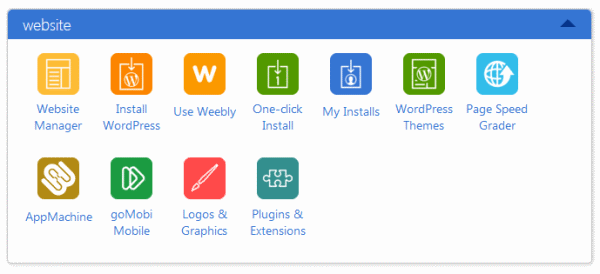
Once you’ve logged into cPanel, scroll down to find your software installer. This web host is using the Softaculous installer. Click on the installer.
You can use the search bar to find the Joomla software, or you can look for it under the CMS
menu. Once you’ve found Joomla, click the “Install” button.
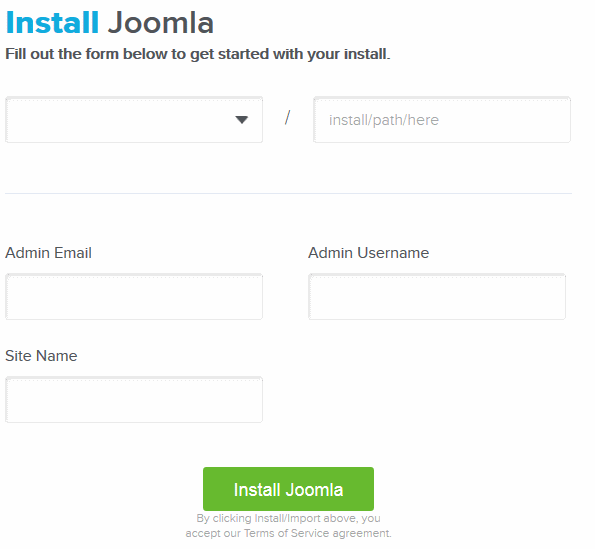
Choose the domain you want to use for the Joomla installation. If you can’t find your domain, you’ll have to contact your web hosting company for help.
Scroll down and enter the name and description of your Joomla site, then choose an admin username and password. It’s a good idea to pick something other than “admin”, as this can be easily guessed by hackers. Make sure you keep a copy of your username and password.
You can change the email and language settings if you’d like. Once you’re finished, click the “Install” button.
If everything goes as planned, the software should report a successful installation. It will also show your Joomla site’s address and the administrative URL for making changes to your site.
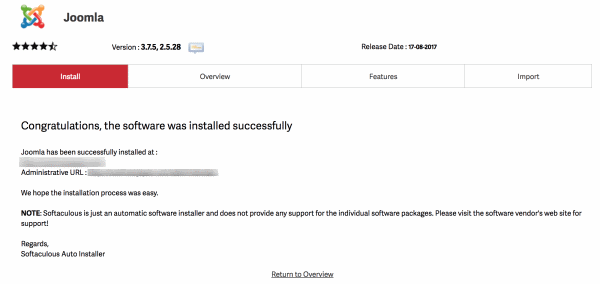
That’s it! Simple, wasn’t it?
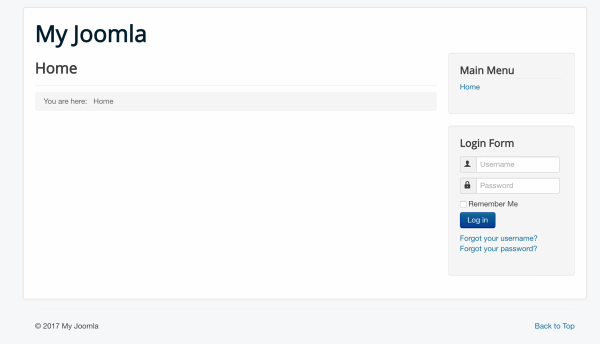
If you click the site link, it should take you to your brand new Joomla site.
Manual Installation
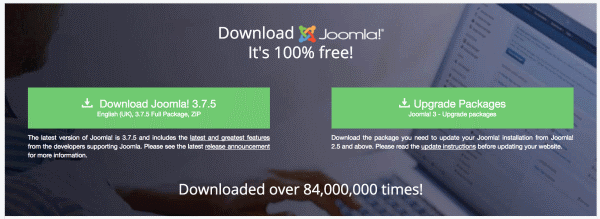
To manually install the Joomla software, you’ll need to head to the joomla.org website (not joomla.com) and click the “Download Joomla” link to download the installation package. Although there are many third-party sites that allow you to download Joomla software, you can never be sure that these copies are safe. It’s always a good idea to download the latest version from the official site.

Click the “Download Joomla!” link to download a .zip file containing the latest version of the software.
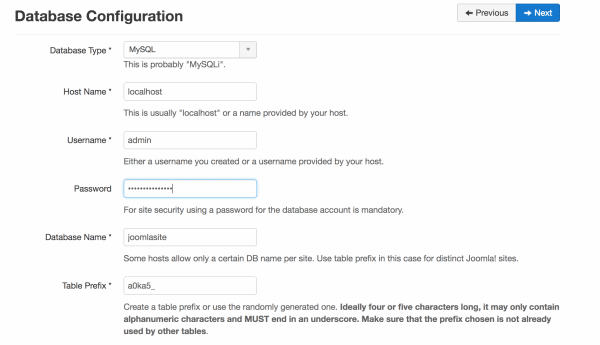
Next, you’ll need to create a database. Databases are like a set of tables that store all your site’s information.
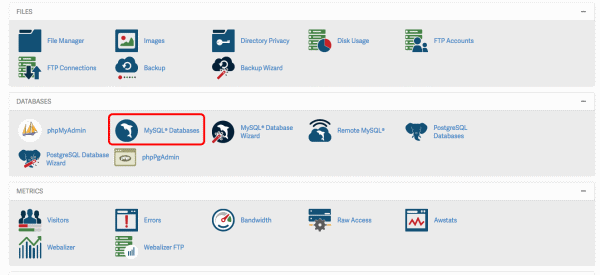
Log into your control panel (using the steps listed above in the One-Click Installation guide) and look for a section called “Databases”.
For this Joomla installation, we’re going to create a MySQL database, so click on the “MySQL Databases” icon.
Scroll down to the Create New Database section, enter the name of your database (it can be anything, but it’s probably a good idea to call it “joomlasite” or something similar), and click “Create Database”.
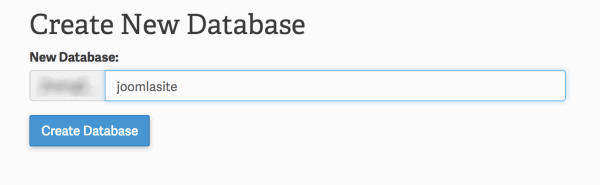
You should see a green checkmark and confirmation that your database has been created.
Next, we need to create a user, so click “Go Back”, scroll down to Add New Users, add a username and password, and click “Create User”.
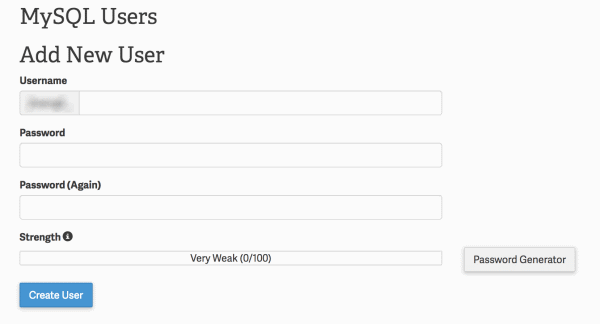
You should see a green checkmark and confirmation that your user has been created.
The last thing we need to do is add the user to the database, so click “Go Back”, scroll down to Add User To Database, select the user and database, and click “Add”.
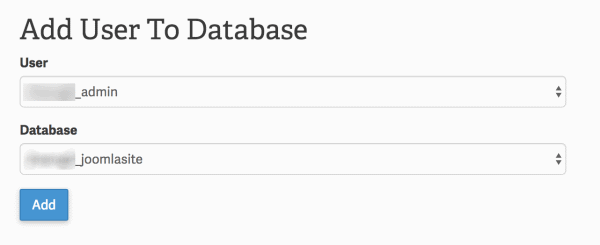
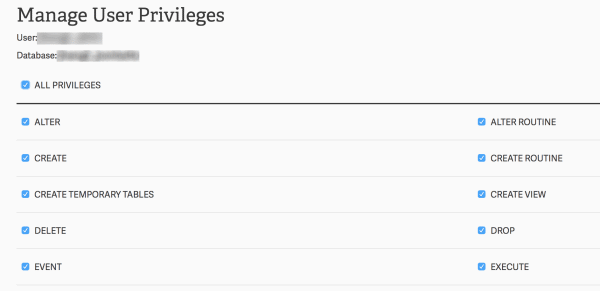
This user will be responsible for the database, so you can give them “All Privileges” and save the changes.
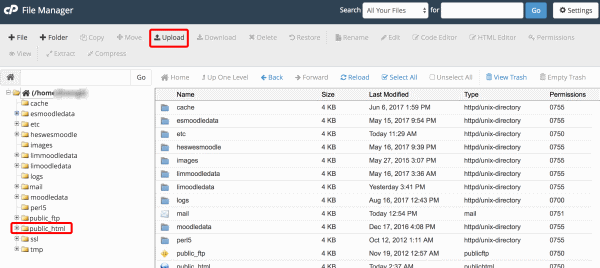
Next, we need to upload the Joomla .zip file into the root folder of your site. This is typically named “public_html” but depends on what your host has set up on the server. If you’re unsure about which folder to upload the file into, it’s a good idea to ask your hosting service.
To transfer the files, you’ll need to use an FTP client or you can use the file manager included in your control panel.
For this example, we’ll take the easier option and use the File Manager. Go to your main control panel page and click on the File Manager icon.
Locate your root folder in the file tree on the left, click “Upload”, select the Joomla installation .zip, and upload the file.
Go back to the file manager, right click on the .zip file you just uploaded, and click “Extract”.

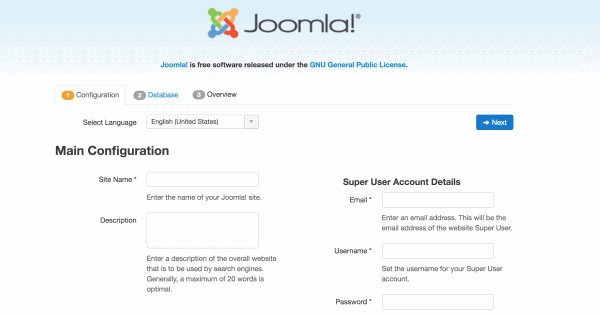
Once all the files have been extracted, open a browser window and enter the address of your site. You should see a Joomla installation page. Enter your site name and user details and click “Next”.
On the Database page, enter all the details from the database you created earlier and click “Next”.
You can check the installation details for your site then click “Install”.
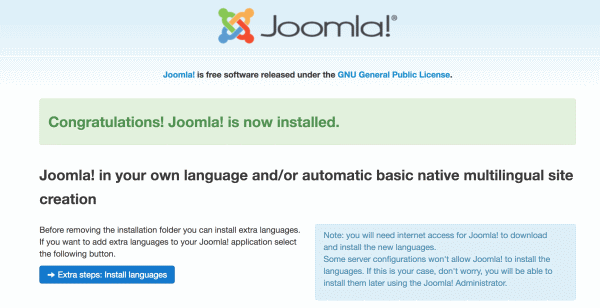
You should get a green confirmation message saying the installation was successful.
Create Your First Joomla Post
Your site probably looks pretty boring at the moment, so let’s start by adding a new post. Posts in Joomla are usually called Articles, and they will make up the majority of your Joomla site. Articles can be categorized by properties such as time and date, meaning it’s easy to keep all your posts organized.
Most of the development of your site will be done using the Administrator’s Control Panel.
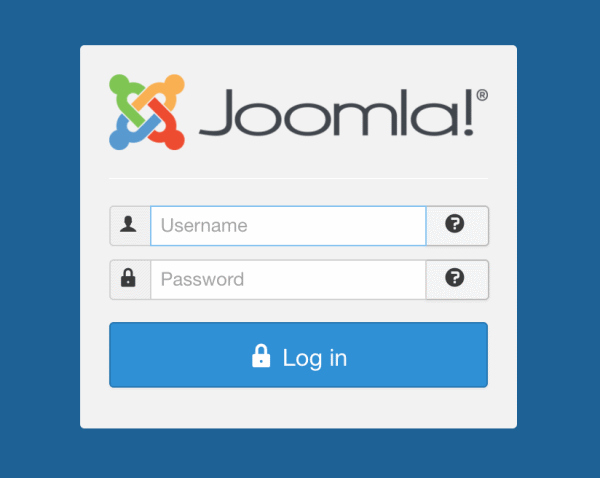
You can go to the Joomla Administrator’s Control Panel by adding /administrator to your site’s address. For example, if your site is cooljoomlastuff.com, your Control Panel can be found at cooljoomlastuff.com/administrator . To access the Control Panel, you’ll need to enter your admin username and password.
The Control Panel lets you do a variety of things such as create new posts, add users, read messages, change your site design, and add themes and extensions.
You can access all the features from the top menu, or you can access some of the most useful features from the menu in the left sidebar.
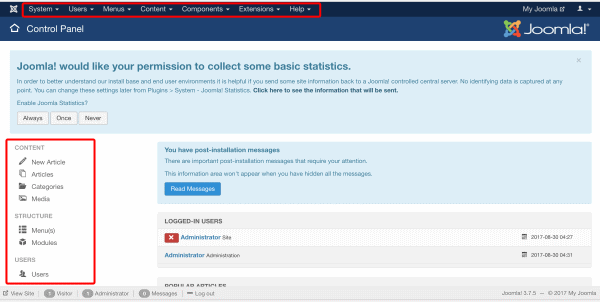
To create a new post, click on “New Article” under the Content menu in the sidebar.
You should see a text editor that looks just like an old version of Microsoft Office. It functions just like any other word processing software – you can change fonts and font sizes, make text bold, adjust alignment, add media and tables, and even print the document.
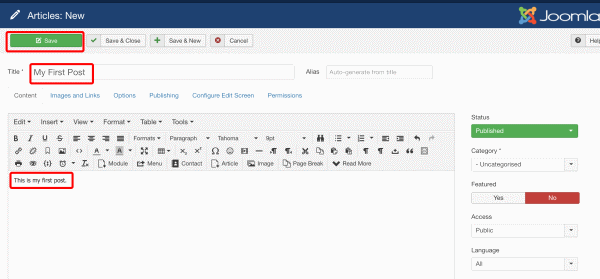
To begin with, enter a name for your post and add some text to the post field. When you’ve finished, click the green “Save” button.
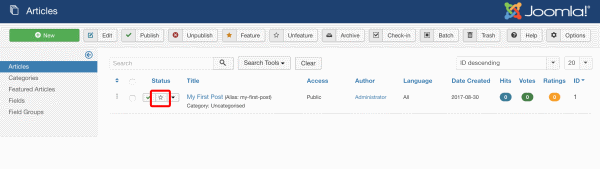
If you click the “Close” button, you’ll be taken back to the Articles page. From here you can see all your articles and their current status (whether or not they have been published).
At the moment, the homepage of our site is only configured to show Featured Articles, so let’s make this article Featured by clicking on the yellow star next to the article title.
If you click on the “My Joomla” link in the top right hand corner of the page, a new window will open with a preview of your site. You should be able to see your first article, ready for the world to read.

Create A Category For Your Post
The next thing you’ll need to do is assign your article to a specific category. Categories are how you keep all your posts organized. You can create categories based on the type of article, the topic or theme of the article, or any other factor you’d like. Categories are hierarchical, which means you can have categories within categories. You can also define category wide settings so they will automatically apply to any article in that category.
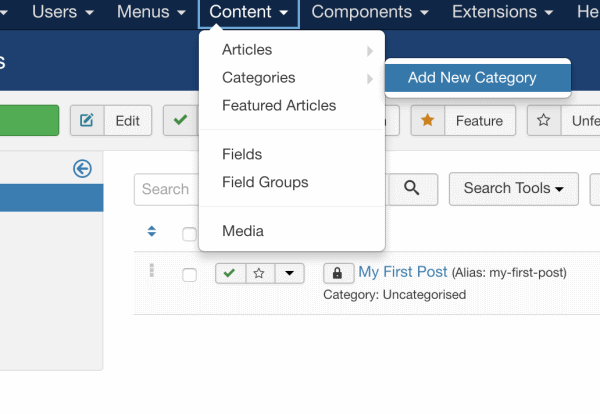
To create a new category, go to the top menu bar, highlight Content, Categories and click “Add New Category”.
Add a title and description for the new category. In the sidebar, you can specify a parent category (a category to which this category will belong).

Click “Save”.
To add your first article to this category, navigate to the articles menu and click on your article. In the right sidebar, you can select the category from the drop down Category menu. Don’t forget to click “Save” before exiting.
Create A New Page
The difference between posts and pages can be a little difficult to understand at first.
In general, posts are dated content entries that you can add to your site. Posts are designed to be time related – as you add new posts, older posts are shuffled down the order. Posts are good for regularly adding new information to your site, and are often used to encourage conversation.
Pages form the structure of your site. Take a look at any website and you’ll see it’s made up of one or more pages. For example, a business website might have a “Home” page, an “About” page, an “FAQ” page and a “Products” page. Pages are usually static, meaning once you have a good structure in place, you probably won’t need to add pages often.
The most important thing to remember about pages is that once you’ve made one, you need to link it to your site for it to be visible. This is usually done by putting a link in the menu bar.
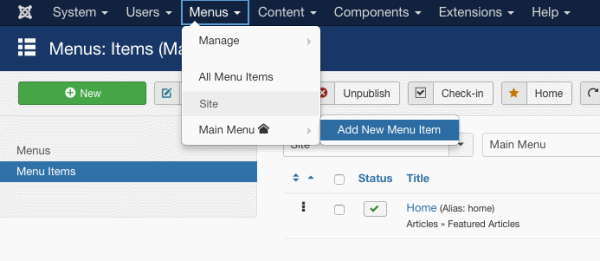
To create a new Joomla page, go to the top menu and highlight “Menus”, “Main Menu” and click on “Add New Menu Item”. This will create a new page in your Main Menu.
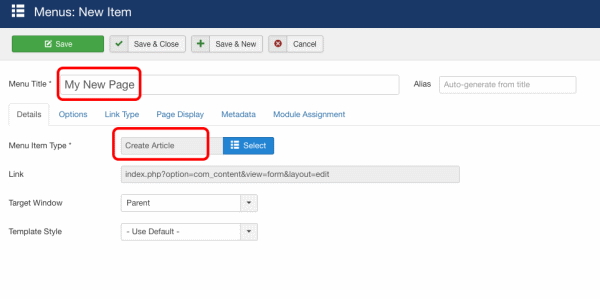
Add a title for your new page in the Menu Title box (we’ll call this one “My New Page”), select a Menu Item Type (for this example we’ll use a Create Article type, which makes a page to help create articles), and click Save. You can learn more about the different kind of menu item types by reading the Joomla Documentation.
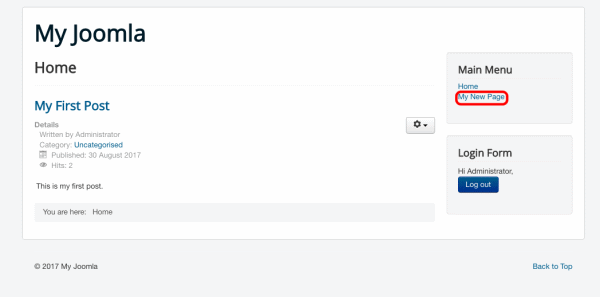
You should now be able to see your new page by viewing your site with My Joomla and clicking on “My New Page” in the menu sidebar.
Install A Theme
The standard Joomla site looks very basic, so it’s a good idea to install a theme. In Joomla, themes are usually called Templates.
Templates make it easy to change the style and design of your site. You can choose from a variety of free and paid templates that offer unique options for your page layout, colors, typography, modules and plugins.
It’s a good idea to look for a template that is responsive (it automatically changes the layout of your site depending on what kind of device is being used for browsing), is regularly updated, and has good support.
You don’t need to limit yourself to just one template. You can download as many templates as you like and switch between them until you find one that suits your style.
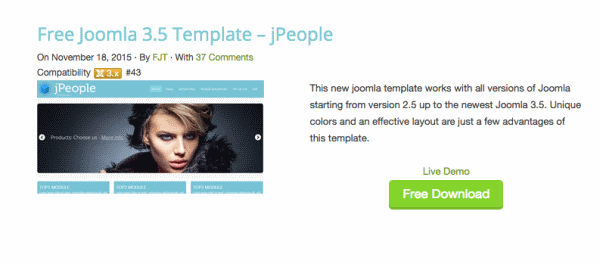
To find a template, you can Google “Joomla templates”, find one you like, and download the template .zip file. Make sure it’s compatible with your version of Joomla. For this example, we’ll use a free template called jPeople.
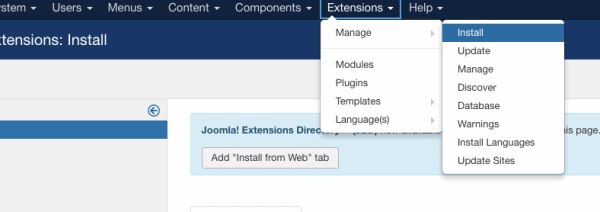
To install the template, go to the menu bar and highlight “Extensions”, “Manage” and click “Install”.
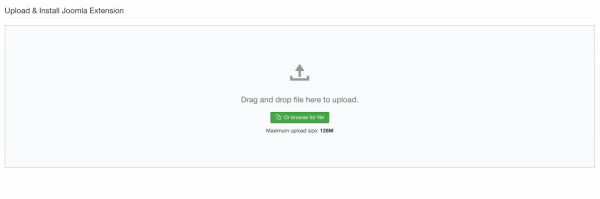
You can drop the .zip file in the drag and drop area and it will automatically install.
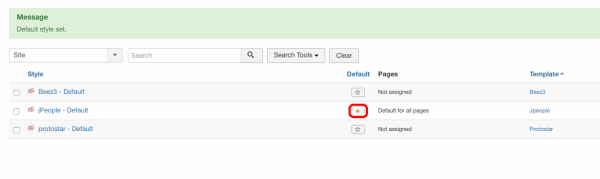
When the template has successfully installed, click on “Go to the Template Manager” and click on the star to make your new template the default template.
If you click on “My Joomla”, you should find that your site looks very different. The colors have changed, the top header is different, and there is a picture slider.

If you want to start customizing your template, click the template name on the “Template: Styles” page. You should see lots of options such as adding a logo, adding social media links and changing the slide images.
Add Some Extensions
Extensions allow you to easily increase the functionality of your site. If you visit extensions.joomla.org, you’ll see there are all kinds of extensions for just about any task you can imagine.
Some popular extensions:
- Akeeba Backup, which lets you create a site backup, and makes it easy to restore sites, migrate sites, or even deploy sites to a client’s computer.
- Google Maps Plugin, which lets you quickly embed maps on your site.
- JEvents, which adds calendar and events management functionality to your site.
- FaLang, which makes it easy for you to offer multiple language versions of your site.
Adding extensions to your Joomla site is simple. The process is the same as adding a new template. All you have to do is download the .zip file and upload to your site it on the “Extensions – Manage” page.
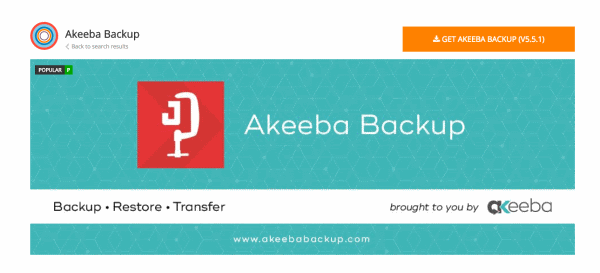
For this example, we’ll install the Akeeba Backup extension. Visit the Akeeba Backup page, click on the “Get Akeeba Backup” link and download the core version for Joomla.
Go back to your Joomla admin panel, go to the menu bar and highlight “Extensions”, “Manage” and click “Install”. Drop the .zip file into the drag and drop area, just like you did with the template.
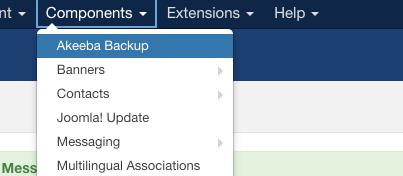
When the extension has been installed, you can manage it by going to the top menu, highlighting “Components” and clicking “Akeeba Backup”.
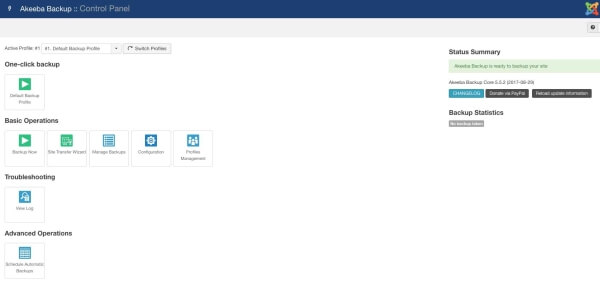
From here, you can use the extension to backup your site, manage backups, or even schedule automatic backups.
Final Thoughts
If you’ve followed this guide from start to finish you should have a basic Joomla site ready to use. You should be able to add posts, add pages, manage menus, change your template and add extensions.
It’s important to remember that all this is just the tip of the iceberg. Joomla is both customizable and incredibly powerful. To really get the best out of your Joomla site, your going to have to start exploring all the other functionality Joomla has to offer.
A great place to start is the Joomla Documentation, which has a number of easy to follow tutorials.
Good luck!