How to Transfer Your WordPress.org Blog to a New Domain

This guide will show you how to move your self-hosted WordPress blog to a new domain. If you are looking to move your WordPress.com blog to a self-hosted installation use this guide instead.

Moving your self-hosted WordPress.org blog to a different domain needn’t be a complicated or particularly time-consuming task, but there are some important considerations to take into account before you start. Most importantly, the process of changing over to a new domain will have a significant effect on your standings in the search engines, since it will take time for them to adjust to the change. As a result, you will inevitably see a drop in traffic during the first few weeks. In this article, we’ll take a look at the steps required to move your WordPress blog to a new domain, keeping SEO intact in the process.

1 – Back Up Your WordPress Database

Since you won’t want to be taking any unnecessary risks during the move, it is essential that you take a few extra steps to back up your WordPress database, since it contains all of your content including posts and comments. The easiest and fastest way to back up your database is to use a free plugin such as WP-DB-Backup, which we will be using for the purpose of this tutorial.

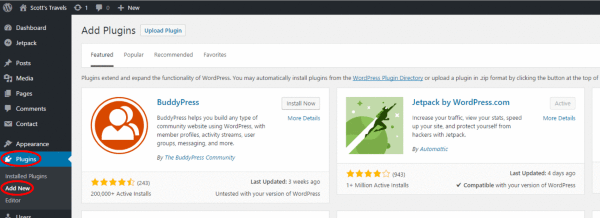
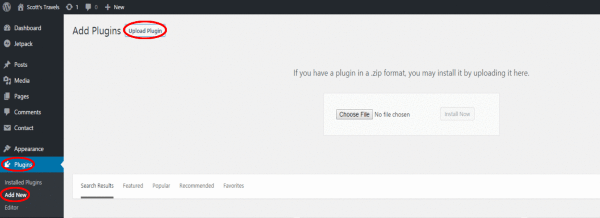
1. Navigate to “Plugins > Add New,” and search for “WP-DB-Backup”. Click “Install Now” and activate the plugin once installation is complete.
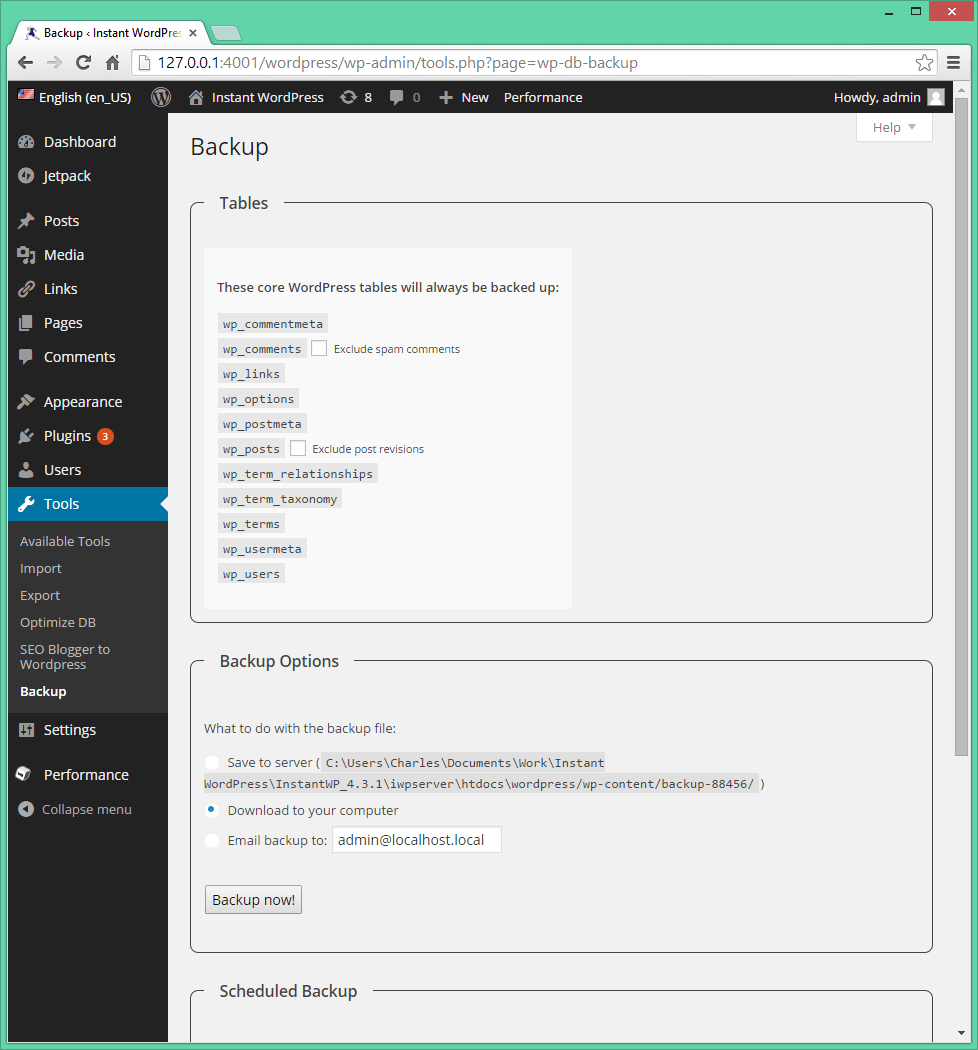
2. Navigate to “Tools > Backup,” and select the option “Download to your computer” before clicking “Backup Now”.

For future reference, you can also use this tool to schedule automatic backups and have them downloaded to your computer, emailed to you or saved to a remote server such as your Web hosting FTP server.

move-wordpress-new-domain-1

2 – Export and Import Your Content

Assuming you already have your new domain set up with WordPress installed, you will now be ready to export your content and import it into the new website. To make things easier, WordPress provides a built-in export tool.

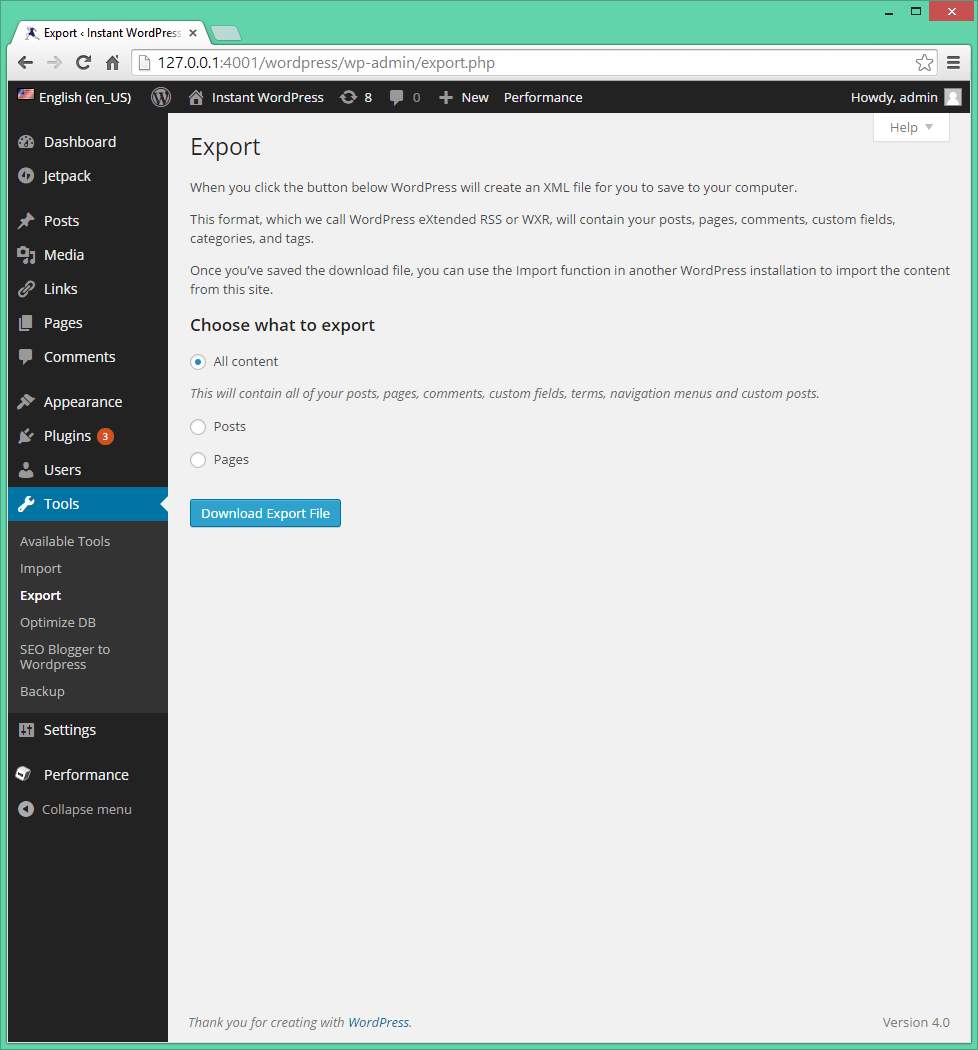
1. Navigate to “Tools > Export,” and select “All content” before clicking “Download Export File”.
2. Go to the administrator dashboard of your new WordPress site and navigate to “Tools > Import”. Select the “WordPress” option at the bottom of the list, and upload the export file you just downloaded. Click “Upload file and import,” and your content will appear on your new website.

All of your posts and pages should now appear on your new WordPress site. However, you’ll also need to migrate any additional content such as images and other uploads, and you will need to re-download any plugins and themes and reconfigure them.
move-wordpress-new-domain-2

3 – Migrate Your WordPress Uploads

The easiest and most practical way to get all of your WordPress uploads onto your new site is to manually transfer them using an FTP client such as FileZilla. Your hosting company will probably also provide a Web-based client, or you can use the File Explorer in Windows 8.

1. Log into the FTP server of your old WordPress site, and navigate to “wp-content/uploads”.
2. Download the entire folder, and copy it over to the corresponding directory of your new WordPress site, overwriting any files as prompted. Alternatively, you’ll need to merge the folders without overwriting any files if you want to preserve any previous uploads on your new site.

4 – Restoring Your Themes and Plugins

Although all of your content and uploads will now be available on the new site, any customization will need to be done again. You can use the paid plugin “BackupBuddy” to do this for you if you prefer.

1. Reinstall and reconfigure your theme. If you have modified any code in the theme, you’ll likely be best off copying over the files manually from the FTP server on your old site. You will find your themes in the “wordpress\wp-content\themes” directory.
2. Reinstall and reconfigure any plugins and widgets that you want. The easiest method is to have both your old and new WordPress sites open beside each other and manually go through the settings one-by-one.

Your new WordPress site should now be looking much like your old one, although there are a few other important considerations. You may need to update any internal links on your new site so that they refer to the new domain, and you can use a plugin such as “Pretty Link” to automate this process. You’ll also need to update any RSS feeds and set up a 301 redirect so that people, as well as the search engine crawlers, will be automatically redirected to your new domain. Finally, don’t forget to submit a new XML sitemap to Google, and be sure to thoroughly test your new WordPress site.

How to Move Your Blog from Blogger to WordPress

Google’s blog publishing service, Blogger, is a popular content management system for casual bloggers, but it doesn’t provide nearly as many features and the degree of versatility that a self-hosted WordPress site does. Powering almost a quarter of all websites, self-hosted WordPress blogs come with a vast database of themes and plugins as well as the ability to make more advanced changes to the inner workings of your site. If you have decided that it’s time to make the move from Blogger to WordPress, you will first need to register a domain and install WordPress. Then you can use the one-click import option in the WordPress platform to transfer all of your posts and reader comments with ease. In this guide, we’ll take a look at how to use the feature and transfer your content over in a matter of minutes.

1 – Exporting Your Content into WordPress

The first step involves copying over all of your content, including your images and links, from your Blogger website into your new self-hosted WordPress site.

  1. Navigate to “Tools > Import” in the administrator dashboard of your self-hosted WordPress blog.
  2. Click “Blogger” in the list of options, and click “Install Now” in the bottom-right corner of the pop-up window.
  3. Click “Activate Plugin and Run Importer” once the plugin has been downloaded and installed.
  4. Click “Authorize” to give WordPress permission to access your Blogger website. You will be transferred to your Google account.
  5. Click “Allow access,” and you will be taken to a new page where you can access and manage your Blogger posts, comments, links and images.
  6. Click “Set Authors” once the content has been imported from Blogger, and assign your author name to the imported posts.


2 – Set up Your Permalinks

To help maintain any search engine optimization work you did on your Blogger website, you should change your permalink setup so that it matches as closely as possible to that of your old website.

  1. Navigate to “Settings > Permalinks” in your WordPress site to view a list of options for your permalinks structure.
  2. Choose “Month and name” from the list of options, since this most closely matches the structure used on a Blogger website.

3 – Set up a Redirect

One of the most important steps is to set up a redirect so that visitors to your Blogger website will be automatically redirected to your WordPress blog. The easiest way to set up a 301 redirect is to use a plugin, such as “SEO Blogger to WordPress “.

  1. Navigate to the “Plugins > Add New” page in your WordPress administrator dashboard, and search for the plugin referred to above.
  2. Click “Install Now,” confirm the installation, and click “Activate Plugin” once the process is complete.
  3. Navigate to “Tools > SEO Blogger to WordPress,” and click “Generate” to create a template for copying to your Blogger website.
  4. Navigate to “Design > Layout > Edit HTML” in your Blogger dashboard, and switch to the Classic Template.
  5. Copy and paste the generated code provided by the plugin into the text area in your Blogger dashboard and click “Save.”


Setting Up Visitor Stats for Your Blog

Before beginning this tutorial you will need to install and activate the free Jetpack plugin. Read this post for instructions on how to install Jetpack.

While there’s no end to the plugins available for self-hosted WordPress blogs which track and display various stats, using the Jetpack Stats feature via the Jetpack plugin is one of the easiest and most convenient methods.

Because the Stats module is automatically enabled when you first set up Jetpack, you shouldn’t need to take any additional steps to enable it. In this chapter, we’ll explain how to view your stats and what they mean, as well as how to configure and customize the module to better suit your requirements.


Viewing Your Website’s Stats

To view stats, you will need to add the Site Stats widget to your administrator control panel as explained in the following steps:

  1. Go to the main page of your administrator dashboard by clicking on “Dashboard” close to the top-left corner.
  2. Click on the “Screen Options” button to the right, and check the box beside “Site Stats”. With this option enabled, you will be able to review the number of visits to your website, the most popular pages and the search times which people are using to find your website.
  3. jetpack-stats-1

  4. If you want to find a more comprehensive overview of statistics pertaining to your WordPress site, navigate to Jetpack > Stats in your administrator dashboard. On this page, you will be able to review additional information about referrals, subscriptions and clicks.
  5. Even more statistical information is available on wordpress.com, which you can view by navigating to wordpress.com/my-stats and logging into your account.

jetpack-stats-2

Using the WordPress.com Stats module, you can easily get a snapshot of your website’s performance without even having to leave the administrator dashboard. However, for a more comprehensive solution, you can also use a popular tool such as Google Analytics without any issues.

Setting Up Email Subscriptions to Your Blog

Before beginning this tutorial you will need to install and activate the free Jetpack plugin. Read this post for instructions on how to install Jetpack.

Jetpack includes a subscriptions module which allows your readers to easily subscribe to your blog in order to receive updates by email on the latest comments and posts. This powerful feature helps to encourage more of your visitors to become regular readers, and it is one of the most effective solutions for setting up email subscriptions for a typical blog. Instead of using your own hosting package to handle the potentially large volume of emails you’ll be sending out, Jetpack uses the servers at WordPress.com, and best of all, it doesn’t cost anything either. The Subscriptions service should be activated by default once you have set up Jetpack, but you can turn it on and off from the Jetpack > Settings page as with any other module belonging to the plugin.

By default, email subscriptions will already be already be turned on, and your visitors will see checkboxes when they leave a comment on one of your posts or pages. When a reader leaves a comment, they will be able to choose up to two options including email notifications when someone posts a follow-up comment or when you publish a new post. Additionally, you can place the Blog Subscriptions widget in any desired widget area or add the option to subscribe anywhere else on your website by using a small piece of code.


Using the Jetpack Subscriptions Widget

By far the quickest and easiest way to set up email subscriptions is to use the widget, which will be available as long as the Subscriptions module is activated (which it should be by default).

  1. In your administrator dashboard, navigate to Appearance > Widgets and look for the “Blog Subscriptions (Jetpack)” widget in the left-side column.
  2. Drag the widget to the preferred widget area, such as the Primary Widget Area which is the main sidebar on your site. It will be activated immediately.
  3. Configure the activated widget by clicking on its name in the right-side column to display the available settings.
  4. Enter your own widget title, optional text to display to your readers and the text for the subscribe button if you don’t want to use the default options.
  5. Check the box beside “Show total number of subscribers” if you want your readers to see how many people are currently subscribing to your blog.
  6. Click on “Save” to save your changes, and they will appear on your site immediately.

jetpack-subscriptions-1


Using the Jetpack Subscriptions Shortcode

By pasting the shortcode for the Jetpack Subscriptions module in the HTML for your website, you can place a subscription form anywhere on your website, without having to be restricted by the widget areas which are available with your currently active theme. The required code is as follows:

[jetpack_subscription_form]

By adding some additional modifiers, you can also customize the subscription form to the same extent that you can customize the widget. The available modifiers are as follows, and they need to be added within the shortcode brackets as illustrated below:

  • To change the title, use the following syntax:
    [jetpack_subscription_form title="Your title"]
  • To change the subscription text, use the following:
    [jetpack_subscription_form subscribe_text="Your subscribe text"]
  • To change the text on the subscribe button, use the following modifier:
    [jetpack_subscription_form subscribe_button="Sign Up"]
  • To display the number of current subscribers, use the following code:
    [jetpack_subscription_form show_subscribers_total="1"]


Simply replace the bolded text with that of your choice. You can use multiple modifiers (including all four if you wish) simply by placing each one within the brackets, leaving a space between each one.

Now that you have set up email subscriptions for your blog, anyone can subscribe simply by entering his or her email address. Once they subscribe, the reader will receive a confirmation email whereby he or she will need to click “Confirm Follow” to start receiving updates from you. Finally, you can also customize the content of the emails to a degree by navigating to Settings > Reading in your administrator dashboard and changing the feed settings to “Summary” so that only post summaries are shown in the emails.

jetpack-subscriptions-2

How to Use Jetpack Publicize

Before beginning this tutorial you will need to install and activate the free Jetpack plugin. Read this post for instructions on how to install Jetpack.

Promoting your blog and new posts when you publish them is a major part of the battle when it comes to building up a successful website. To help streamline the process, Jetpack includes an extremely useful feature called ‘Publicize’ which will automatically share new posts on specified social networks, such as Facebook and Twitter, whenever they are published. In this chapter, we’ll take a look at how to set up this invaluable feature to help spread the word about your new content.

Jetpack supports the following social networks for automated posting: Facebook, Twitter, Google+, LinkedIn, Reddit, Digg and StumbleUpon. You can also define your own additional custom services if you want to promote your posts on social networks which are otherwise unsupported.


Activating the Publicize Feature

If the Publicize feature is disabled, you will need to activate it before you can link your social media profiles in order to have Jetpack post and promote your blog posts on your behalf.

  1. In your administrator dashboard, click “Jetpack” in the top-left corner, scroll down the page and click “View all Jetpack Features”.
  2. Scroll down the list of features until you find “Publicize”. Click on the link and click “Activate” on the window which appears.
  3. In the same manner, also activate the “Sharing” feature, since it will allow you to add social media sharing buttons automatically to your posts.

jetpack-publicize-1


Connecting to Your Social Networks

In order to have Jetpack publish posts on your social media profiles on your behalf, you will need to give the plugin your permission to access them:

  1. Navigate to Settings > Sharing in your administrator dashboard to connect the social media accounts you use with Jetpack.
  2. Click on “Connect” beside the name of the social network you want to add, and enter your username and password.
  3. Once your connections to the services you wish to use have been approved, a list of them will appear in the “Publish” box whenever you write a new post.

jetpack-publicize-2

Whenever you publish a new post, it will automatically be shared on your connected social media accounts, including an image such as a featured image, an image attached to the post or any other image that Jetpack can find in your post (in this order of priority). Note that only posts will be publicized; static pages, draft posts and duplicate posts will not be publicized.


Adding Sharing Buttons

In the Sharing page in your administrator dashboard, you’ll also be able to add sharing buttons automatically to every post that you publish, allowing your readers to quickly and easily share your posts on their own social media profiles.

  1. Drag the buttons you want to add to your posts from the “Available Services” section to the “Enabled Services” section beneath it.
  2. Modify any additional options, such as “Sharing label” and “Button style” as required. Any changes will be displayed in the “Live Preview” window above.
  3. Click on “Save Changes” at the bottom of the page, and the sharing buttons will go live on every post on your blog.

jetpack-publicize-3

With sharing and post publication set up, a great deal of your social media promotion will already be taken care of, and Jetpack and your readers will be able to start spreading the word about your hard work!

How to Use the Jetpack Sidebar Image Widget

Before beginning this tutorial you will need to install and activate the free Jetpack plugin. Read this post for instructions on how to install Jetpack.

Jetpack includes a simple widget which you can use to easily add images to any of the widget areas available in your currently selected theme. You can activate additional widgets and other features using the Jetpack settings page, available by clicking on the applicable option in the sidebar in the administrator dashboard. In this chapter, we’ll take a look at the process of activating the image widget and placing an image in the sidebar of your WordPress site.


How to Activate the Image Widget

Activating and managing the various features of Jetpack may be done from the Jetpack settings page, which provides a user-friendly interface along with a list of features and explanations as to what they do.

  1. In your administrator dashboard, click on “Jetpack” close to the top-left corner of the page.
  2. Scroll down the page and click on “View all Jetpack features” to see a list of all of the available plugins and widgets.
  3. jetpack-sidebar-1

  4. Scroll down to find the “Extra Sidebar Widgets” tile. You should find it in the left-side column. Click on the tile and click “Activate”.

jetpack-sidebar-2

How to Add an Image to the Sidebar

You can add any image you like to the sidebar using the Jetpack Image widget, provided that it is in the JPG or PNG format. The image doesn’t even need to be hosted on your website either – you can specify any image located on any website, since all you need is the URL.

  1. In your administrator dashboard, mouse over the “Appearance” button and click “Widgets” in the pop-up menu.
  2. Drag and drop the “Image (Jetpack)” widget from the left-side column to the preferred widget area on your right, such as “Primary Widget Area”.
  3. Click on the activated widget in the right-side column to display the available configuration options.
  4. Enter a title for the widget, or leave it blank if you only want to display an image without any accompanying text.
  5. Enter the full URL of the image in the box beside “Image URL”. Ensure that the URL links directly to an image, including its file extension, such as JPG. You will first need to upload the image to your WordPress media library (Media -> Add New) and then get the URL from there.
  6. Fill in the alternate text with a few words describing the image. This text will appear when someone moves the cursor over the image.
  7. Enter a title and a caption for the image if you wish. Finally, choose an alignment, and specify a width and height for the image in pixels if you wish.
  8. If you want to turn the image into a link, enter the full URL of the link you wish to use in the “Link URL” box.
  9. Click “Save” to save your changes. The image should appear immediately on your WordPress blog.

jetpack-sidebar-3

That’s all there is to it! You can add as many images to your sidebar or other available widget areas as you wish, simply by dragging another instance of the widget into the desired sidebar area.