In Step #4 of the tutorial I highlight some of the ways that you can utilize plugins as part of your blog. Plugins can make any blogger’s life easier, and they might even offer you some new functionality that you were unaware of. Now I’ll show you how to actually go about installing these useful tools!
There are two main ways that you can install WordPress plugins onto your blog, and I will review both of them in the tutorial below.
Option #1: Search for Plugins via the WordPress Dashboard
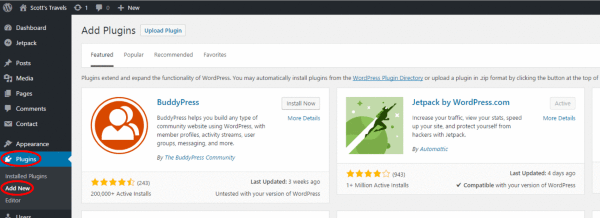
The most straightforward way of finding and downloading plugins is to simply search for them via your WordPress dashboard. Best of all, every plugin listed in this area is completely free. In the screenshot below, you’ll see where to click on the left: first on “Plugins” and then on the “Add New” button.
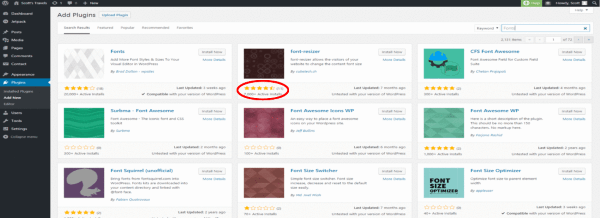
In the upper right you will see the Keyword search bar that will allow you to search for plugins. Now let’s do a sample search!
In this search I looked for plugins having to do with “Fonts.” You can see there are a number of options available to me, and I typically recommend focusing on the plugins that have a strong overall rating and a large number of active installs. This shows you that other bloggers out there are using these plugins and finding them helpful. I’ve circled where this information appears so that you know exactly where to look.
Option #2: Upload a Plugin Zip File on the WordPress Dashboard
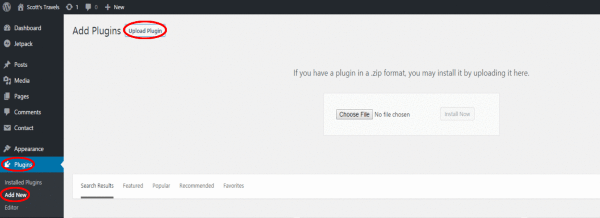
Plugins that are not free need to be uploaded to your site in a different way. Once you pay for one of these plugins, you should receive a .ZIP file. You will then be able to upload the plugin manually by clicking “Plugins” and then “Add New” followed by the “Upload Plugin” button. You can see an example below:
Once you manually upload the .ZIP file, you will be to activate the plugin as normal.
And there you have it – all the steps you need to follow to start taking advantage of the many amazing WordPress plugins available out there for your own blog.


