How to Make Money Blogging

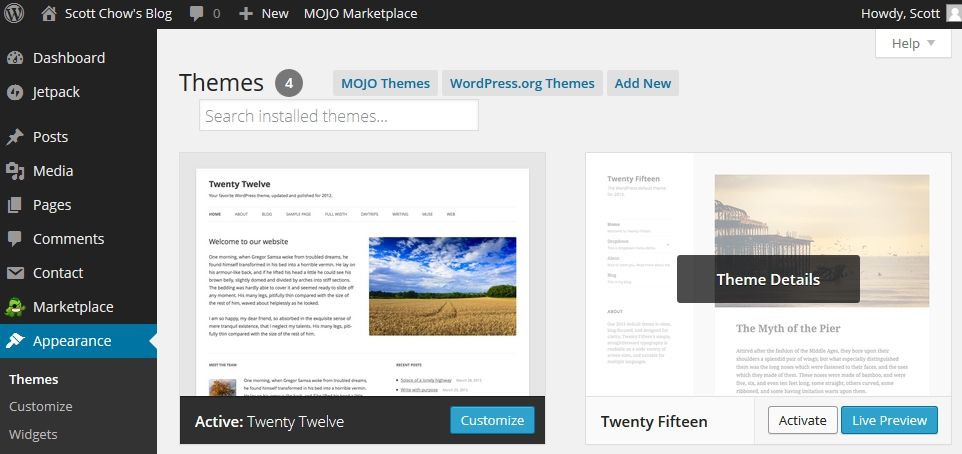
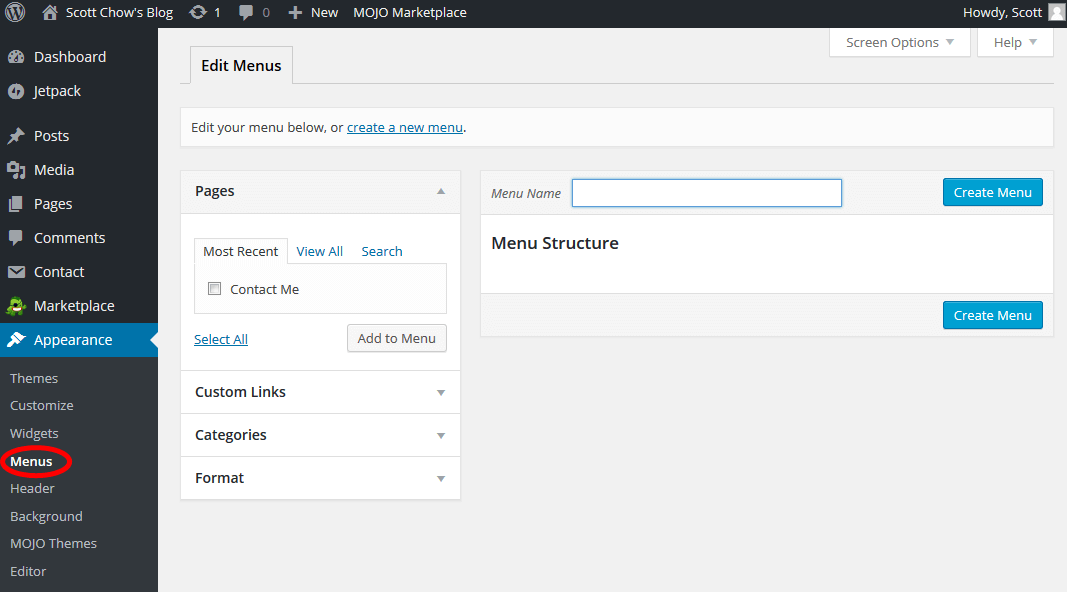
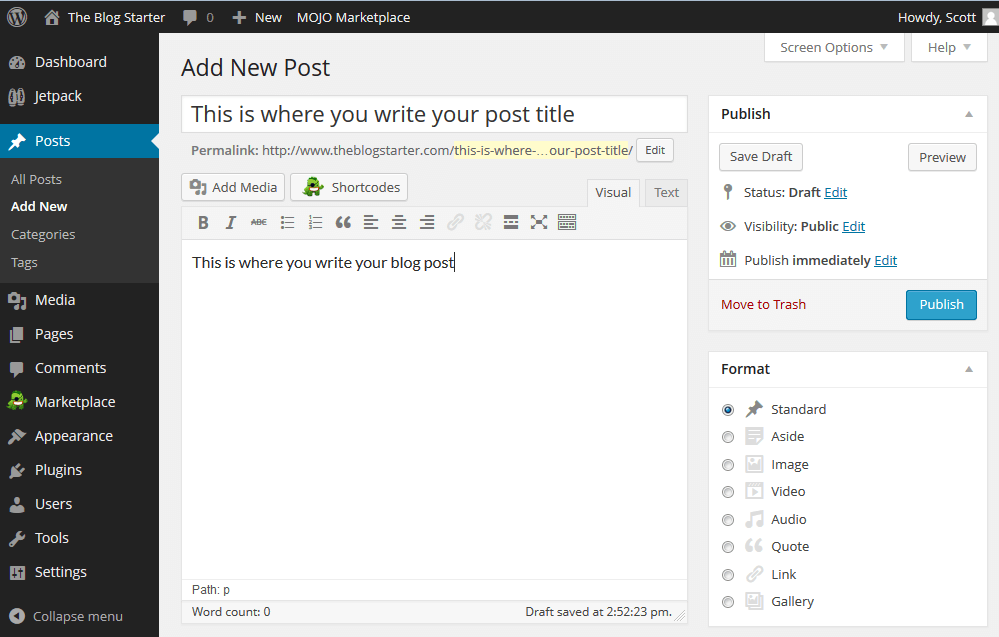
This post is about making money blogging. You will first need to register and install your blog to follow along.

Click here to see the free, easy guide to starting your blog in about 20 minutes.


How to start making money online with a blog

1. Building Your Readership

There are lots of ways to monetize your blog once you have a good number of visitors. But when you are just starting out you won’t have many readers, so it’s important to make the most of each one.

That means that you need to make sure first-time readers of your blog will come back. Only by having returning readers will you ever build a sizable audience that you can profit from.

So how can you stay in touch with your readers?

The easiest and best way is to ask them for an email address where you can contact them with updates. By collecting your readers’ email addresses from the very beginning of your blog you will build the biggest mailing list possible.

Ever wonder why just about every website you go to asks for you to sign up with your email address?

In marketing there is a saying that “the money is in the mailing list”. This is because a mailing list allows you to contact people over and over again.

Every time you send an email to your list you can offer them products/services or just get them to your visit your blog again where you can make money from ads (discussed below). This is exactly what big companies like Groupon do with their mailing lists. They send out offers on a daily or weekly basis

You will need an email marketing service to get started. By far the easiest and most reliable that I have found is Constant Contact, which offers a free trial of their services for new bloggers. I have put together a complete step-by-step tutorial on how to use Constant Contact with your blog.

2. Monetizing Your Blog

Once you have built a decent readership base you can turn your attention to making money from your blog. There a variety of way to do this, but one of the most lucrative ways bloggers make money also happens to be the easiest- advertising.

Having a large number of visitors to your blog means that advertisers will pay to have their ads shown to your readers. The easiest way to blog for money is to get paid for showing advertisements on your blog by joining Google’s AdSense program at http://www.google.com/adsense

Once you setup your account on AdSense you will be given a code to add to your blog. This code will automatically display advertisements on your blog from companies who are part of Google’s advertising network. You may see ads from small companies related to your topic, or you may see ads from large companies that are completely unrelated to your topic.

The nice thing about AdSense is that you have thousands of advertisers bidding to advertise on your blog, and all you have to do is add the simple code to your blog. Once you do that the process is completely hands off.

Every time one of your visitors clicks on an ad, you get paid. Google collects the money from the advertisers and then cuts you a check (usually every month).

This arrangement is nice not only because it is hands-off, but because you are dealing with a reputable company that you know will actually pay you on time.


How much can you make?

The amount that you can make from AdSense depends on three factors:

1. The number of visitors to your blog

This one is pretty obvious. More people visiting your blog means more clicks on advertisements, which means more money for you.

2. The visibility of the ads

When you put the AdSense code on your blog you have a choice of the style of advertisements (large images, small images, text, etc.) and also where they are placed. The more prominently the ads are displayed the more likely they are to be clicked.

However, you have to balance placing the ads prominently with the prospect of possibly annoying your readers. We have all visited blogs where it’s difficult to see the content due to the number and size of the ads. This is a delicate balance to achieve and it’s something you will have to experiment with to get the most out of your blog.

3. The topic you are blogging about

The final factor that affects your AdSense income is the topic you are blogging about. This is because advertisers will pay more to be on certain blogs than they will for others.

For example, if your site is about golf, your readers are likely to have a healthy income. Because of this, there are a good number of advertisers that want to get their ads in front of your readers, and they are likely to pay a good amount per click to do this.

Contrast this with a blog about Justin Bieber. The readers of this blog are likely to be teenage girls, who usually don’t have very much purchasing power. Because of this advertisers will likely pay less for each click.

These three factors will determine the amount of money you make. Estimating exactly what you will make is pretty difficult, but a high traffic blog on the right topic has the potential to bring in several thousand dollars every month. Of course, many people earn less than this, and some earn even more. In fact, it has been estimated that some top AdSense publishers earn nearly $2 million per year just from AdSense.

Keep in mind that making money from your blog takes time. After all, there is a reason that learning how to make money online is the last step in my guide. You need to make sure you have followed all the previous steps perfectly in order to give yourself the best chance of earning a substantial income from blogging. This will not happen overnight, but most bloggers find that the work itself is rewarding enough to continue on the journey.

Once you have your blog up and running, make sure to check out my step-by-step tutorial on how to install AdSense on your blog.


What next?

Learning how to make money with a blog is the final step in my tutorial on how to start a blog. I hope that you not only read this complete guide, but also took action on it. Blogging is a long, on-going journey, but only by taking the first step will you ever get to see where this road can take you.

Still haven’t started your blog? Click here to get started with Step #1 of the guide

Of course, there is still much more to learn about blogging once you have followed this guide. You can continue to read more tips and tricks on my blog or check out some of my other tutorials including my guide on how to create a website and my review of website builders.

If you have any questions at all about blogging please do not hesitate to contact me!

How to Customize Your WordPress Blog Design

So, you’re about to start your own blog using the WordPress platform. You’ve purchased hosting and a domain and you’ve installed WordPress. Now what?

Now, it’s time to design your blog using the provided tools in the WordPress backend of your blog. There’s a lot to go through when customizing your WordPress blog, so we’ve provided a step-by-step guide to get you started.

1) Access the backend of your WordPress blog to open the dashboard

Easily access the backend of your blog by navigating to yourdomain.com/wp-admin (replacing yourdomain.com with your own domain name). This will reveal the login page.

Enter the username and password you retained when you initially installed WordPress in your hosting account. Tick the checkbox “Remember Me” for faster logins. After logging in, you will be taken to the dashboard, a fully functional backend website management console.

2) Adjust your blog name and tagline

Within the dashboard, you will see a list of menu items on the left column. The first thing you should do is edit your website/blog name and tagline since the tagline always displays the generic line: Just another WordPress site. Chances are, you won’t even use the tagline, but just in case – let’s edit it.

In the left menu, hover over ‘Settings’ and click on ‘General’ in the drop down.

Adjust your blog name and tagline in the provided fields.

And when you’re done, scroll to the bottom and click ‘Save Changes’.

Note: At any time, open a new tab and navigate to your domain to see changes reflected immediately!

The next thing that should be done is to change the structure of your permalinks. It is preferable to have your page and blog post URLs take the name of their respective post titles because this helps SEO. So instead of having a URL named after the article ID number or the date it was posted on, we’re automatically going to assign the name of the post as the URL.

Navigate to ‘Settings’ and then to ‘Permalinks’. On this page, click on ‘Post name’ to change the permalink structure.

At the bottom, click ‘Save Changes’.

4. Create Your Two Main Pages: Home and Blog.

These two pages should be created and set before we get into the more detailed customizations. In the dashboard, hover over ‘Pages’ in the left menu and then click on ‘Add New’ in the dropdown.

The editor will open and provide a place for your page title. Add ‘Home’ to the title and click ‘Publish’ in the upper right-hand side. You can fill in the page later. For now, we’re just laying down the framework.

After publishing, click the WordPress icon on the upper left-hand side to go back to the dashboard, and it will bring you to your current page. Click ‘Add New’ at the top, and create a new page again using the title ‘Blog’. Return to the dashboard.

Now you have two main pages published and ready to go. But we need to set them first. These are the two pages that should be set in the dashboard settings. Once again, hover over ‘Settings’ and now click on ‘Reading’.

Change ‘Your homepage displays’ to ‘A static page’. Then from the ‘Homepage’ dropdown, select ‘Home’. And from the ‘Posts page’ dropdown, set it to ‘Blog’. Then click ‘Save Changes’.

5. Create the menu.

In the dashboard, hover over ‘Appearance’ on the lef-thand side and click on ‘Menus’ in the dropdown. If a menu has not been created, create a new menu and call it Main Menu. Make sure ‘Primary Menu’ is ticked, and not ‘Secondary Menu’. Then click ‘Save Menu’.

If a main menu has already been set, make sure it is set to the appropriate location. At the top of this page, click on the tab that says ‘Manage Locations’ and then set the ‘Primary Menu’ to ‘Main Menu’. Click ‘Save Changes’.

Now add your two pages to this main menu. Using the tab at the top, click on ‘Edit Menus’. In the left box, check ‘Blog’ and ‘Home’ and then click on ‘Add to Menu’.

After adding them to the menu, the home and blog pages will be displayed. You can reorder them through simple dragging and dropping. Click ‘Save Menu’ to finalize.

6. Pick a theme.

In the dashboard, navigate to ‘Appearance’ and then ‘Themes’ in the dropdown. Only a few basic WP themes will be listed and the one your blog uses will be shown is in the first position. Click ‘Add New’ to select a new theme from the WP repository.

Use the menu above the themes to find the perfect theme for your blog. Use the filters to search for features you would like your theme to have included. Once you find your perfect theme, click on it and then click ‘Install’ on the upper left-hand side. Once installed, click ‘Activate’ in the box that appears.

7. Customize your theme.

In the dashboard, hover over ‘Appearance’ and click on ‘Customize’ in the dropdown. This will bring you to a new screen where you can preview the changes made to the design of your blog.

In this example, I’m using the basic WordPress Twenty Twenty-One theme. Other themes may give you many more options to choose from in this customization screen. Here, we will go through basics.

Click on ‘Site Identity’ in the left-hand column.

If you have a logo, you can upload it by clicking on ‘Select Logo’ and uploading it from your computer through a few steps depicted below. Don’t forget to give your image an ‘alt text’ which describes what the image is. When you’re finished, click ‘Publish’ at the top to save your changes.

On this same page, select ‘Site Icon’ in the left column, and go through the same steps of adding an image as above. The site icon will be displayed in the tab of your browser. It should be an image of 512 x 512 pixels or larger. A simple image is best.

Return to the full set of customizer options by clicking the back arrow to the left of ‘Customizing Site Identity’. As noted above, each theme provides different options such as background color and even typography. Play around with options available to you.

You can skip ‘Menus’ as you have already created yours, and the ‘Widgets’ can be better manipulated in the ‘Widgets’ section of the dashboard under ‘Appearance’.

To exit the customizer, click the ‘X’ in the top left-hand side of the screen.

8. Endless Additional Options

Above are the main steps to begin customizing your new blog. Different themes will offer different selections and options such as sidebars, footer columns, and even built-in widgets.

Widgets can be added to sidebars and footer columns through Appearance > Widgets in your dashboard.

With the Gutenberg editor, you can manipulate the design and layout of each page and blog post with columns, blocks, and widgets. In this manner, you can even create your own custom sidebars with different designs and widgets for different pages and posts.

9. Custom CSS

If the theme doesn’t provide easy options to adjust the elements you seek to change, you can add your own custom CSS by clicking on ‘Appearance’ and then ‘Customizer’, then selecting ‘Custom CSS’. If you need help adding CSS, visiting the WP support forums is a great place to start to find help for specific CSS changes.

Step 6: Promote Your Blog

Promoting your blog is where I see the majority of bloggers fail. There are lots of great bloggers out there that no one has ever heard about, simply because they don’t know how, or just don’t want, to promote their blog.

The most important tip I can give you about promoting your blog is to not be shy about telling people about your blog!

I have heard from many bloggers who tell me that they don’t promote their blog simply because they don’t feel it is worthy of promotion. They say things like “I don’t have enough posts yet” or “I need to work on my site design first”.

Don’t do this to yourself! If you have put in the time to setup a great site and with great content, then you need to tell people about it. Be proud of the work you have put in.

So just how do you promote your blog? Well, it turns out the most effective methods of promotion are free!

1. Email marketing

A lot of the other tips on this list are about getting new readers to your blog. But if you want to build a real following you not only need new readers, you also have to keep first-time readers coming back!

This is where email marketing plays a big role. By collecting the email addresses of your visitors (with their permission of course), you can then notify them when you post something new on your blog. This keeps people coming back to your blog, which not only gives you more readers over time, it also allows you to build a closer relationship with your readers.

Email marketing is too big a topic to cover well here, so I created a separate guide to email marketing for those who are interested (hint: every blogger who wants more readers needs to read this guide).

2. Social networks

Chances are that you already have a Facebook account, and maybe even a Twitter account as well. So when you post something on your blog, make sure that you also post a link to your blog post on your social accounts.

It also helps to connect with other people interested in your topic. Send a friend request to the top bloggers in your niche and make sure to follow them on Twitter as well.

You may be surprised at just how many people will find your post interesting and then share the link with their friends.

3. Commenting on other blogs

On many blogs you can leave a comment along with a link back to your own blog. If you make useful comments on blogs related to your topic you will be putting your blog right in front of people who you know are interested in your topic.

Caution! Do not abuse this method.

If you are leaving terrible comments on posts just to get your name out there this will only hurt your blog. Furthermore, poor quality comments are likely to be deleted by the blog owner anyway.

If you make a useful comment people are more likely to visit your site, since they will want to hear more about what you have to say on the topic.

4. Link to other blogs

One the best ideas for writing a blog post is to write a response to a post from another blog. This could be a blog post you disagree with, or simply a topic that you have something else to add to.
When you do this, make sure to link to the blog you are responding to. On most blogs this creates what is known as a “trackback”.

A trackback simply means that the blog you linked to will also post a link (automatically) to your blog. This means that anyone reading the other person’s blog post will also see the link to your blog, and hopefully click on it to visit your site.

5. Guest posting

Another way to get readers of other blogs to hear about your blog is to write guest posts.
To write a guest post you simply need to contact other blog owners and offer to write a post for their site.

Not all bloggers are open to this idea, but if you can find a few who are it is a great deal for everyone. You provide them with quality content, and in return you put a link to your blog in your post. If people enjoy your guest post then they are likely to visit your blog for more great content.

6. Online forums

If you haven’t already, you should join popular online forums related to your topic. For example, if your blog is about dog training, join a couple of the most popular dog training forums.

Many forums will allow you to post a link to your site in the signature that goes at the bottom of every post you write. Some forums may require you to make a few posts before letting you do this.

Once you have joined a forum, make helpful posts. Just as with blog commenting, the content of your forum posts needs to be high quality and helpful. People are not going to want to read your blog if they don’t find your forum posts to be helpful and interesting.

7. Frequent posting

The promotion methods above all focus on getting new readers to your blog. This is usually the most difficult step for any blog. However, you also need to make sure that once readers find your blog they come back!

Making new posts frequently (at least once a week, but preferably every 1-2 days), is the key to building up and keeping a large following.

Your content may be fantastic, but if you only post once a month people are likely to forget all about your blog. You have to strike a balance between high quality and high quantity. This is a difficult balance for any blogger to achieve, as it is not always easy to write a high quality post once a day or even once a week.

If you are struggling with finding ideas to write about, make sure to re-read the previous step in this guide.

What’s next?

By now you have learned what you need to know about getting your blog started and getting readers to your site. For some bloggers this is the end goal. They simply want people to read their ideas and have the opportunity to participate in a community of like-minded people.

However, once you have developed a decent following, you can start to make some money from your blog if you so choose. Check out the next, and final, step now to learn how to make money blogging.

Step 5: Start Writing Your Blog

Finally, we can get to the fun stuff!

Every successful blog follows just a few basic principles:

Steps to a successful blog

1. Proper Blog Setup

2. Amazing Content

3. Marketing

Proper Blog Setup

The first 4 steps of this guide explained to you how to get your blog setup properly (start with Step 1 if you haven’t already). As I have mentioned in previous steps, there are an infinite number of tweaks and changes you can continue to make to your blog. But if you have gone through the previous steps in this guide then your blog should be setup just fine.

Keep in mind that being a good blogger isn’t all about writing. You also need to read other blogs to stay informed on what is popular and to get new ideas for your own blog.

You may visit a blog and see they have a really cool plugin that you want on your site. Usually, you can just ask the blogger directly and they will tell you all about it. This is a great way to improve the setup of your blog while also making connections in the blogging community.

I can’t emphasize enough that the steps I have already shown you are more than sufficient. If you want to make more changes in the future that is fine, but don’t get hung-up on thinking that everything needs to be perfect before you start blogging, because your blog will always be a work in progress.

Amazing Content

The heart and soul of a successful blog is great content. If no one wants to read what you are writing about then your blog won’t be very successful.

One of the easiest ways to write content that people actually want to read is to answer a question about your topic that you have yourself. Chances are, if you are wondering about something, so are other people. Obviously you will need to do some research to find the answer, but once you do you will be providing valuable content that people actually want to read and share with their friends.

It is also important to keep in mind that great content is about more than the writing. Images, videos, different fonts and colors all make your content look eye-catching and interesting. Blogs are not books, and they need to have more than just a huge block of text to keep the readers’ interest.

Marketing

Even if you setup your blog properly and create great content, there is no guarantee that anyone will ever see it. Because of this, marketing your blog correctly is a requirement if you want to be a successful blogger.

In the next step we will go over a variety of methods for marketing your blog so that you can make sure people are actually seeing all of your hard work.

Step 4: Blog Customization

If you haven’t installed WordPress yet, go to Step 2 to use my easy WordPress install guide.

Now that you know the basics of your blog, we can get into some more of the details. WordPress is an amazingly powerful tool that allows you to build your blog in just about any way you can imagine.

You’re probably thinking that your blog design looks pretty boring now, right? Not to worry, I will show you how to change your design and layout in this step, along with a bunch of other cool tips and tricks for personalizing your blog.

Click on the arrows below to see the guide for each topic:

Basic Blog Design

Everyone has a different idea of how they want their blog to look. One of the great things about WordPress is that you can change the entire layout and design of your site with just a few clicks. Here are just a few examples of WordPress designs that are completely free (click an image to see it bigger):

polar-mediastrap-slider-litexenastoretravelifyzenithworkalitythoughtsgreat

In WordPress, site layouts are known as “Themes”. Themes control the entire design of your blog. To change your theme you are going to click on the “Appearance” tab on the left menu.

wp-theme-install-1

You will see several themes are already installed on your blog: Twenty Fifteen, Twenty Fourteen, etc. These are simple, clean-looking themes that can work for just about any type of blog. In fact, many of the world’s top bloggers use one of these themes.

Unless you have a very specific design in mind for your blog, I suggest you use one of these pre-installed themes to start with. For our example, let’s use the “Twenty Twelve” theme. In order to activate the theme on your blog, hover over the theme and click the “Activate” button. That’s it! You have just changed the entire design of your blog with just one click!

wp-theme-install-2

If you are not a fan of the themes that come pre-installed with your blog, don’t worry. There are thousands of other free themes that you can easily install.

To install a new theme, click on the “Appearance” tab on the left menu. On the screen that comes up you are going to click on the button at the top that says “Add New”.
wp-theme-install-3

You will then be taken to the theme search screen. There are lots of different ways to find a theme you like. You can search by color, layout, and more by clicking “Feature Filter”. In the Feature Filter, check the boxes that you want and then click “Apply Filters”.
wp-theme-install-4

Now you can browse the themes that have the characteristics that you want. When you find one that you like, hover over it with your mouse and click the blue “Install” button.
wp-theme-install-5

Once the theme is installed click “Activate” to activate the theme on your blog. To see your new theme in action, go to your site and take a look!

Creating Menus

The next step in the process is to create a basic navigation menu so that your readers can easily find important sections of your site by clicking on the links in the menu.

To do this, click on the “Appearance” tab on the left-menu of your blog administrator area. Then click on “Menus”.

wordpress-menus-1

We are going to create a new menu called “Main Menu”. Go ahead and enter that name in the “Menu Name” box and then click “Create Menu”.

wordpress-menus-2

Now we can begin adding the items we want to this menu. For our example, I am going to start with adding a link to the homepage of my blog.

To do this I am going to click on “Custom Links”. Then I am going to enter the URL of my blog’s homepage. This is just your domain name with “http://” (without quotes) in front of it. In the case of our example I am using http://scottchow.com

You then need to enter in the “Link Text” which is the text you want to appear in the menu for the link to your homepage. I am going to call this link “Home”.

Once you have entered your URL and link text, click “Add to Menu”.

wordpress-menus-3

Let’s add one more item to the navigation menu for now. I am going add a link to a page that I created previously.

To start, click on the “Pages” section of the menu editor.

wordpress-menus-4

This will show me all of the pages that I have created so far. If you have not created any pages yet then this area may be blank or may show a “Sample Page”. In order to create a new page go to “Pages” on the left-menu of your blog administrator area and click “Add New”

The page that I want to add to the menu is called “Contact Me”, so I am going to click the checkbox next to that page and then click “Add to Menu”. Then I am going to click “Save Menu” to save the changes I just made.

wordpress-menus-5

Now that I have created my menu I need to add the menu to my blog. To do this, click on the “Manage Locations” tab. In this example I want to add the menu we created (“Main Menu”) to the “Primary Menu” area. Just use the drop-down box to do this and click “Save Changes”.

wordpress-menus-6

Customizing Your Blog Design

Now that you have your basic blog design and navigation, you can further customize things to your liking. To do this, go to the “Appearance” tab on the left-menu of your blog administrator area. Then click on “Customize”.

This will bring you to a screen that shows you your blog homepage on the right, with the customization menu on the left. Important: If you are using a different theme than the one I am using for this example then your options for customization may vary slightly.

customize-wordpress-1

There are a variety of customizations you can do from this screen. Let’s take a look at them one-by-one.

Site Title & Tagline
This section allows you to change the title and sub-title that appear at the top of your blog. You also have the option to remove these entirely by unchecking the “Display Header Text” box.

Colors
Here you can change the text color of your header as well as your background color.

Header Image
With this option you can add an image to your header. Please note that each theme will have a different recommend image size for the header.

Background Image
If you want to use an image as your background instead of a solid color this section will allow you to do that by uploading the image you want to use.

Navigation
You can choose which of your navigation menus you want to use here. The menu needs to have been created already, which I show you how to do in an earlier step on this page.

Widgets
Widgets are various items that you can add to your blog sidebar menus. This section allows you to add and remove widgets from your sidebar menu(s). This is a little more complicated than the previous options, so let’s take a look at an example.

To start, click on “Widgets” and then click “Main Sidebar”. This will show you a list of the widgets that are currently being used in the “Main Sidebar” area.

customize-wordpress-2

You can see we have 3 widgets: Search, Archives, and Meta.
You can also see how those 3 widgets appear on your site, by looking in the right sidebar area. You can see that the Search widget creates a search box, the Archives widget shows a monthly archive of my posts, and the Meta widget shows a variety of links related to my blog.

I don’t want to keep any of these, so I am going to delete them one-by-one. To do that I just click the arrow next to the widget name and then click “Remove” to delete it.

customize-wordpress-3

Now that I have removed all of those widgets I am going to add a few that I do like. To do this I click the “Add a Widget” button and select the widget I want.

To start with I am going to add the “Recent Posts” widget which will create links to my most recent posts in the sidebar area.

customize-wordpress-4

Then I am also going to add the “Calendar” widget which will show the current month’s calendar with the dates that I wrote posts on highlighted. Once that has been added, click the “Save & Publish” button.

customize-wordpress-5

There are a variety of other widgets you can add if you wish, so feel free to explore.

Adding Plugins

Plugins are additional tools that you can add to your WordPress blog from third-party developers. There are hundreds of free plugins available that can do just about anything on your blog.

There are plugins for creating contact forms, adding social media buttons, or enhancing your site’s visibility to search engines.

There are simply too many to list here, but there is one free plugin I believe every new blogger should start with called JetPack.

Jetpack adds a ton of easy to use features to WordPress like the ability to easily add images in your sidebar menus, publish your posts to Facebook, and see how many people have visited your blog.

As with all plugins, Jetpack is optional, and you can certainly blog without it. However, I have found that most bloggers benefit from the additional features that are included. Here is how to install it: How to Install Jetpack

Changing Your User Details

When first starting your blog it is important that you change your user details so that people know who is writing your blog.

To do this, click on “Users” tab on the left menu. Then click on “Edit” under your username.
change-user-details

On the user details page you will want to at least change your Nickname and E-mail. Your nickname is the public name that will appear on all the posts you make, so keep this in mind when selecting it.

Simply type whatever you like in the “Nickname” box and then choose that same name in the drop-down box next to “Display name publicly as”. You can also change your email address if necessary.
change-user-details-2

Once you have made all the necessary changes be sure to click the “Update Profile” button at the bottom of the screen to save the changes.

Changing Your URLs

Every time you publish a new post on your blog you are creating a new page with a unique URL. The settings for your URL names are known as “Permalinks”.

The default permalinks setting is not optimal in my opinion, as it gives you URLs with a bunch of numbers that look like this: https://www.theblogstarter.com/?p=123

To change that setting you need to scroll over the “Settings” tab on the left menu and then click on “Permalinks”. Then you can choose one of the options listed there.

permalinks

I am using the “Post name” setting on theblogstarter.com, but any of the options are perfectly fine and will not affect the usability of your site in any way. I just happen to think that the default permalinks setting looks kind of ugly.

Other Helpful Tutorials

What next?

After completing this step you should have a functioning and attractive blog. Again, you can always go back and make additional changes later. There is no need to have everything perfect right away.

Now let’s get to the fun part – writing your blog!

Step 3: How to Use Your Blog

If you haven’t installed WordPress yet, please return to Step 2 to learn how.

Once you have WordPress installed on your site you are just about ready to start blogging. In this step, I am just going to show you the basics to get you up and running with your new WordPress blog. The next step after this one will show you some more advanced changes you can make to personalize the design and structure of your blog.

Logging In

To start with, you will need to login to your site. Go to BlueHost.com and click on the “Login” link at the top right to bring up the login screen. If you are unsure of your login name or password, check the email that was sent to you from BlueHost that has this information, or you can use the password reset link on the login page.

Changing Your Blog Title

Once you login you can click the blue “WordPress” button to be taken the WordPress blog administrator area. This is where you will make any changes you want to your blog. To start with, you will probably want to change the title of your blog. To do this, go to the bottom of the left menu and click “Settings”. That should take you to this screen:

blog-title

On this screen you can change your “Site Title” and also the subtitle, known as your “Tagline”. Enter whatever you want in these two boxes and then scroll to the bottom and click the “Save Changes” button.

Once you save these changes they will immediately be live on your site. To see what your site looks like at any time you can just type your domain name in the browser and hit enter.

How to Write a Post

Blogging is all about writing, so let’s learn how to write your first blog post.

Go to the left menu and click on “Posts”. (Click the image below to see a larger version.)
write-a-post-1

You will see there is already a post there titled “Hello world!” This is a default post on every new WordPress blog, and we don’t need it. To delete it click “Trash” just under the post.
write-a-post-2

To begin writing a new post, click the “Add New” link (found in either the left menu or next to the word “Posts”).
write-a-post-3

You should now be on the post creator screen. You can enter the title of your post in the top box and then begin writing your post in the lower box.
write-a-post-4

If you would like to add a picture to your post, click on the “Add Media” button and click “Select Files” to upload a picture from your computer. You can make adjustments to the picture size and alignment on the next screen. When you are all set click “Insert into post” to add the picture.

Once you have finished your post just click the “Publish” button on the right side of the screen to publish it.

Publishing Your Blog

Even after you have written a post your blog may still be showing a “Coming Soon” page like this:

When you are ready to remove that page, login to your blog and click “Home” on the left menu. Click “Launch with confidence” and then click “Launch your site”.

What’s next?

Congratulations! You now know how to publish content on your site!

You will probably want to make some more changes to your blog as I describe in the next step, but none of them are absolutely necessary, since your site is already live and ready for the world to see!