How to Change Your Header Image in WordPress

Please note: This tutorial is for WordPress.org blogs. If you are still using a WordPress.com blog the process may be different. To unleash the full power of WordPress you may want to consider migrating from WordPress.com to WordPress.org.

The header is undoubtedly the most important visual element in almost any WordPress blog. It’s usually the very first thing that your visitors see, so it is essential to choose and customize your header image wisely. The header image helps to define the entire look and feel as well as the theme of your blog, or in the case of a business website, it helps to define your brand image. You should keep your header image and style consistent with any social media profiles or other online resources connected to your website so that your visitors will more easily come to recognize your online presence.


By default, the header image is displayed at the top of every page and post on your site, and it is often accompanied by a website title and a series of menu options just beneath it. Many WordPress themes come with their own default header images, but you will always be better off using your own image, preferably one which is specifically tailored to your content and the style that you want to go for.


The optimal dimensions for a header image depend entirely on your currently selected theme. If you select an image which is too large or not of optimal dimensions, you’ll be able to crop it when you choose the image. You can either choose an image file from your computer or from your WordPress Media Library. Alternatively, and although this is not recommended, you can sometimes choose from a set of default images, or in some cases, have a random image displayed on each page. However, the exact settings available to you will depend entirely on the currently selected theme.


For the purpose of this tutorial, we’ll be using the latest default WordPress theme, Twenty Fourteen. Unlike some of the older WordPress default themes, this theme has a minimal set of header options available for it, and the default header for the theme is simply a black bar accompanied by a title. Follow the steps below to change your header image:


  • Log into your WordPress administrator dashboard and navigate to Appearance > Header.
  • Click “Choose File” and upload an image from your computer. You will have the opportunity to crop it before saving your settings.
  • Alternatively, click “Choose Image” to choose an image from your media library. If you don’t have any images in your media library, simply drag and drop the image you want to use into the box which appears, select the file and click on “Set as header”.
  • Click “Save Changes,” and the settings will take effect immediately.


Most themes, including Twenty Fourteen, also allow you to show or hide the header text or change its color. The header text is the title of your website, and you can change this by navigating to Settings > General in your administrator dashboard and specifying a new title in the field beside “Site Title.”

The Custom Header page for the Twenty Ten Theme
The Custom Header page for the Twenty Fourteen Theme

11 Ways to Speed Up Your WordPress Blog

speedWordPress is one of the world’s most popular content management systems, and this is thanks largely to its excellent versatility and the vast amount of fully customizable themes and plugins available for it. However, a lot of websites which use WordPress do not maximize its potential. Given the typically short attention span of Web users, a website which does not perform up to scratch will end up turning visitors away in droves, and if you rely on your WordPress site for marketing purposes or e-commerce, this can end up costing your business a great deal in lost revenue. This in-depth guide takes a look at some of the most effective tried and tested ways to supercharge your WordPress site.

Before you begin, you should test your website’s performance so that you can get a better idea of what you need to change and how far you need to go to tweak its performance. One place to test your website’s speed for free is webhostinghero.com/speed. All you need to do is enter your website’s URL, and this tool will provide you with a performance grade along with some useful reports to help you speed up your website.

1 – Choose a Good Hosting Company

By far the most influential factor with regards to website performance in most cases is the hosting company itself. A poor Web hosting service which uses outdated hardware will slow down your website no matter what you do to speed it up. Particularly if you rely on your WordPress site for business purposes, trying to save a few extra dollars and compromise on service quality in the process is just not worth it. Some of the most popular hosting companies include BlueHost, Hostgator, Siteground and InMotion Hosting. All of these are good choices, but my personal recommendation for your WordPress site is BlueHost.

2 – Install WP Super Cache

Because the WordPress platform uses dynamic PHP scripting, it must execute all queries whenever a page is loaded in someone’s browser, and this can slow things down significantly, particularly when the server load is high. WP Super Cache is a free plug-in which converts your completed posts into static HTML files so that these PHP queries do not have to be executed every time someone visits your website. Download and install the plug-in through the WordPress Administrator dashboard. A new option will then appear in the Settings menu entitled ‘WP Super Cache’. You will also need to turn caching on, as shown in the screenshot below:

3 – Clean Up Your Homepage

By default, WordPress will usually display the full last ten posts on the front page of your blog, and this can greatly decrease loading speeds, particularly if your posts contain a large number of images. Fortunately, you can easily customize the front page of your blog by navigating to Settings > Reading in the administrator dashboard.

As you can see from the options shown in the screenshot above, you can choose either a static page or limit blog posts on your homepage to displaying summaries only. Doing so will greatly decrease server load when someone visits your website.

4 – Optimize Your Database

Optimizing your WordPress database can significantly reduce loading times, and there are a number of ways of doing this. You can optimize the database manually through phpMyAdmin, although by far the easiest way to do it is to use the Optimize DB plug-in instead. Download and install the plug-in through the administrator dashboard, and a new menu entitled ‘Optimize DB’ will appear in the Tools section of the dashboard. Simply click ‘Optimize Now’ as shown in the screenshot below to optimize all of the tables in your database.

5 – Reduce Your Image Sizes

Images can take up a great deal of bandwidth, particularly if they are not properly optimized and displayed in the right place. They will also make your website take much longer to load up. Particularly if bandwidth is limited with your chosen hosting package, you may want to consider hosting your images off-site on a free image hosting platform such as Flickr. Flickr also integrates well with WordPress, especially if you use a plug-in such as Flickr Shortcode Importer. You should also use thumbnail previews for your images, particularly if you have a lot of images on one page. Another option is to use WP Smush.it, a plug-in which reduces the sizes of your images as much as possible without noticeably sacrificing quality.

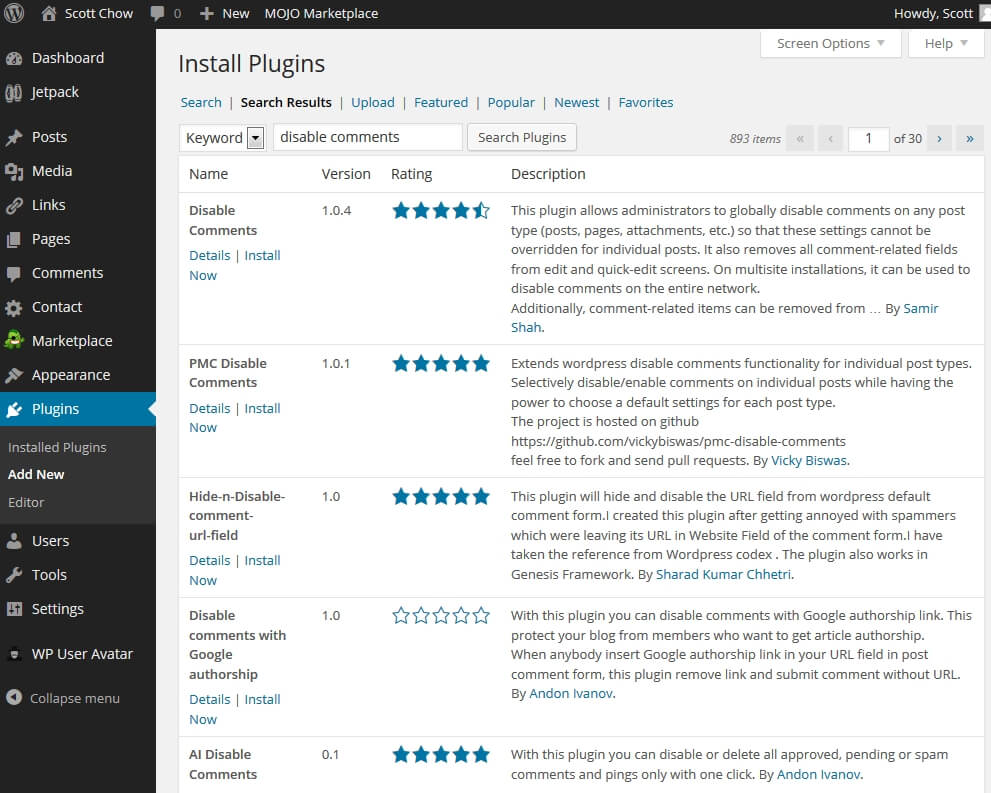
6 – Remove Unnecessary Plug-ins

Generally speaking, the more plug-ins your WordPress site has, the slower it will be. Firstly, you should remove all inactive plug-ins which you no longer use. You can always reinstall them again later. While going through your list, take a look at your active plug-ins as well. Particularly if you have more than around twenty plug-ins installed, you should get rid of any ones which you don’t absolutely require. You should also uninstall any themes which you don’t require, and while this won’t impact the performance of your blog, it will help to reduce disk space usage and keep your administrator dashboard better organized.

7 – Split Your Comments Section

If you have some pages on your blog which became extremely popular and generated hundreds of comments, you should consider splitting up the comments section into multiple pages, as doing so will significantly reduce bandwidth consumption when anyone visits the pages in question. You can find necessary options in the Settings > Discussion section of the administrator dashboard as shown in the screenshot below:

8 – Enable GZIP Compression

GZIP compression is one of the most popular and effective ways to reduce the loading time of your WordPress website or any other website for that matter. GZIP offers on the fly compression in which the webpage is compressed before it is sent to the browser, and in many cases, it can greatly reduce the size of the data being sent out. Some hosting companies enable GZIP compression by default in order to reduce bandwidth. If not, there are a number of plug-ins for WordPress which allow you to enable compression. The most popular plug-in for this purpose is W3 Total Cache, a tool which also provides many other performance enhancing features.

Be aware that W3 Total Cache is not compatible with WP Super Cache. You can find the setting to enable GZIP compression on the Performance > Browser Cache section of your administrator dashboard, as shown in the screenshot below:

9 – Update WordPress and Your Plug-ins

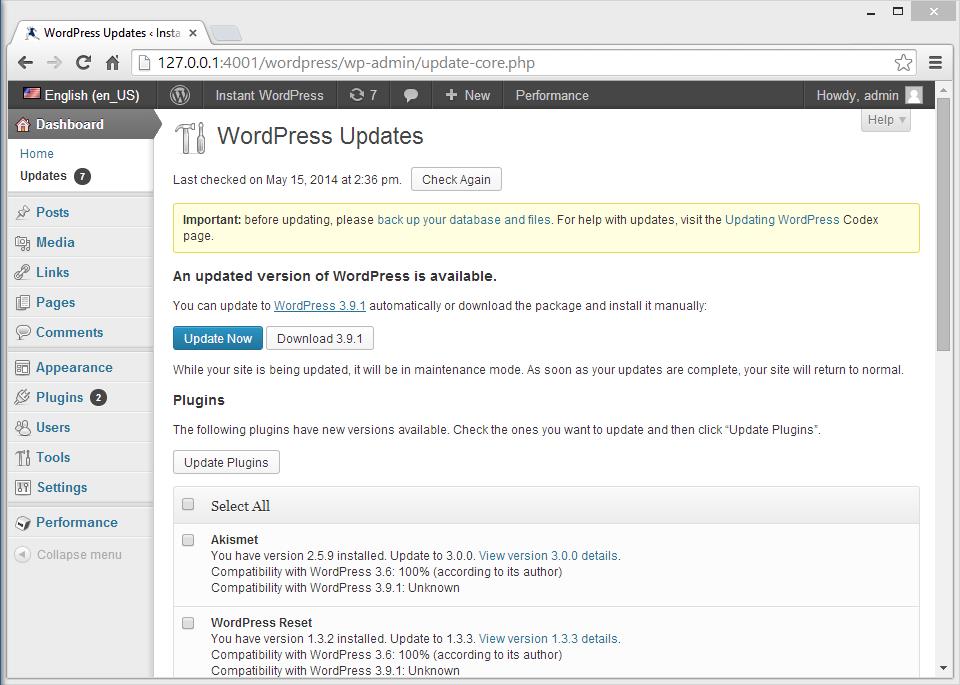
Both for the sake of performance and security, you should always keep the WordPress platform up-to-date. New versions are released quite regularly, and they present a whole raft of bug fixes, tweaks and other enhancements. When an update for WordPress is available, a notice will appear at the top of the administrator dashboard, and updating is just a click away. At the same time, ensure that your plug-ins are all up-to-date by navigating to the plug-ins page and choosing ‘Update’ from the Bulk Actions dropdown menu as shown in the screenshot below:

10 – Prevent Image Hotlinking

Hotlinking is a direct link to one of the images on your website from elsewhere on the Web. If the image is hosted on your website and there is a hotlink to it on another website, it will be your site’s bandwidth which is consumed. In the same way, services like Flickr allow you to host images and hotlink them to your website so that you use their bandwidth instead of yours. However, if images hosted on your website are being linked to by numerous other websites via direct links, your website can slow down significantly while also consuming your bandwidth. To disable image hotlinking, you’ll need to paste the following code into the .htaccess file in the root directory of your Web server:


RewriteEngine on

RewriteCond %{HTTP_REFERER} !^$

RewriteCond %{HTTP_REFERER} !^http://(www\.)example.com/.*$ [NC]

RewriteRule \.(gif|jpg|jpeg|bmp)$ – [F]


Edit the third line to include your own website address. If you want to allow any other domains to hotlink to your content, repeat the third line using the addresses of the allowed domains. You can also add other file types, such as MP3 or AVI to the fourth line by specifying their file extension and separating them with a vertical bar.

11 – Use a Content Delivery Network

Websites which receive a great deal of traffic may benefit significantly by using a content delivery network which copies your content to multiple servers so that visitors to your website will receive the content from the server which is nearest to them geographically. Some content delivery networks will only cache your media files and other bandwidth-intensive content on other servers around the world, while others cache all of your content. One of the most popular content delivery networks is Cloudflare.

How to Improve the Security of Your WordPress Blog

After a spate of brute force hacking attacks on the WordPress platform in 2013, many webmasters have started taking additional steps to protect their websites. Security should be your number one concern, particularly if you use your WordPress site for storing any personal or financial information or as an e-commerce website. While WordPress is one of the most popular content management systems in the world as well as one of the most versatile, these factors also make it a prime target for hackers using automated tools to get passed your login page and gain access to your administrator account. This guide takes a look at some of the most important and effective practices and plug-ins to help safeguard your website.

1 – Limit Login Attempts Plug-in

Limit Login Attempts is a plug-in for WordPress which allows you to set a limit on the number of times someone can attempt to log in to your administrator dashboard, either through the wp-admin page or by using authentication cookies. By default, WordPress does not have any limit on the number of login attempts, and this can leave your blog open to brute force hacking attacks. Download and install the plug-in from the administrator dashboard, and you will find a new menu appear in the Settings page called ‘Limit Login Attempts’ as shown in the screenshot below.

improve-wp-security-1

2 – Change Your Login Information

Using the default username for your WordPress administrator account is bad practice, as is using any other generic username such as ‘administrator’. The best idea is to use your first name or the name of your business. To change your username, log in to your administrator dashboard and navigate to Users > Your Profile and change the settings as shown in the screenshot below.

improve-wp-security-2

You can also change your administrator password in the same page, and you should do so on a regular basis. When creating a new password, make sure that it is a long one using both letters and numbers and preferably some special characters as well. Such passwords are practically impossible to hack using brute force methods. If you have multiple user account for your WordPress website, ensure that they also change their passwords regularly.

3 – Keep Everything Up-to-date

It should go without saying, that for the sake of security, performance and a whole range of other factors, you should keep your WordPress platform as well as all themes and plug-ins which you use up-to-date. Whenever a new version of WordPress is available, a notice will appear at the top of your administrator dashboard page, and you should install any updates as soon as they become available. Updates for the WordPress platform, as well as any themes and plug-ins which you have installed (including inactive ones) will appear on the Updates page. The number of available updates, if any, will appear in the top-left corner of your dashboard as shown in the following screenshot:

improve-wp-security-3

It is also wise to uninstall any unused plug-ins and themes, particularly if development for them has been discontinued. Doing so will be beneficial for both performance and security.

4 – Back Up Your Site Regularly

Things can always go wrong, so keeping a backup of your WordPress site and database is absolutely vital. While most hosting companies provide this feature for you, they sometimes charge a fee for if you want to retrieve your backup. For the best security, install the WP Backup plug-in or another similar plug-in. WP Backup will back up your entire website, including your database. It also integrates with Dropbox, provides automated scheduled backups and offers a one-click restore function. Download and install the plug-in from your administrator dashboard, and a new section entitled ‘Backups’ will appear in the sidebar as shown in the screenshot below:

improve-wp-security-4

On this page, you can configure scheduled backup tasks, and by opening the ‘Settings’ submenu, you can also manage Dropbox integration.

5 – Other Useful Security Plug-ins to Try

With security being the major concern that it is, it should come as no surprise that there are many security plug-ins to choose from. Following are some of the most popular options:

• iThemes Security: Formerly known as Better WP Security, this plug-in provides an extensive range of extra features and settings to help you secure your blog and detect any suspicious activity.
• BulletProof Security: This plugin protects your blog against many different types of hacking attempts by securing the .htaccess file in your website’s root directory.
• Securi Security: This plug-in checks your WordPress site for any suspicious software and other potential security threats such as comment spam and .htaccess redirects.

How to Add Links to Your WordPress Blog

If you are new to blogging with WordPress, you are probably wondering how to create links from your blog to other pages on the internet.

Creating links allows you to share useful information from other sites with your readers.  This allows you to connect with the global the internet community, and it is the reason the internet is sometimes referred to as “the web”.

The process for creating a link on your blog depends on where you want the link to show up.  I am going to show you how to add a link in your blog post and also in your sidebar menus.


How to Add Links to a Blog Post

Adding a link to within a blog post is actually rather easy.  The process I will explain also works for adding a link to a page.


  1. To start with, login to your WordPress dashboard and either create a new post or click to edit an existing post.  When you have done that you should be on the post editor screen.
  2. If you don’t have any text in your post yet, you will want to type whatever you want the link text to be.  This is what is known as the “anchor text” of the link.  For example, “Click here” is a popular anchor text.  Once you have the text you want for you link, you will need to select the text with your mouse to highlight it.  In the example below I have highlighted the text, “create a hosting account”.
  3. Now you will need to click on the paperclip icon (circled in red) just above the blog post text box.
  4. You will then see a pop-up box.  In the text area called “URL” you will enter the address of the page that you want to link to.  IMPORTANT: The address must start with either http:// or https://
    blog-post-link-4
  5. Once you have put in the address of the page you want to link to, click “Add Link”.  Then you will need to click the blue “Update” button to update your post.  The link will now be visible on your blog for everyone to see!


How to Add Links to Your Menus

Now we are going to see how to insert a link into the sidebar menu of your blog.  The sidebar is the area where you might see things like links to your recent posts, recent comments, or categories.  It is also a popular place for bloggers to put something known as a “blogroll” which is simply a list of links to other recommended blogs.  Here is how to add links to your sidebar menu:

  1. Go to “Plugins ==> Add New” and type “link manager” in the search box. Click “Search Plugins”.
  2. You should see the Link Manager plugin first in the search results.  Click “Install Now” and then click “Activate Plugin” on the next page.
  3.  This plugin has created a new item in the left menu of your WordPress dashboard called “Links”.  Go to “Links ==> Add New” to add a link.
  4. Now you can enter in the link text (anchor text) in the “Name” box, and the address of the page you are linking to in the “Web Address” box.  When you are done, click the blue “Add Link” button on the right.
    sidebar-links-4
  5. Now that you have created the link, you need to choose where it will go on your blog.  To do this, go to the left menu of your dashboard and select “Appearance ==> Widgets”.
  6. Now you are on the widgets page.  Widgets are simply helpful tools that you can add to the menus of your WordPress blog.  On the left of the widgets page you will see the available widgets.  On the right of the page you will see your menu areas (your menu areas may be different from the example depending on the theme you are using for your blog).  To add a widget you simply drag-and-drop it from the available widgets to menu you want it to appear in.  We want to add the “Links” widget, so we are going to drag-and-drop that into the appropriate menu.
  7. Once you have put the “Links” widget where you want it you can select any options you want and then click the “Save” button.
  8. Your link is now live in your blog sidebar!


How to Disable Comments in WordPress

There are several reasons you may want to disable commenting in WordPress.  The most common reason is that you are using WordPress for some type of site other than a blog.

There are a variety of workarounds to disable comments. The simplest is to go to “Settings ==> Discussion” and un-check the box that says “Allow people to post comments on new articles”.

Unfortunately, this can be a hit-or-miss because, as the warning on that page says, “These settings may be overridden for individual articles.”

Because of this, many find it easier to install a simple plugin that makes disabling comments easier to control.  Here’s how to do it:

  1. From your WordPress dashboard navigate to “Plugins  ==> Add New”.
  2. In the search box type “Disable Comments” and click “Search”
  3. The “Disable Comments” plugin should be the first result.  Click “Install Now” and then click “Activate Plugin” on the next page.
  4. Navigate to “Settings ==> Disable Comments”.  Select the options you want and click “Save Changes”

10 Amazing Free WordPress Themes for 2014

There are already well over one-thousand free WordPress themes available through the WordPress administrator dashboard itself, as well as many more both free and paid themes available elsewhere. While there is something to suit just about every website out there, you can find yourself being spoiled for choice. This article takes a look at some of the best free themes available right now for the world’s most popular blogging platform.

1 – vFlex

vFlex is a responsive theme which includes a number of additional customization options, including the built-in FlexSlider feature. This allows you to choose featured images, logos and more to truly make your blog your own. This theme is ideal both for conventional blogs and portfolio websites which showcase your best work. The layout is well optimized for cross-platform functionality, so it will look good on mobile phones, tablets and other devices.

2 – Appliance

appliance

If you are looking for a minimalistic theme which is great for conventional blogs, online magazines or portfolio presentations, this highly customizable free WordPress theme provides a clean and professional look. It presents your posts and pages in the form of tiles on the homepage, making it best suited to blogs with posts featuring eye-catching images. The design is very light on the coding as well, making it quick to load and suitable across all platforms.

3 – Noteworthy

 noteworthy

Noteworthy is another professional theme which is great for showcasing content and online magazines thanks to its dark color palettes and responsive layout. The author of the theme claims that he was inspired by the style of the USA Today website. By default, your featured or recent posts will appear as tiles on the front page, and these tiles will be automatically rearranged depending on the size of the window or screen resolution of the device used to view it.

4 – Origin Lite

origin-lite

Origin Lite is another theme which takes a professional and minimalistic approach for blogs and websites which want minimal clutter hindering user interaction. This responsive theme is ideal for a wide variety of blogs and websites as well as portfolio presentations. It comes with a customizable image gallery on the front page, a two-column layout and a range of custom widgets. There is also a more feature-rich paid version of this plugin.

5 – Customizr

customizr

Customizr is one of the best themes currently available for those who want to make their blog look as unique as possible without having to design their own theme from scratch. The base design is minimalistic and professional, but users can customize all sorts of features including skins, logos, headers, social media profiles and page layouts. The theme is also available in fifteen languages. Customizr uses a responsive design layout for cross-platform compatibility.

6 – Swift Basic

swift-basic

Swift Basic is the free version of the popular Swift theme. This professional and responsive theme is designed to be quick loading and highly customizable. It is also one of the most advanced and effective SEO-orientated themes around. It supports a practically infinite number of different layouts thanks to its customization features, and it supports all of the built-in features which come with WordPress, including post types and formats and more.

7 – Attitude

attitude

Attitude’s simple and minimalistic responsive design makes it ideal for cross-platform use, and while the base theme might not look very inspiring in itself, it provides a wide range of customization options. You can choose between narrow and wide layouts as well as different layouts for different posts and pages. It provides five widget areas, four custom widgets, social media integration, custom backgrounds and headers and much more.

8 – Vantage

vantage

Vantage is another responsive multipurpose theme which also comes with some useful plugins such as Page Builder for optimizing responsive design layouts. It also provides great integration with the MetaSlider plugin and the WooCommerce plugin for online shops. This retina-ready theme is ideal for professional blogs and websites used to showcase content, market a business or operate an online store. It also supports custom backgrounds and fluid layouts.

9 – Virtue

virtue

One of the most versatile of the free themes currently out there, Virtue offers a vast range of customization options. The base design is clean, minimalistic and modern while using a responsive design so that your blog will look great on any screen of any size. It is also fully compatible with WooCommerce, making it ideal for online stores. The included options panel allows you to configure everything from the layout of your homepage to the configuration of custom fonts and color schemes.

10 – Sixteen

sixteen

Sixteen is a responsive theme with an artistic feel about it. The most notable feature of this WordPress theme is the customizable header images which support parallax scrolling effects. You can choose from a variety of grid layouts for the homepage and fully customize the headers and footers. The theme is available in a number of other languages as well.