How To Migrate Your Wix Website to WordPress
The Wix platform is alluring for new and small businesses when they are able to get a website up and running quickly on a limited budget. But after a while, this allure fades with the realization of major limitations and the need to pay for each and every plugin and module that soon becomes a necessity.
A WordPress hosted website is hard to beat and the statistics speak for themselves. Over 30% of all websites use the WordPress codex for many reasons: a vast repository of completely free plugins and tools, superior SEO, thousands of free themes, and a much easier platform for customizing.
With Wix feeling a steady loss of customers to WordPress, they recently disabled their RSS feed, a tool commonly used to transfer blogs, in an effort to staunch the steady flow of Wix customers jumping ship for WordPress by making it more difficult for customers to transfer data.
If you have an older Wix site, you may still have a feed. But if your website is newer on Wix, you may have no feed and might have to take manual steps for a transfer.
Let’s explore the steps needed to be taken in order for you to transfer your site from Wix to WordPress without a loss in traffic or SERPs (Search Engine Results Placement).
1) Sign Up For WordPress Hosting
A web hosting company will give you space on a web server where you can install WordPress. This sounds complicated, but the process is actually pretty simple.
For WordPress sites I personally recommend using BlueHost.com as your web host. BlueHost has been recommended by WordPress since 2005, and currently hosts several million websites. WordPress also comes pre-installed, which makes this whole process much easier.
Disclosure: BlueHost compensates me when you purchase with this discount link, so all of my help is free of charge to you! Contact me if you have any problems transferring from Wix to WordPress.
Once you complete your registration with BlueHost you can continue with the steps below to get everything migrated over from Wix.
2) Get A Temporary Domain
Since your domain is likely tied up with Wix, you can start building your new website straight away on a temporary domain provided to you for free with your web hosting plan.
3) Log In to WordPress
You can log in to WordPress directly from your BlueHost dashboard.
Alternatively, you can log in to the backend of WordPress using your temporary domain with /wp-admin appended to the URL.
http://yourtemporarydomain.com/wp-admin
4) Pick a Theme and Customize
In the backend of WordPress, also known as the dashboard, navigate to Appearance > Themes.
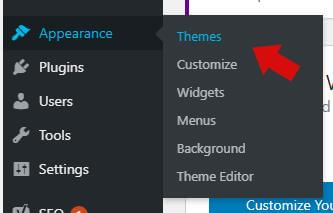
At the top of the next screen, select “Add New”.

Here you can search through the WordPress Repository for thousands of free themes. Search by popularity, or the newest, or by using the feature filter to find specific needs. You can even use the search bar to find a possible theme related to your business through the use of keywords.
Once you find the perfect theme, download it and then activate it.
You can customize the theme by navigating to Appearance > Customize on the left side of the dashboard. And to view your progress at any time, simply view the site in a separate browser tab without the /wp-admin in the URL.
4) Create a Menu and Pages
Take note of your existing pages on Wix and create the same ones on your new site.
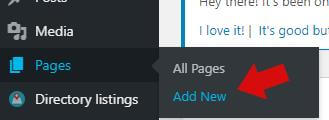
Easily create all of the pages you need by navigating to Pages > Add New.
Title each page, leaving the body blank for now, and save them. Don’t forget to create a “Home” and “Blog” page. After these two pages are created, navigate to Settings > Reading to set your Home and Blog (Posts) page.
Once you’re done, navigate to Appearance > Menus and click the link to “Create a New Menu”.

Fill your new menu with the top-level pages you just created by dragging and dropping them over from the left module and save when you’re done. Don’t forget to set the menu position which is theme dependent. It is usually the “Main Menu” position.
5) Set Your Permalinks
Navigate to Settings > Permalinks to change your URL structure which is a good step to take prior to your move.
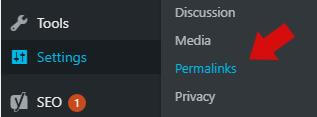
Change the Permalinks structure to “Post Name” and click Save Settings.
6) Transferring Your Data
Now that you have your WordPress website ready to go, it’s time to transfer your data. And this is where it gets tricky. There are several methods and parts that can be employed. The two main methods are manual (free) and automatic (paid). With the free manual method, you may be able to transfer the blog quickly and easily if your Wix account has an RSS feed.
If you want to use a paid plugin to transfer everything quickly and automatically, skip to Option Two: Automatic.
Option One: Manual (Free)
1) Determine if your Wix website has an RSS feed. You can do this by navigating to your Wix website and appending /feed.xml or /blog-feed.xml to your URL. If you don’t have a custom domain and instead have a Wix subdomain, use the URL:
username.wixsite.com/blogname/feed.xml
or
username.wixsite.com/blogname/blog-feed.xml
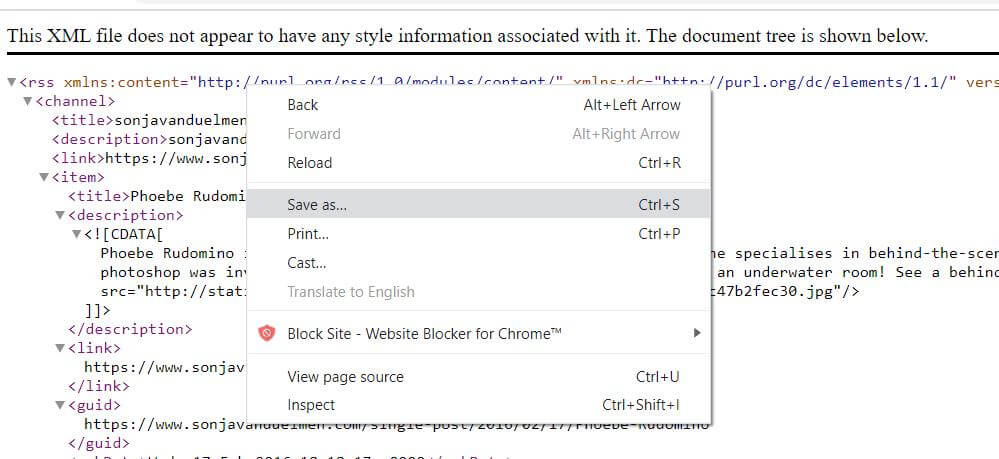
If one of these URLs produces a feed, right-click anywhere on the feed and click “Save As” to save the XML file to your computer.
Now, let’s import all of your blog posts through the WordPress RSS feed importer.
In your WordPress dashboard, navigate to Tools> Import, and under RSS, click “Install Now”.
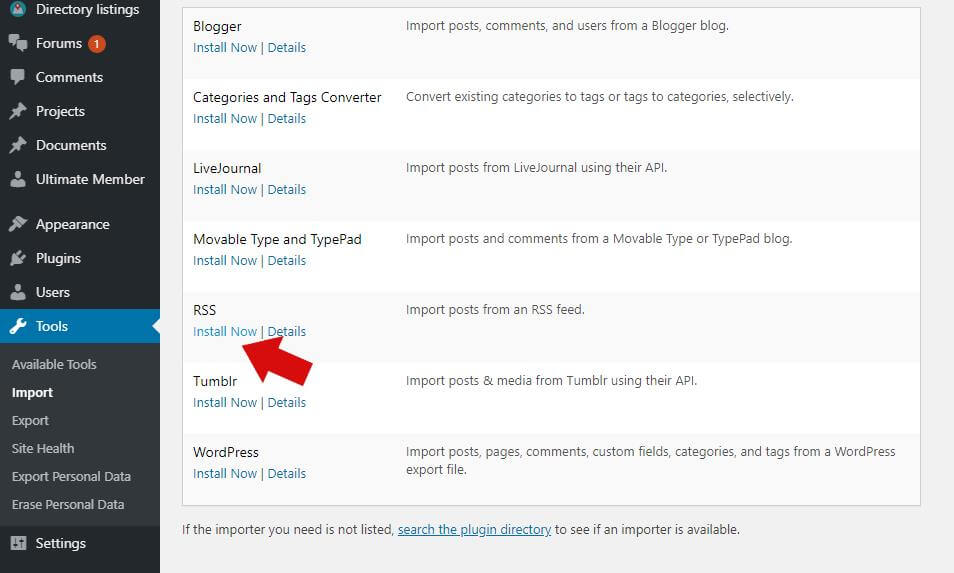
When the “Run Importer” link appears, go ahead and click it. Next, click “Choose File” and select the XML file you recently downloaded, and then simply run the import. Depending on how many blog posts you have, it may take anywhere from a few seconds to several minutes.
When the import is complete, check to see if your posts have been uploaded. Navigate to Posts > All Posts and confirm all of your blog posts have been uploaded.
While the blog posts are there, we encounter another problem: the images are not hosted on your site. But there is another quick and easy fix.
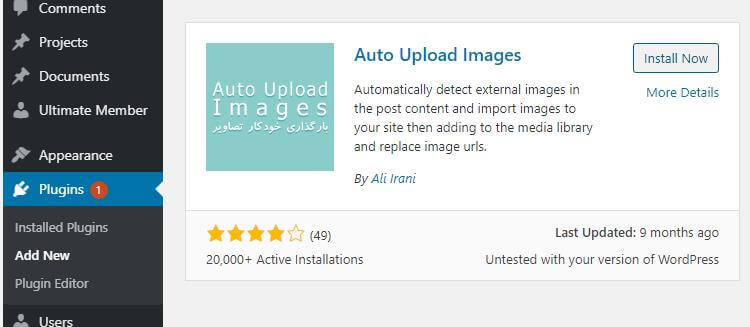
Navigate to Plugins > Add New and conduct a search for “Auto Upload Images”. When the plugin appears, download it and then activate it. This plugin will look for external images and then upload them to your server, but only when a page/post is saved.
The plugin works automatically when you open up any post and save it by looking for an external image and then uploading and replacing it.
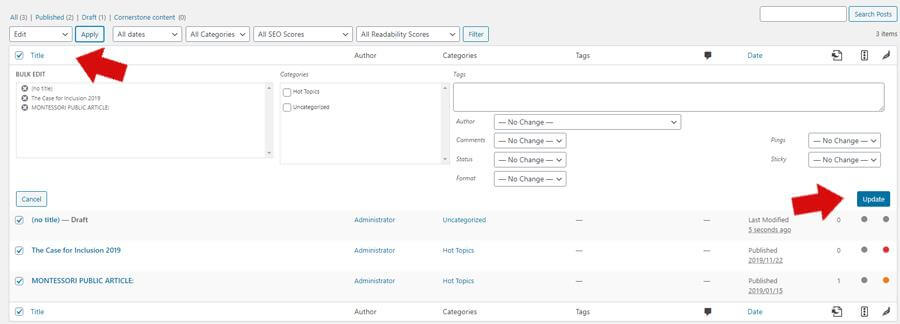
If you have many blog posts, you can save them all simultaneously by going to Posts > All Posts and selecting “Screen Options”. Change the “Number of Items Per Page” to 999 and then click “Apply”. This will display all blog posts on one page.

Now you can tick the very top checkbox above all posts which will then check all blog posts automatically. Change the dropdown to “Edit” and then click “Apply”. This will open a box under the first blog post. Click “Update” and all of your posts will be saved, automatically uploading and replacing all images.
To make sure this worked, navigate to Media > Library, and confirm all images have been uploaded. It may take several minutes for all images to appear.
When you’re satisfied that all images have been uploaded, deactivate and remove this image uploader plugin.
Now that your blog has been moved over, the next step is to import your pages. Unfortunately, this must be done manually through copying and pasting the text. There is no automatic importer for pages.
And if you have no RSS feed, all blog posts must also be copied over manually.
Option Two: Automatic (Paid)
This option will transfer all posts, pages, and images to your new site with a click of a button. And it’s very inexpensive to boot! Pricing depends on the number of pages and posts you have.
CMS2CMS provides plugin software for a variety of platforms, and they are commonly used for Wix to WordPress migrations. You cannot download this plugin from the WordPress repository.
Navigate to CMS2CMS and visit the pricing page.
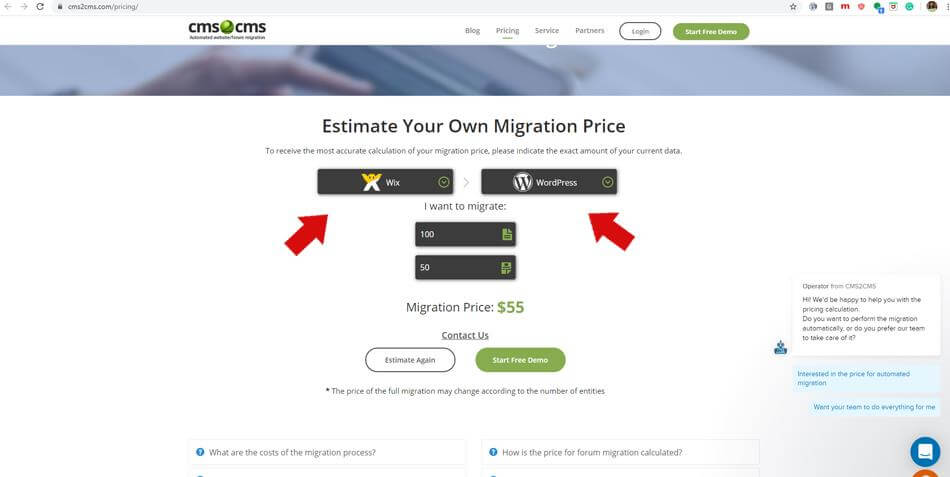
Change the first box to Wix and the second box to WordPress. Change the number of estimated pages and taxonomies, and the system will give you an estimated price. Next, try the demo to see it in action.
CMS2CMS will provide you with the plugin and instructions for use. It is easy, affordable, and they have great customer support with – gasp! – real people at the helm!
7) Make a List of Your URLs
Now that you have pulled your content over, it’s time to make the final switchover as long as you’re okay with your new site’s appearance. First, make a list of all URLs (all pages and posts) on your existing Wix site. For posts, you don’t need to list every single blog post URL- just note the structure of one blog post URL.
8) Point Your Domain
Who has control over your domain name? If your domain is hosted by Wix, you will need to transfer your domain to your new hosting provider. Simply log into your Wix account, navigate to your Subscriptions and then click on “Domains” in the dropdown. Choose your domain and then select the “Advanced” tab. Choose “Transfer Away from Wix” and you will receive a code.
Use this code in the domain section of your hosting provider to transfer the domain to you.
If the domain is somewhere else in your ownership, you can simply point the domain to your new server by altering the nameservers. Your hosting provider will give you the nameservers.
When the domain is pointed to your server, it often takes 24 hours to propagate globally.
9) Change Your Domain References
Your website is likely built using the temporary URL. Therefore, we need to change all references to this URL to the new one.
Navigate to Plugins > Add New and search for Better Search Replace. Download and activate this plugin.
Now navigate to Tools > Better Search Replace and you’ll find an easy-to-use interface. This plugin will replace all references of your temporary URL with the new one.
In the “search for” bar, enter your temporary URL. There may be variations such as with or without an http or https.
And then choose to replace it with your new URL.
TAKE CARE TO MAKE SURE THE URLS MATCH. A full temporary URL should replace a full new URL. If one has a trailing slash at the end, so should the other. You do not want to replace tempurl.com with a URL with https:// because it will then be rewritten as http://https//newurl.com in many cases.
When you are certain you have the correct URLs, highlight all tables, click “Replace GUIDs”, uncheck “Dry Run”, and run the search/replace.
When finished, you will have to log back in again using the same credentials, but under the new domain.
10) Redirect The URLs
You’re almost done!
Compare the list of Wix URLs to your new URLs. There may be some differences in URL structure. If so, let’s create some redirects to make sure we tell Google and other search engines, as well as visitors following old links, that the pages have been moved.
Navigate to Plugins > Add New and search for Redirection. When you find the plugin, install and activate it.
After activating, you’ll notice a message at the top of your screen.
Redirection needs to make changes to your database. Click the link and proceed with the updates which take a couple of steps.
Once finished, navigate to Tools > Redirection. Here, add in your old URL slug and the new one. Then click “Add Redirect”. You can test to see if the old URL is redirected to the new one in a new browser window.
Once all redirects are in place, you’re officially transferred over. Congratulations!