
If you are a person who is interested in building websites or web applications, odds are, you have heard of Ruby on Rails. If you are here reading this, more likely than not, you would like to better acquaint yourself with the wildly popular web application framework. If this is the case, you’re in the right place!
In this tutorial, we will first walk through the basics of Ruby and Rails including a brief overview and history of Ruby (the programming language that powers Rails) and Rails, the Ruby powered framework. Next, we will cover installing Ruby (the programming language), Rails (the framework), and a few other prerequisites on your computer so that you can build your first Rails application. Finally, and most importantly, for the majority of this tutorial, we will build a blog application together using Ruby on Rails.
With that brief introduction out of the way, let’s get on with this tutorial!
What is Ruby?
If you are new to Ruby on Rails, it is important to first know what Ruby is, so what is Ruby? Ruby is an object oriented programming language based on another popular programming language, C. Introduced in the early ’90s by a Japanese programmer named Yukihiro “Matz” Matsumoto, Ruby was created “to make programmers happy”. How does Ruby achieve this goal? Ruby makes programmers happy by being a programming language that is read and is written like plain English.
Other than being the foundation for Rails, why bother learning Ruby? First and foremost, because Ruby is written and read like English, the learning curve for Ruby is much lower than with other programming languages. Beyond the fact that Ruby is quick and easy to learn, it is object oriented, offers lots of powerful tooling, and has a huge, supportive open-source community backing it.
What is Rails?
Rails is an open-source web application framework for rapidly developing database-backed web applications. In other words, Rails is a tool that allows anyone to quickly build out powerful web applications with minimal effort as compared to other similar tools. To give you an idea of how powerful a tool Rails is, we will list a few of the many well-known web applications that are built on Rails. This star-studded list includes Airbnb, Shopify, SoundCloud, Hulu, Twitch, and Square.
A slightly more technical explanation of Rails would be that Rails is a web framework for Ruby which uses Ruby on both the front and back end to communicate with the database and displays data to users. In order to pass information back and forth between the users and the database, Rails uses what is known as the “Model, View, Controller” or MVC style of organization. While Rails was not the absolute first MVC framework, it is one of the first popular implementations of this organizational method and many give it credit for popularizing this method of structuring web applications. MVC application structure is now conventional in almost all web application frameworks meaning that there is no better place to start developing for the web than with Rails.
While all this talk of databases, models, views, and controllers may seem confusing at first, the best way to understand these topics is to see them first hand, so let’s get to it! Next up, we will set up your computer with the prerequisites required to run Ruby and Rails and jump right into building your first Rails application.
Installing Prerequisites
In order to use the latest version of Rails (Rails 6), you need to have several other tools installed on your computer. These tools are:
- Ruby (the programming language that will oversee the logic of your application)
- SQLite3 (a database engine for storing all your application’s data)
- Node.js (an engine for running your application’s JavaScript)
- Yarn (a package manager to manage your application’s JavaScript)
The most involved of all these installations will be Ruby, so we will cover that in depth first. The other three installations should be relatively straightforward and we will link out to their respective installation instructions provided by their creators.
Installing Ruby
If you don’t already have Ruby installed on your computer or if your Ruby version is less than 2.5.0, this is the first step in the process of getting going with Rails. Some of you may already have Ruby installed or may be unsure if you do or don’t, so before we start the installation, let’s check and see if this is the case.
The first step to checking if Ruby is installed on your computer is to pull up your terminal. For Mac users, you will open up the application called “Terminal”, for Windows users, your terminal application is called “Command Prompt”. On both types of systems, the terminal application is installed by default and you can find it by searching your computer.
If this is your first time using the terminal, congratulations, you are now a real programmer. We will be using the terminal for the duration of this tutorial so you can leave it open for now. For those of you who are new to the terminal, the basic pattern for using the terminal is as follows:
1. Type in a “command”
2. Press enter to “run the command”
3. See what the “return” or “output” of the command is
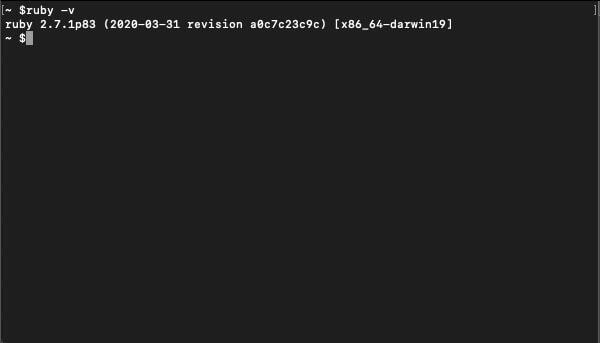
Once your terminal is open, type in the following command and then press enter:
ruby -vThis command should return the version of Ruby that you have installed on your computer as is depicted in the screenshot below. If the number printed is less than 2.5.0, you will need to continue with this section and install the latest version of Ruby (2.7.1 at the date of publication). If the number is greater than 2.5.0, you can skip ahead to installing Rails.
If your computer doesn’t have Ruby on it at all or if the version is less than 2.5.0, you’ll need to install the latest version. This step will be different for Mac and Windows users and the instructions for both operating systems are outlined below.
Installing Ruby on Windows
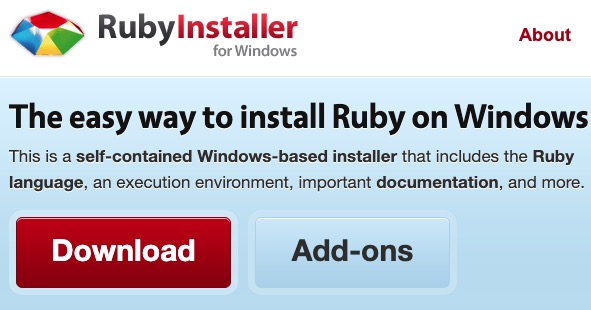
If you are using Windows, this step is going to be easier for you than for your Mac using counterparts. All Windows users will need to do is visit https://rubyinstaller.org/ and click the big red “Download” button that is close to the top of the homepage.
This will download a .exe file which will walk you through the Ruby installation by clicking through a graphical installation process. It is recommended that you leave the default settings as they are and simply click through this installation.
Once the installation is complete, close and re-open your command prompt and execute the same command from before:
ruby -vThis should now return:
ruby 2.7.1There will also be some characters after that, but so long as the returned output begins with ruby 2.7.1, you are in the clear and can carry on to installing other prerequisites.
Installing Ruby on a Mac
Mac users, this step can be difficult, so be patient with yourself and try to work through errors if they come up by copying and pasting them into Google.
With that said, installing Ruby on a Mac requires that you install what is known as RVM or the Ruby Version Manager. The RVM is a set of command-line tools that allow you to have multiple versions of Ruby installed and switch between them. RVM is an incredibly useful tool and will come in handy down the line, so it is great that you are starting your Ruby career by familiarizing yourself with this tool. The downside to this way of installing Ruby is that you will need to install it via the command line which can be intimidating if this is new to you.
With your terminal open, the first step is to enter and execute the following command:
gpg2 --recv-keys 409B6B1796C275462A1703113804BB82D39DC0E3 7D2BAF1CF37B13E2069D6956105BD0E739499BDBThis command tells your computer that you trust the RVM installer and that it is safe to allow it to modify your computer.
Next, you can install RVM and the latest stable version of Ruby by running the following command:
\curl -sSL https://get.rvm.io | bash -s stable --rubyThis may take several minutes to execute, but you will know it is done when your terminal shows the $ with a blinking cursor again. Once your cursor returns, you can then run the following command:
ruby -vThis should now return:
ruby 2.7.1There will also be some characters after that, but so long as the returned output begins with ruby 2.7.1, you are in the clear and can carry on to installing Rails.
If you run into trouble with this step, check out the official RVM installation documentation here: https://rvm.io/rvm/install.
Installing SQLite3
Many computers come with SQLite3 installed by default. You can check if this is the case for you by running the following command in your terminal:
sqlite3 –versionThis should return:
3.32.3or some other variation that starts with a 3 such as:
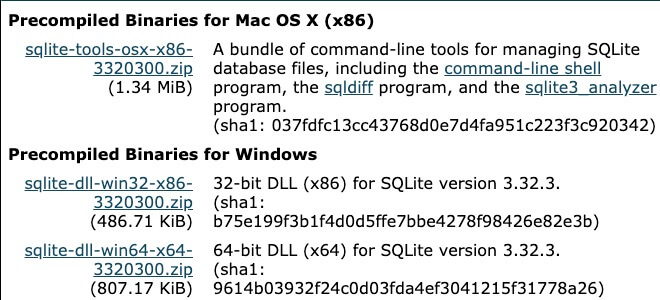
3.28.0This number will be followed by some other characters, but so long as it starts with a 3, you have SQLite3 installed. If this command does not return your SQLite3 version, you will need to download and install SQLite3 by visiting https://www.sqlite.org/download.html and download/install the latest precompiled binaries for your operating system. To do this, you will need to click the appropriate one of the following three links (depicted in the screenshot below) based on your system.
Once downloaded, simply click through the installation and you will be ready to use SQLite3.
Installing Node.js and Yarn
Because the latest version of Rails (Rails 6) relies heavily on JavaScript behind the scenes, these two tools are now required to use Rails. You will need to install Node first and can do so by downloading the installer for your operating system here: https://nodejs.org/en/download/ once downloaded, you can click through the installation to install Node.
Once installed, you can run the following command to make sure Node installed correctly:
node –versionThis should return:
v12.18.2Or something similar. All that matters is that the number is 8.16.0 or above.
Yarn is a bit more tricky, but it still shouldn’t be too bad. You can find the installation instructions for Yarn on their website here: https://classic.yarnpkg.com/en/docs/install
Yarn’s website will detect what operating system you are using and walk you through the appropriate installation instructions.
Once installed, you can run the following command to make sure that Yarn is installed correctly:
yarn -vThis will return
1.22.0or something similar.
Installing Rails
Once you have a version of Ruby installed on your computer that is 2.5.0 or above, along with SQLite3, Node.js, and Yarn, you are ready to install Rails!
Installing Rails is incredibly easy because it is a Ruby “Gem”. If you are familiar with WordPress plugins, Gems are the Ruby version of this concept. Basically, Gems are prepackaged code that you can install and use with little or no configuration. With Ruby installed, you can install Gems via the command line.
To install the Rails Gem, all you will need to do is execute the following command:
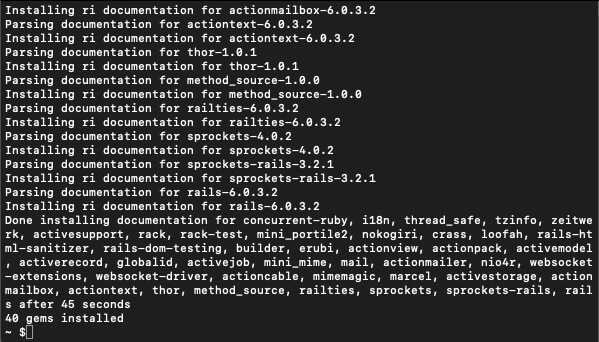
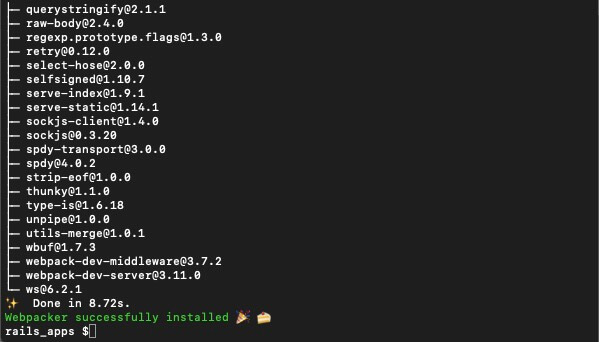
gem install railsRunning this command will then put Ruby to work fetching and installing all of the dependencies that Rails requires to run. This process is resource intensive and will probably take 3-10min depending on how powerful your computer is and how fast your internet is. Once the installation is complete, your terminal window should look something like the screenshot below.
Once Rails is done installing, you can double check that the installation went as expected by running the following command in your terminal:
rails –versionThe output should be:
Rails 6.0.3.2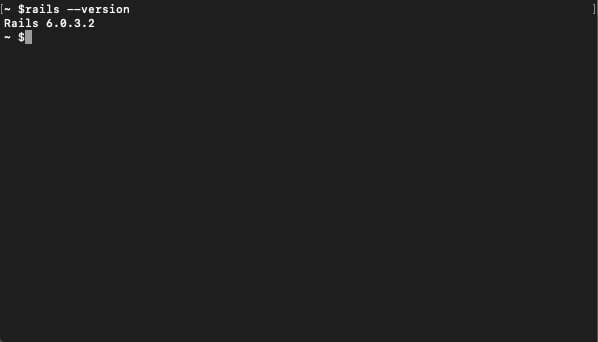
The numbers after the 6 may be different for you, but as long as the first number is a 6, you have successfully installed the latest version of Rails!
With Rails and all of its prerequisites installed, it’s time to move on to the fun part of this tutorial, building your first rails application!
Getting Started With our Application
Congrats! Believe it or not, if you have made it this far, you are past the hard part. Configuring your computer to start coding is significantly harder than building a simple Rails application. It is also much less rewarding. This part should be fun.
As already mentioned, we will be building a blog. Why build a blog? We will build a blog because all other applications are basically blogs with a few extra features (Facebook, Craigslist, Wikipedia, etc..) when it comes down to it. This means that once you know how to build a blog, you will be able to use this foundation to build more complex applications.
That said, before we start building, there is one other strongly recommended prerequisite before we get going and this is a code editor. While you can edit code using a plain old text editor (code is just text after all), code editors are text editors that add color to code to make patterns more recognizable and code easier to read. The code editor that will be shown in this demonstration is Sublime. Other popular free editors are Atom and VS Code. Here are links to download those editors:
- Sublime: https://www.sublimetext.com/3
- Atom: https://atom.io/
- VS Code: https://code.visualstudio.com/Download
If you are unsure which one to use, sticking with Sublime might be wise just to be in sync with the screenshots in this tutorial. Once you have downloaded and installed one of these (or perhaps another one that seems to be the best fit for you), we can start writing some code!
To lay the foundation for our Rails app, we will use the “rails new” command followed by the name of our application. This command will generate a new folder with the name of our application which will contain several other files and folders generated by Rails.
Before running the “rails new” command, it is recommended that you create a folder that will contain all of your Rails apps. For us, this folder is simply a folder on the desktop with the creative title of “rails_apps”. You can name it and place it wherever it feels easiest for you to access.
Once you have a folder for your Rails apps, go ahead and open up that folder in your terminal by either navigating to it via the command line or by opening it up in another way that you feel more comfortable with. If you are still becoming familiar with the terminal, here is an article with 10 ways to open the command prompt on Windows:
https://www.howtogeek.com/235101/10-ways-to-open-the-command-prompt-in-windows-10/
And here is a similar article for Mac users:
If you are on a Mac, you can also just drag the folder over the terminal application and the terminal app will open to that folder.
Once you are in the folder where you want your Rails app to live, you can run the following command to create your Rails app:
rails new bionic_blogMuch like installing Rails, this command will take a while to run because it is downloading and installing dependencies while also building and creating the foundation for your Rails app. While you wait, we will give a brief explanation of that command.
First up in this three-word command is the word “rails”. This portion of the command tells your computer that the following words in the command will be commands related to Rails. The next word is “new” this says that you want to create a new Rails application. Finally, the third portion of this command is the name of the application. In this case, our application will be called “bionic_blog”. We could have called it “blog” or “bashful_blog”, but bionic just sounded more exciting.
The only important piece to remember when naming your application is to keep your name to one string of characters. If you include spaces in the name of your application, Rails will get confused. Seeing as our application has a multi-word title, we separated the two words with underscores as this is the convention within Ruby. Convention means that naming things this way isn’t required, but it is strongly recommended.
At this point, your Rails application is probably still building itself and you are seeing a bunch of green text stream across your terminal. Once it is done, the cursor will return to your terminal and your terminal should look something like the screenshot below.
What Did Rails Create For Us?
Once your Rails app has been created successfully run the following command to move into the folder containing the contents of your new Rails application:
cd bionic_blogThe command “cd” stands for “change directory” which is just another way to say change folder (directory and folder are synonymous) and is followed by the directory we want to change into. Once this command is run, you can verify that you are inside the directory with the contents of your Rails app by running the following command on Windows:
diror, if you are on a Mac, the command is:
lsThis command will list off all the files and folders within the current directory (in this case, our Rails app). The output should look something like the screenshot below.

If that is what this command returns for you, you are on the right track and you can open up your Rails application in your code editor of choice. All code editors can be configured to be opened from the command line and this is recommended. To figure out how to set up this shortcut on your machine, simply Google “how to open a folder in **the name of your code editor here** via the command line on **the name of your operating system here**” and you will be able to find instructions on how to set up this shortcut.
You can also open your code editor and go with the classic “file > open” and find the name of your Rails app via the graphical interface if that is more your speed.
Either way, you should now have your Rails app open in your code editor and can start exploring all the files that Rails just created for you. There are a lot of files to explore, so here is a quick rundown of all the important folders and files that you will find.
app/– This folder contains the controllers, models, views, helpers, mailers, channels, jobs, and assets for your application. This is where most of the coding happens.
bin/– This folder contains the scripts related to starting, deploying, updating, and running your application. Feel free to look over the contents of this folder, but don’t edit anything here as it could cause some serious trouble down the road.
config/– This folder contains all the files related to configuring your application’s routes, databases, and more. The only file in here that we will touch is routes.rb, other than that, we won’t pay this folder much attention.
config.ru– This file contains configuration information for the rack-based servers used to start the application. It is best to leave this untouched unless you know what you’re doing.
db/– This folder contains your current database schema as well as the database migrations. We will run a Rails command that will modify the contents of this folder, but rarely will you ever need to modify the contents of this folder by hand.
Gemfile, Gemfile.lock– These files allow you to add “Gems” (kind of like plugins, remember?) to your Rails application.
lib/– This folder contains extended modules for your application. Not much to see here.
log/– This folder contains the log files for your application. You shouldn’t need to do much in this folder while your application is in development, but it can be useful if something goes wrong in production.
package.json– This file allows you to specify the “Yarn dependencies” for your application. These are kind of like Gems, but for the JavaScript portion of your app.
public/– This folder contains all of the static files and compiled assets that are made available to the public when your app is live on the web. It is good to be aware of that, but the contents of this folder are generated automatically and you shouldn’t have to edit them.
Rakefile– This file finds and loads tasks that can be run in the command line (such as “rails new”). These task definitions can be found throughout Rails. Rather than changing the Rakefile to add new tasks, you should add them to the lib/tasks directory of your application. That said, you definitely won’t need to do this for your first Rails app, but this is good to be aware of in the future.
README.md – This file is made to contain all of the instructions for editing and running your application. It should provide all the information that another developer would need to make changes to your application. You can edit it accordingly.
storage/ – This folder contains Active Storage files for Disk Service. You won’t need to make any changes here and shouldn’t unless you know what you’re doing.
test/ – This folder contains all the files related to testing your rails application. Testing is a good idea and while it won’t be covered in this tutorial, it is worth familiarizing yourself with the concept.
tmp/ – This folder contains temporary files (like cache and pid).
vendor/ – This folder is a place for all third party code. Typically, it contains the code from your Gems.
.gitignore – This file tells Git which files it should ignore. If you are using Git (which is recommended) it is important to add the names of any files or folders which contain private data to this file so that they don’t end up on the web.
.ruby-version – This file contains the default Ruby version.
This brief tour is just scratching the surface, but hopefully it helped orient you a little bit, because it is time to start writing some code!
Building our “Resource”
In the world of Rails, the types of data that our app works with are called “Resources” in the case of this application, we are building a blog. What kind of data does a blog display? Well, blog posts of course! Because of that, the resource will be creating will be called “Post” with all the attributes that blog posts have.
You may be thinking “Shouldn’t we call it ‘Posts’, we want to have more than one post, right?” This thought is normal, but try to go against your instincts here.
When creating resources, we are creating a prototype that the many different instances of this resource will adhere to. Because of this, Rails wants to know what the name of this prototype is, and what attributes it will have. For Rails to understand this, it needs to receive the name of the resource as a singular, capitalized word followed by the attributes it will have. So, let’s think about our Post resource for a moment and what attributes it will have.
At the very least, all blog posts have an author, a title, and the content of the blog. Some blog posts have more than that, but let’s keep it simple to start. We will have a Post resource with author, title, and blog_content attributes.
Part of what makes Rails great is that it makes creating resources quick and easy thanks to the “scaffolding” feature. Scaffolding creates your resource in the database, and creates Ruby “methods” in the controller for creating, reading, updating, and deleting instances of your resource. Scaffolding also creates “views” for looking at all instances of your resource, a specific, single instance of your resource, and a page to edit instances of your resource. This is part of the magic of Rails and why it is such a popular choice for rapid application development.
With that bit of information out of the way, it is time to actually scaffold our post resource. To do this, make sure you are inside of the folder containing your Rails application within your terminal and type in the following command:
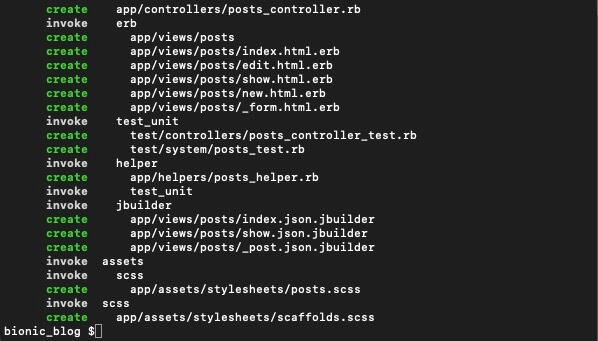
rails g scaffold Post title:string author:string blog_content:textThis command will prepare a “Post” table for your database which will contain all of your posts and create three columns within that table for the three attributes you specified. The columns for post titles and authors are made to contain strings (short bits of text) as was specified in the command. The column for the blog_content is made to contain “text” a specific datatype for longer selections of written content. When adding attributes to Rails resources, you must specify what types of data those attributes contain (string, text, integer, etc…).
This command will also create several other files that will be listed in the output. The output of the command should look like the screenshot below.
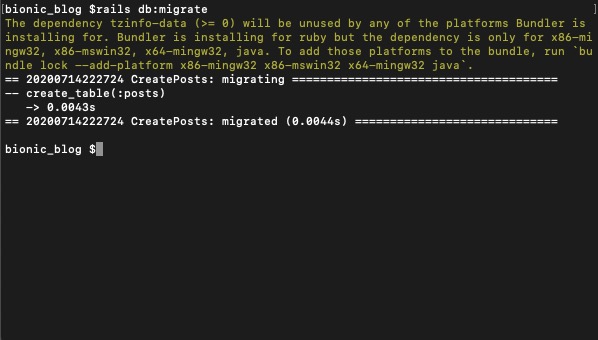
Once we have created our resource, there is one final step to make it official. We have to “migrate” for the prepared database tables to be created. The command that you need to run to do this is:
rails db:migrateThis command will allow you to start creating instances of your resources immediately. How exciting! The output should look something like the screenshot below.
Now that the “Post” resource has been created and added to the database, it’s time to fire up our local server and see what we have built so far.
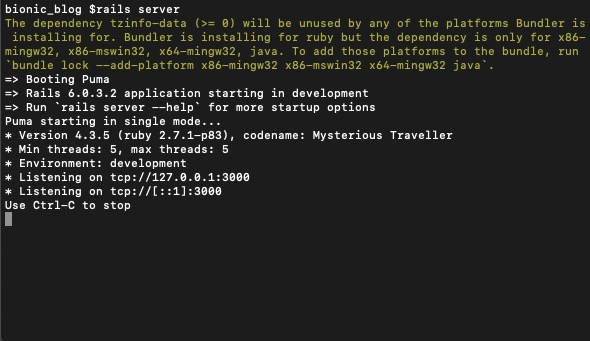
To start your local server you will need to run the following command:
rails serverThis command will start a development server for your application which will allow you to interact with your application from a web browser on the computer that is running your server. The output of this command should look something like the screenshot below.
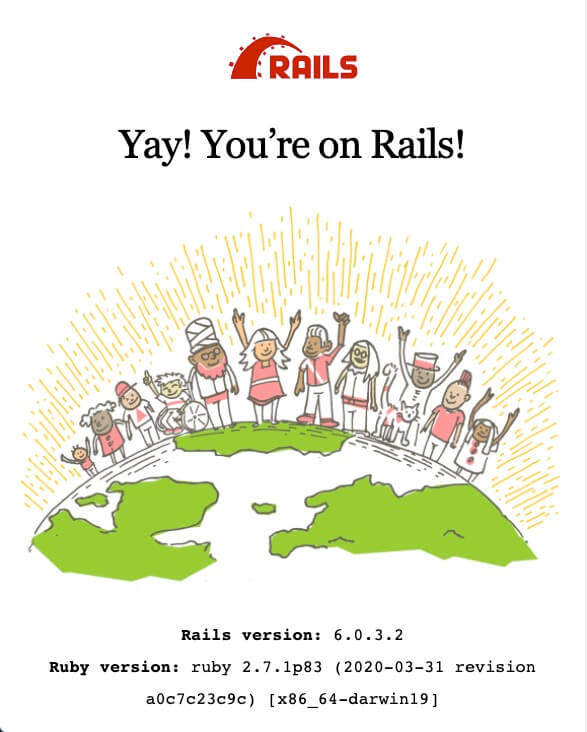
Once your terminal informs you that your server has started successfully, you will be able to start interacting with your application by going to the URL “localhost:3000” in your web browser. Once that page loads successfully, you should see the same welcome message from Rails that is depicted below.
While it is exciting to see that the server was able to successfully start-up, we came here to see our blog, not a welcome message from Rails. It would be nice to see a page that lists all of our posts when we visit localhost:3000 and we will set it up to work that way momentarily. The good news is, even if that page isn’t hooked up to the correct URL, it does exist, so let’s go check it out.
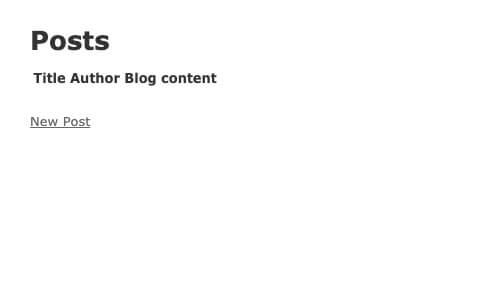
Because we scaffolded a “Post” resource, Rails created a page and corresponding route (URL) to view all of our posts and create new posts. You can navigate to that page by going to localhost:3000/posts
This page is pretty bland right now and it also doesn’t have any posts. It should look like the screenshot below.
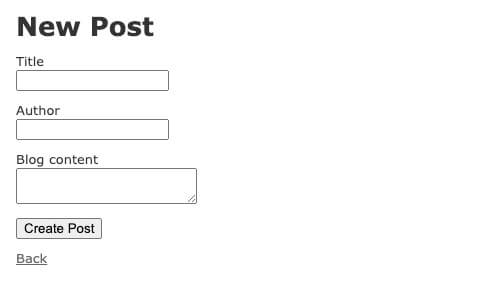
While this page could use more than a little bit of styling, all it needs to be a blog is a post on it. You can add a post by clicking the “New Post” button. This will take you to the “posts/new/” route where you will be able to create a post. It should look like the screenshot below.
This page could use some style too, but it is fully functional as is. Go ahead and click in the boxes to add a title, author, and some content to your post. Once your post has these attributes, you can click the “Create Post” button. This will create your post and then take you to a page containing your post. It should look like the screenshot below.
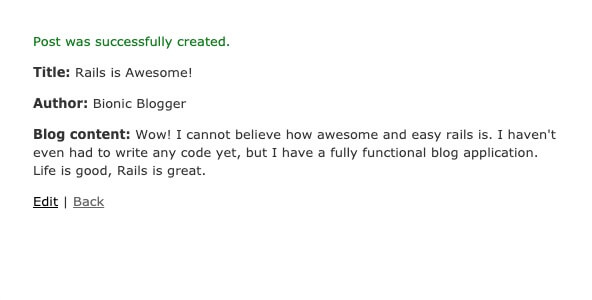
From this page, you can then edit your post by clicking the “edit” button, or you can go back to the page displaying all of your posts by clicking “back”. We will return to that page just to see how it looks. When you arrive, it should look like the screenshot below.
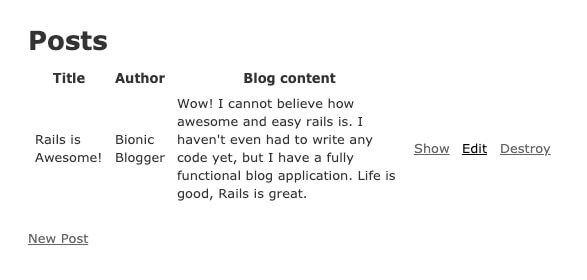
You will notice that you now have four buttons at your disposal, three attached to the post we just created, and one for creating new posts. The “Show” button will take you back to the page to view a single post that we were just on. Edit will allow you to edit the post. Destroy will delete the post. These three buttons will appear next to every post you create. To create more posts, you can click the “New Post” button.
At this point, you have officially created a working blog application with Rails! Congratulations! It still needs some more work though, so before we call it quits, let’s look at a couple of next steps.
Next Steps
You may be surprised to discover that we have built out a full-fledged application without writing a single line of code. That said, to customize the look and feel of the blog, some coding will be required. Before we call it a day, let’s look at how to set the “Posts” page which displays all the posts as the home page and look at where you will need to go to further customize the look and feel of all of the pages.
First thing’s first, let’s hook up the “Posts” page to be the “root” page of our application. In other words, let’s set it so that when we visit localhost:3000 it routes us to our “Posts” page instead of the Rails welcome message.
To do this you will want to open up config/routes.rb or in other words, go to the config folder within your Rails app and open the file named routes.rb This file should look like the screenshot below (although the colors of the words may look different in your code editor).
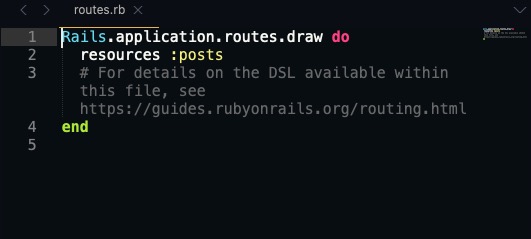
Right now, this file contains the routes related to our posts resource (/posts, /posts/new, etc..) and those are created with some Rails magic with the line:
resources :postsThe greyed out line is a comment with a link to learn more about routing. You can keep it or delete it, it doesn’t matter. It might also be beneficial to visit that link.
Either way, below the “resources :posts” line, you want to add the following block of code:
root ‘posts#index’This file should now look like the screenshot below.
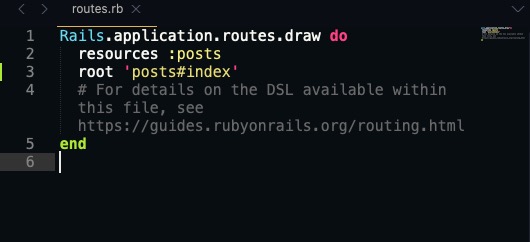
Now, if you visit localhost:3000, you will see the “Posts” page that previously resided at localhost:3000/posts. Sweet! This is also a great segue into where you can customize the look and feel of this page. In the line we just added, we are telling our application that we want the root URL to take us to a page called “index” that is a child of our posts resource. This is the page that we have been referring to as our “Posts” page up to this point. In reality, that page is formally called the “Posts index page” as it contains an index of all of the posts.
To find the code that dictates how all pages relating to your posts will look, you can look in app/views/posts. You will find eight files within that folder. Five of them end in “.html.erb” and can be edited like HTML, but can also contain Ruby. The HTML is written like regular HTML and the Ruby is inside of “ruby tags” which look like
<%= ruby related to rendering goes in here %>or
<% ruby related to looping and logic goes here %>Here is a list of these files, what they look like, and what pages they control:
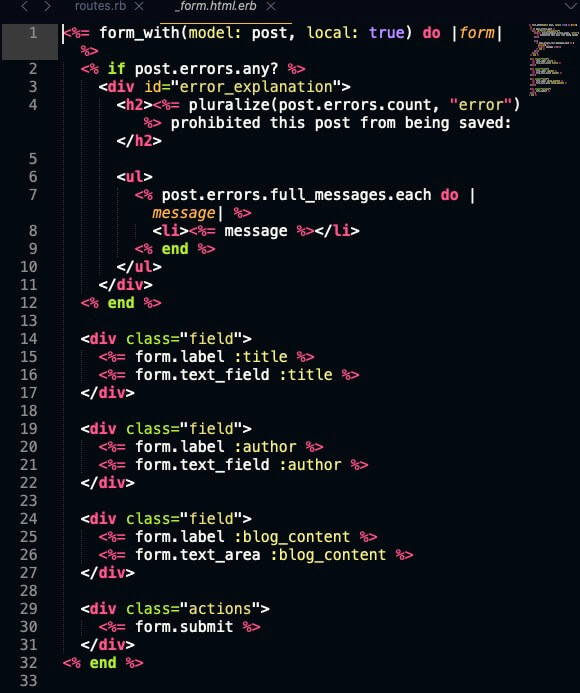
form.html.erb – This file contains the form “partial” and contains the fields for creating and editing posts. It is used on the page for creating new posts and the page for editing existing posts. The fact that it is used on multiple pages is what makes it a partial, and its partial status is denoted by the fact that the file starts with an underscore.
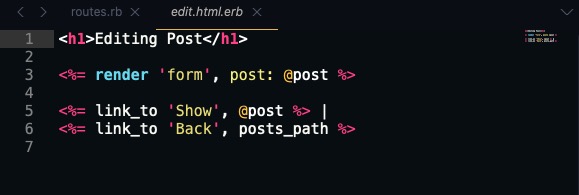
edit.html.erb – This page is for editing posts, it displays the title, pulls in the form partial, and contains links to show the post, or to go back to view all of the posts.
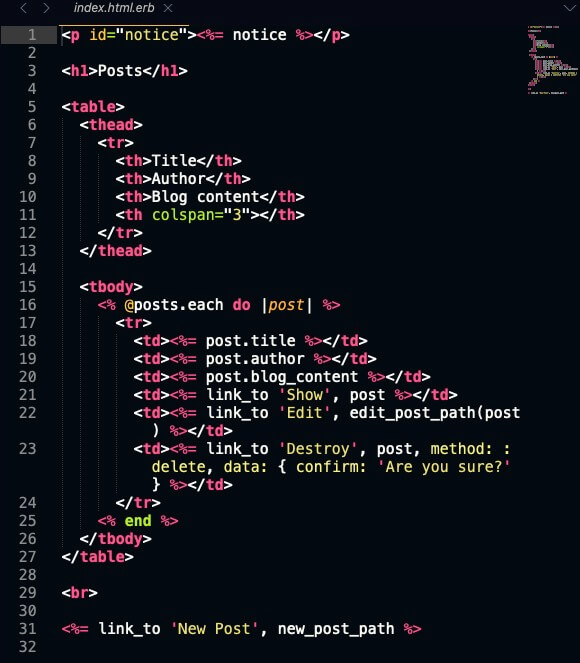
index.html.erb – This file controls how the page which displays all the posts looks. It contains a title, an HTML table element containing a loop that displays each post as a new row within that table, and a link to the “New Post” page.
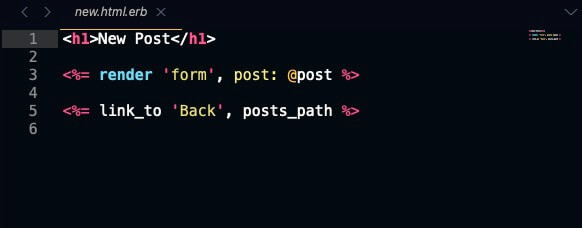
new.html.erb – This page contains a title, the form partial for creating new posts, and a link back to the posts index page.
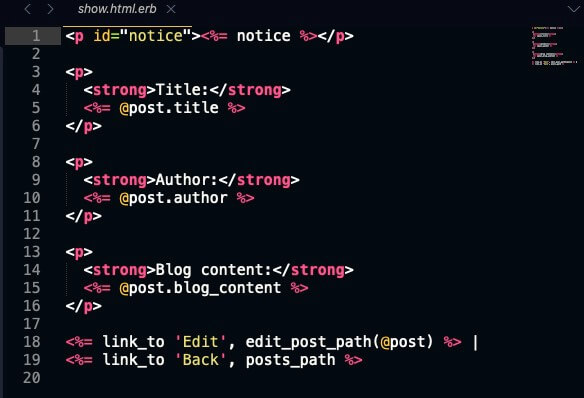
show.html.erb – This file handles how single posts are displayed. It displays all the attributes of the post within HTML paragraph tags.
To change the appearance of how those pages display, simply modify the HTML surrounding the Ruby tags which are responsible for dynamically pulling in data from the database.
You can also add some style to your pages by adding CSS ids and classes to those HTML elements and then writing CSS rules for your posts within app/assets/stylesheets/posts.scss or within the application.css file that resides in that same folder.
Wrapping Up
All that we have done thus far completes the promised Ruby on Rails basics that we will cover in this tutorial, but there is so much more to do and learn! We didn’t even dig into the controller to see the Ruby methods responsible for pulling in our data from the database (but if you want to check that out, you can take a peek under app/controllers/posts_controller.rb).
Beyond some improvements to its appearance, there are probably some other features that this app could benefit from. Some good additions might be:
- The ability to add comments to posts
- A navigation bar/menu
- A way for users to log in and create posts/manage their posts (anyone can delete/edit any post as of now)
- A way to attach images to posts
- An option to “subscribe for updates”
- The feature you feel is important but is also missing
The good news is, all this is possible and more with the power of Ruby on Rails. The bad news is, we won’t be learning to do all of that today. For now though, you have created your very first Rails application and you should be proud. Great work, and see you next time!