Website migrations are complex and these complexities are not always simplified with WordPress blog or sites. There are a number of steps that should be followed in the correct sequence to ensure a proper migration. If done incorrectly you may experience website downtime.
Please make sure to read through this entire guide before initiating your website migration.
Step One: Setup Your New BlueHost Account
I recommend using BlueHost because of their reliability and cost-effectiveness. In addition, in my experience their customer support has been top-notch, which is particularly nice to have when you are doing something like migrating your site.
Disclosure: The Blog Starter receives a commission when you purchase a BlueHost package through our link.
Use this link to get the discounted rate of $2.75 per month on a BlueHost package.
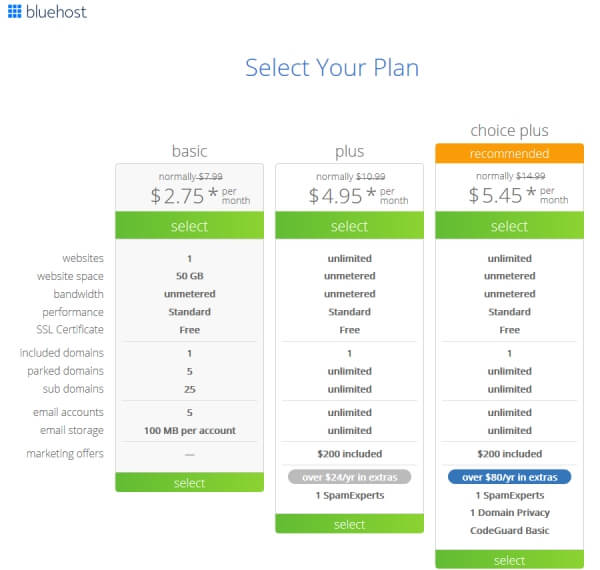
Bluehost offers a number of packages. For most people the Starter plan will be fine (if you are just hosting 1 site), or get the Plus plan if are hosting multiple sites.
Step 2: Create FTP Credentials in Your Existing Hosting Account
In the cPanel of your existing hosting account, navigate to FTP Accounts usually under the “Files” heading.

Add a new FTP account by filling in the user name and password. Often, a file path under “Directory” will be automatically created. Delete this file path completely so that your new FTP account will have ROOT access.

Make sure the quota is set to “Unlimited” and click “Create FTP Account”. Make sure to notate your new FTP account password.
You should see the new account at the bottom of this page. Click “Configure FTP Client” next to the new account and then notate the User Name, Host Name, and port number.
Step 3: Download Filezilla
Filezilla is a free FTP client and is the most commonly used. You can download this software here. After downloading the installation file, click “run” to begin setup.
Step 4: Connect to Your Server
Once Filezilla is installed on your machine, open the program and under “File” click “Site Manager”. Here you’ll be setting up the connection to your existing server. Add in the hostname and port from above, and then your username and password.
Click “Connect” to begin the connection.
Note: If you’re unable to connect, try adding @yourdomainname.com to the User Name. If that doesn’t work, you may need to call your hosting provider to troubleshoot.
Step 5: Download Your Files
On your local machine, create a new file folder where you will be able to transfer all of your website files and remember its location.
In Filezilla and connected to your server, navigate using the top right window to the file folder containing your website files. Usually, this is under the public_html file. If you click on the public_html folder, the files within this folder will appear on the bottom right window.
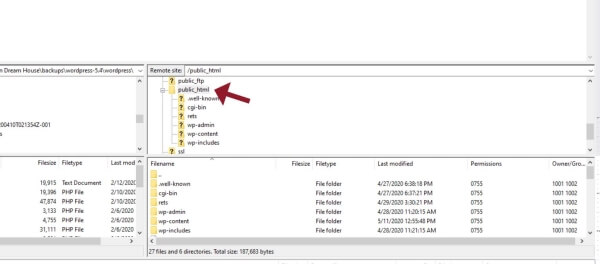
Your website files may be in a different folder within the public_html folder. Locate the appropriate folder and open it.
In the top left window, navigate to the empty folder you created on your machine. Open the folder by clicking on the + icon to the left of the folder name. The empty folder will open in the left bottom window.
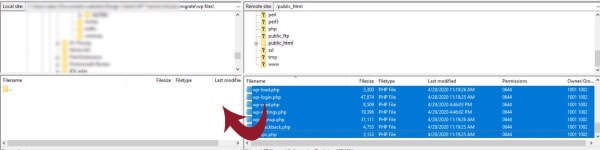
In the RIGHT bottom window, click on the first folder and then scroll down to the very last file, press and hold the SHIFT button and click the last file. All files and folders should be highlighted.
Drag and drop all of the highlighted files and folders into the bottom LEFT window by pressing and holding the CTRL button and clicking on any file/folder and dragging them over.
The download will begin in the bottom window. This will take some time. There are a LOT of files in WordPress. And don’t worry, you’re only copying the files, not removing them!
Go have a cup of coffee. Or move on to the next step which you can do while the download is running.
Step 6: Download Your Database
In the cPanel of your existing server, navigate to phpMyAdmin under Database.

On the lefthand side, click on your website’s database.
Note: If you have many databases, and you’re not sure which one it is, take a look at your website’s wp-config file and notate the database name. That’s the one you’re looking for.
With this database file open on the left, click on “Export” in the top menu of phpMyAdmin. Keep the export at “Quick” and the format as “SQL”. Click “Go”. This will download the SQL file onto your machine. It’s a fairly quick process.
Step 7: Create a New Database
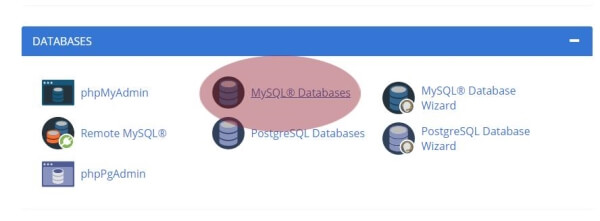
In the cPanel of your new Bluehost hosting account, navigate to MySQL Databases.
First, create a new database. Give it any name you like next to the designated prefix and click “Create Database”.
Next, scroll down to the bottom of this screen to create a “User” attached to this database. Under “Create User” add a new user name and password, and click “Create User”.
Under “Add User to the Database”, select the user you created and the new database you created, and click “Add”.
Note: Remember to notate the name of the user and database (with the prefixes!).
Step 8: Upload Your Database
Access the phpMyAdmin of your new Bluehost server in the same manner described above. Select the new database you just created on the left-hand side.
Navigate to “Import” on the top menu. Here, you can browse from your computer and select the SQL file you recently downloaded. At the bottom of the screen, select “Go”. This will upload your database and your new DB will show on the left-hand side of the screen momentarily.
Step 9: Create an FTP account in Bluehost
Using the same method described above for creating an FTP account, create a new FTP account in Bluehost, remembering to notate your credentials.
Step 10: Connect to the BlueHost Server
Assuming your download is complete (Do NOT disconnect if it is not complete! Wait until the transfer is done!), under File and Site Manager of Filezilla, click “New Site”.
Using your new BlueHost FTP credentials, and the method described above, connect to your Bluehost server.
The local file containing your WordPress files and folders should be already showing in your left-hand window. In the right-hand top window, your server, navigate to public_html or to the file you would like to store your WordPress site.
Using the method above to select all files, move all files and folders from the bottom left-hand window to the right-hand window.
Again, this will take a while. Go walk the dog.
Step 11: Adjust the WP-config file
Once all of the files have been uploaded, access your Bluehost cPanel and navigate to the file manager. Then navigate to the folder where you’ve uploaded all WordPress files. Open the wp-config.php file in the editor.
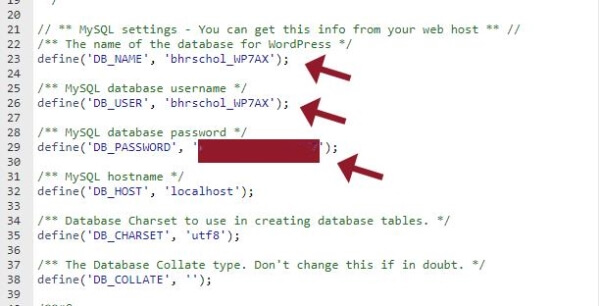
Change the DB_NAME to your new database name, the DB_USER to the new database user name, and the DB_PASSWORD to the new password you just created.
The DB_HOST is normally ‘localhost’ and you won’t need to change this. However, if you have a VPS, the hostname might be different.
Step 12: Is there an SSL?
If your existing website has an SSL certificate installed, you will need to have one installed on your new hosting account for the same domain before you point your site over. Contact Bluehost and make sure the SSL is installed and ready to go.
Step 13: Point Your Domain
Now that your files and the database have been transferred, you can point your domain over to Bluehost. You can achieve this by changing the nameservers or by creating DNS records.
Navigate to the domain registry where your domain is registered. Select your domain to manage the DNS and find the nameserver section. Change the nameservers to:
ns1.bluehost.com
ns2.bluehost.com
It can take up to 24 hours to propagate to all servers, but most of the time your site should be working correctly within 1-2 hours. Keep checking your domain and make sure everything looks good. If you have a database error, recheck your config file for the proper credentials.
Note: Changing the nameservers will also change the email to Bluehost. Log into your Bluehost account and create new email accounts.
Note: Domains registered through GoDaddy often encounter trouble with changes to the nameservers, especially with SSL. Rather than changing the nameservers, make DNS entries instead of altering the nameservers.