Classroom Blogging Step 2 – Establishing Rules and Guidelines for Your Class Blog

Before you start getting your students involved in your class blog, you’ll need to establish some rules and guidelines, since one of your main aims is, after all, to educate your students on how to interact responsibly online. While we all grow up with technology in this day and age, this does not necessarily mean that everyone knows how to post appropriately online. A quick look at a typical Facebook wall should be enough to showcase that fact. Your class blog needs to set a good example from the outset, and your students must be encouraged to behave appropriately online. For the privacy and wellbeing of both yourself and your students, it is particularly important to set strict rules with regards to the type of personally identifiable information which people can and cannot post. You’ll probably want to decide on the most important rules and guidelines for your blog yourself, but there’s no reason why it shouldn’t become a class activity in itself.

The following are some possibilities to help you get started:

  • Your students, their parents and other readers should only be identified by their first names in posts and comments. Additionally, no personally identifiable information, such as street addresses, phone numbers and email addresses should be made public.
  • All comments and posts submitted by your students will be reviewed by yourself or another moderator before they get published on your blog.
  • Students should proof-read their comments and posts carefully to avoid spelling and grammar errors and other issues. Additionally, in order to maintain clarity and professionalism, students should be discouraged from using acronyms, emoticons and other features which tend to be used in text messages and instant messaging programs.
  • Students should stay on topic when commenting on your blog posts, while also being conscious about what they post. The last thing you want is for the comment section for a particular post to devolve into a flame war.

Your blog rules and guidelines should ideally include some general online safety and privacy guidelines as well.

Publishing Your Blog Rules and Guidelines

In addition to creating posts, which will gradually get lower down the page to the point of being archived as your blog grows, WordPress also allows you to create static pages. These pages are typically accessed by permanent buttons or menus located beneath your blog’s header image or in a sidebar. Publishing your blog rules and guidelines on a page rather than in a post will make them easier to find. In addition to having a rules and guidelines page, you may also want to have a separate “About our Blog” page.

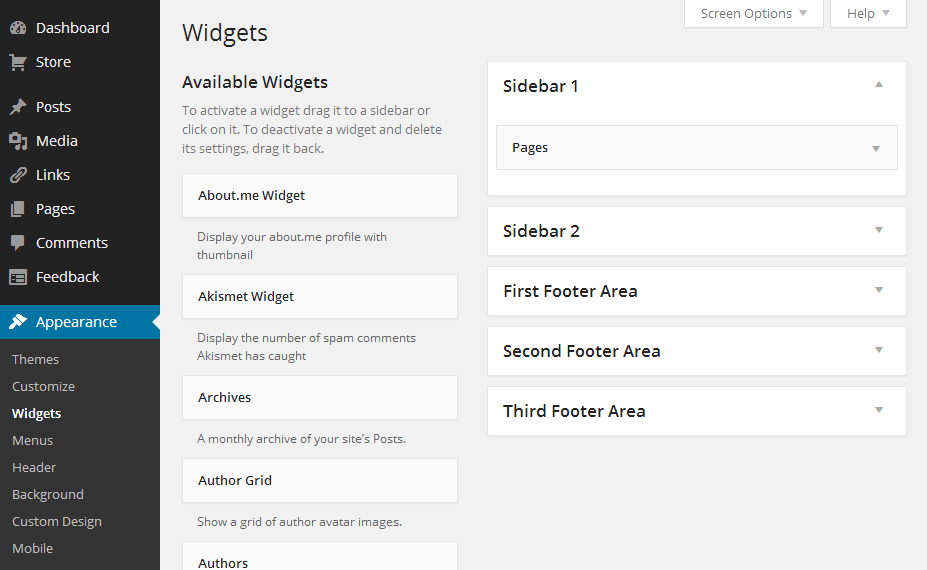
To create a new page, navigate to “Pages > Add New” in your administrator dashboard. Enter a title and the content for the page, and publish it exactly as you would a normal post. You’ll then need to set up links to your new page, though some themes do this automatically by adding links in the header area. In other cases, you can add the Pages widget to your sidebar. To add a link to your page in the sidebar, navigate to the “Appearance > Widgets” section, and drag across the “Pages” widget from the available widgets to the left to the widget area (such as Sidebar) to the right. Enter a title for the widget if you wish, and click “Save”. Links to your blog’s pages, including the Rules and Guidelines page, will now appear permanently on your blog.

classroom-6

How to Leave a Comment on Your Blog

Commenting on a blog post is a very quick and straightforward process, and by default, commenting is enabled for all posts and pages that you create. To leave a comment, you’ll need to open your blog and click on the preview of the post which you want to comment on to open the full version. Scroll down to the bottom of the post until you see the “Leave a Comment” (the exact wording may vary depending on your currently active theme) section. Simply write the comment and click “Post”. New commenters will, by default, be asked to enter their name and email address to submit the comment, however, the address and full name will not be made public.

Moderating Comments

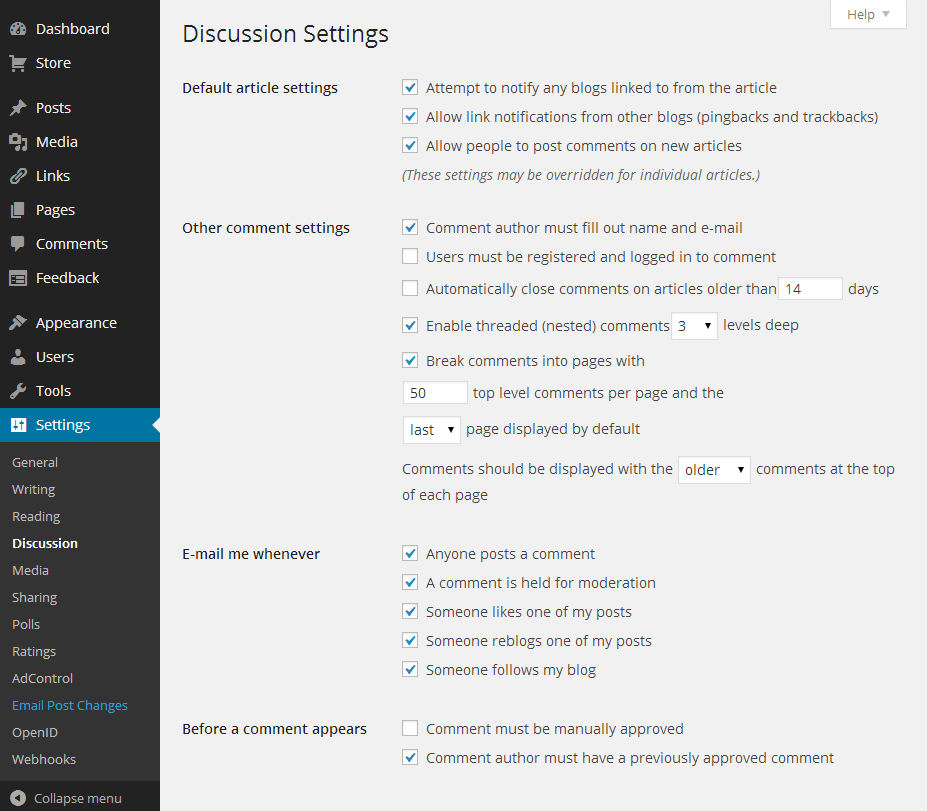
By default, comments will only be posted without moderation if its author has already had a comment approved previously. However, since you are operating a class blog, you’ll likely want to moderate all comments before they are published. In the WordPress administrator dashboard, navigate to “Settings > Discussion” and check the box beside “Comment must be manually approved” before clicking “Save Changes” at the bottom of the page. You can manage, delete and approve comments from the “Comments” section in your dashboard.

classroom-7

Disabling Comments

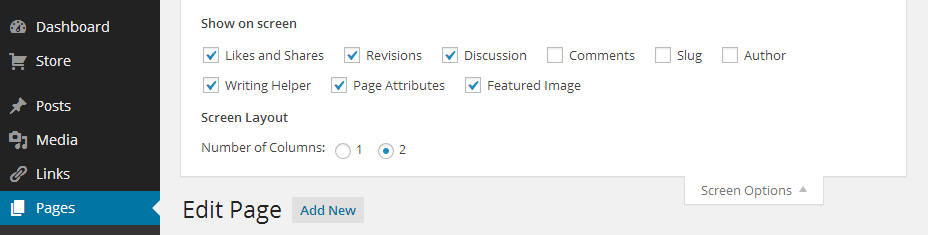
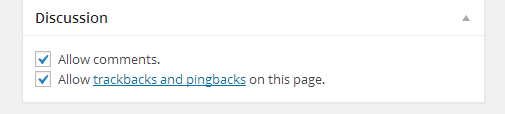
You can also disable comments for specific posts and pages, and you’ll probably want to do this for your Rules and Guidelines page. Navigate to “Pages > All Pages,” mouse over the page and click “Edit”. Click the “Screen Options” button in the top-right and check the box beside “Discussion”. Scroll down the page, and uncheck the box beside “Allow comments”.

classroom-8

classroom-9


Classroom Blogging Step 1 – Setting Up a Blog for Your Class


With the number of blogs around the world running into the tens of millions, blogging has become an immensely popular platform for online content creation, publication and sharing. Individuals may maintain a blog for sharing their knowledge and experiences, while many companies consider it to be an invaluable part of their marketing campaigns. However, blogging is about far more than simply writing posts; it’s also a social thing which involves sharing your knowledge and collaborating with others, and this is why a class blog offers so much potential for you and your class.

Blogging can be a very useful tool for education, and a class blog can act as a great starting point for encouraging your students to use the power of the online world to collaborate and share their knowledge and reflect upon what they have learned. With a class blog, you’ll be in complete control and responsible for publishing content to share with your class and with the general public. At this point, you should start encouraging your students to post comments, and those who offer some valuable input may then be able to publish their own posts or even start their own student blogs in conjunction with your class blog. Even if all of your students maintain their own blogs, a class blog can still act as a valuable tool for aggregating the best content from your class and encouraging new students to get blogging as well.

Your goals as a teacher when it comes to maintaining a class blog are ultimately to encourage your students to read each other’s posts, interact by posting comments, and eventually, to have them start writing posts of their own. The class blog itself will act as the main hub connecting the efforts of your class together while making it easier to share knowledge among the class and even with a worldwide audience.

How to Set Up Your Class Blog

The first decision is to choose a platform to use for your blog. For the purpose of this eight-part guide, we will be using a free blog hosted at wordpress.com. WordPress is by far the most popular blogging platform in the world, with over 25 percent of all self-hosted websites using it. The platform itself is also free and open source, though if you have a blog hosted at wordpress.com, rather than having your own domain name, there will be some limitations. However, for a class blog, wordpress.com is perfectly adequate (for info on blogging with WordPress.org see my tutorial on making a blog and my guide to creating a website); it costs nothing, there’s no complicated setup process involved, and there’s absolutely no coding involved (similar to using website builder services). With a free blog at wordpress.com, you can literally start posting within minutes.


Your Blog URL and Name

classroom-1


When you sign up for a free blog at wordpress.com, you’ll need to choose a URL such as yourclassblog.wordpress.com. Choose your URL wisely, and try to keep it as short as possible. Many teachers simply use their names. Note that the URL does not necessarily have to have the same name as your blog, which may be too long to use as a URL anyway. Again, try to stick to something relevant and recognizable when choosing the name.

Fortunately, you can easily change your blog’s name itself at any time by navigating to “Settings > General Settings” and changing the text in the “Site Title” field before clicking “Save Changes.” To reach the administrator dashboard, navigate to yourclassblog.wordpress.com/wp-admin and enter your username and password. The dashboard is where you will manage your blog, configure users, moderate comments and create and edit posts.

Choosing Your Display Name

You’ll also be asked to enter a username when signing up, which cannot be changed later on without creating a new account. However, you can change your display name at any time, and the display name will appear on your blog dashboard and on any comments you post. To change the display name, log in to the dashboard, and navigate to “Users > My Profile”, and change your display name as required. For best results, use a display name which makes it easy for your students to recognize and relate to. Fill in the remaining optional details as required.

Changing Your Blog’s Theme

With free hosting, you’ll only be able to choose from a relatively small number of themes, and further customization options will be limited. However, there should still be more than enough options available for a typical class blog. You can change theme settings by navigating to “Appearance > Themes”. To activate or preview a theme, move the mouse pointer over the thumbnail preview and click “Activate” or “Preview” as required. Additionally, you can further customize your currently active theme by moving the mouse over its thumbnail and clicking “Customize”. The options available to you will vary depending on your currently selected theme, so feel free to experiment until you get your blog looking how you want.

classroom-4

Creating Your First Post

Creating and publishing a post in WordPress is no more complicated than writing and saving a document in Microsoft Word or any other word processor. Simply navigate to “Posts > Add New” and start writing. Enter a title and the content of your post as well as tags and categories to help identify it. Once you’ve finished writing the post, click “Publish” and it will go live immediately. Alternatively, you can click “Save Draft” if you want to come back to it later or click “Preview” to take a look at what your blog post will look like once it goes live.

classroom-5

Congratulations! You have now set up your class blog and published your first post. If you’re looking for some inspiration to help you customize your blog or come up with content ideas, be sure to check out some other class blogs to see what other teachers are doing. In the next chapter, we will take a look at setting up rules and guidelines for your blog and getting your students to start commenting on your posts.