Classroom Blogging Step 8 – Aggregating Content with a Feed Reader

As the number of student blogs for your class grows, it can become inconvenient and time-consuming to visit each individual blog separately to view new posts. However, thanks to a simple tool known as an RSS (Really Simple Syndication) reader, new content may be aggregated into a single Web-based application or desktop news reader. The process works by grabbing all of the latest content from each blog or other website which has been added to the feed before displaying it in a single location. RSS feeds often display headlines and previews of content only, but it is still useful, since it provides constant updates in an unobtrusive manner.

classroom-20

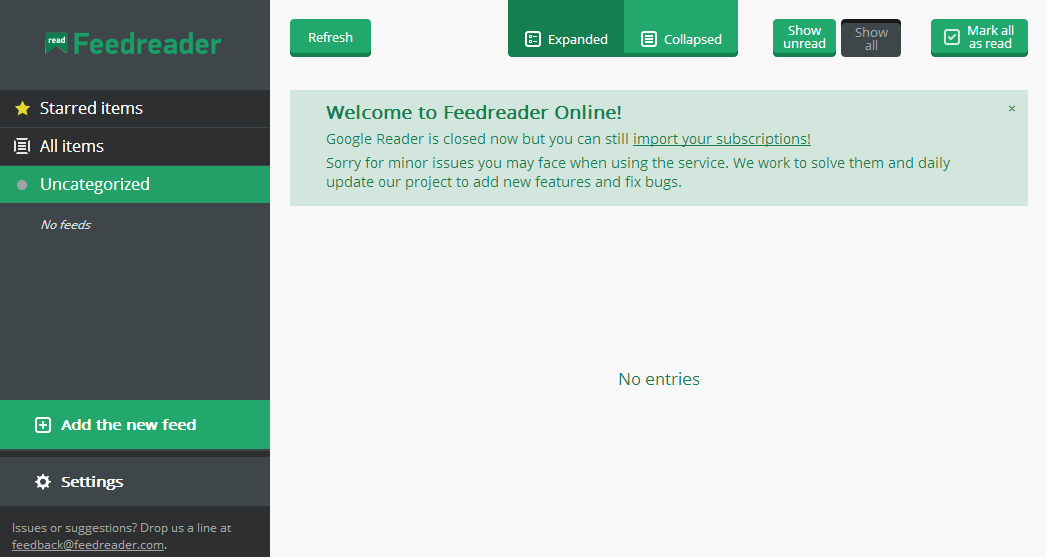
Websites with RSS feeds are often accompanied by the above icon, though blogs which use standard blogging platforms, such as WordPress, automatically provide RSS feeds, even if this icon if not present. To provide your students with a convenient way to view all of the latest blog posts from across your class, you’ll need to show them how to set up a feed reader and add each blog to it. Among the easiest feed readers to use were the free Google Reader service or an iGoogle widget, but since services these have now been discontinued, we’ll have to turn to another option. Although there are numerous services to choose from, we’ll be using the free Feedreader service from feedreader.com, a popular alternative to the now defunct Google Reader.

Setting Up Feedreader

Navigate to feedreader.com and click on the first option “Start reading feeds now”. Either sign up for a new account or log in using a Gmail account if you have one. To add a new feed, click on “Add the new feed” at the bottom of the left-side column. Create a new category if you wish, and enter the full URL of your student’s blog into the “Address” field before clicking “Add the feed”. Repeat this process to add all of your students’ blogs as well as your class blog. The latest posts from all blogs added to the feed reader will appear.

classroom-21

Sharing Your Feeds with Your Students

When you have set up feeds for all of your students’ blogs, you can export your subscriptions so that your students won’t need to set them up from scratch. To export your subscriptions, log into Feedreader and click “Settings”. Click “Download your subscriptions as an OPML file”.

Email the downloaded file to your students and instruct them to log into Feedreader, click “Settings” and upload this file by clicking “Choose File,” browsing to the file location and clicking “Import”.

Displaying Feeds on Your Class Blog

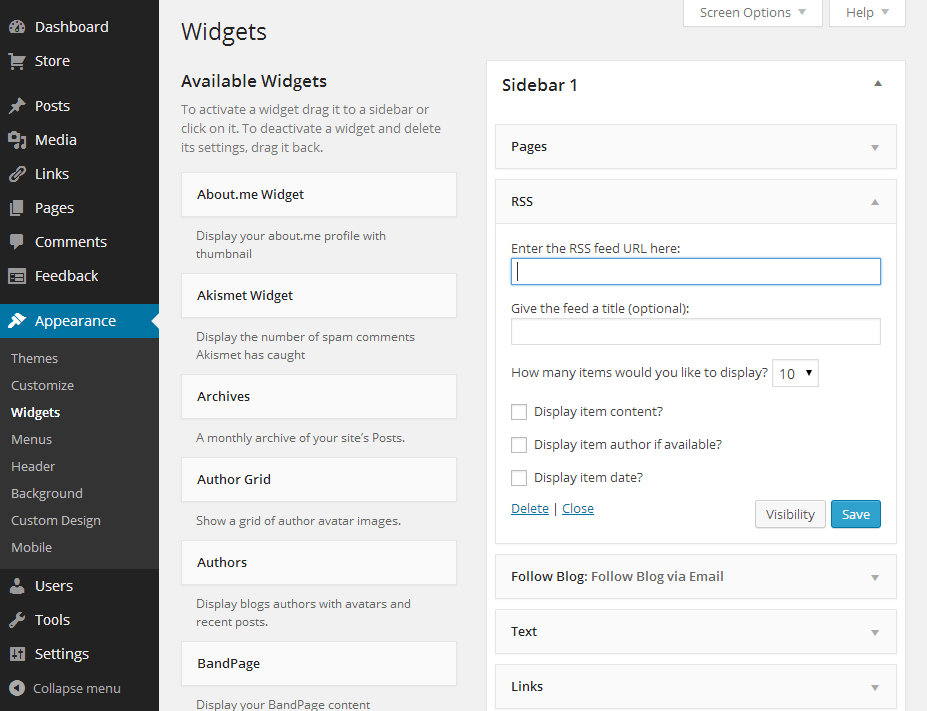
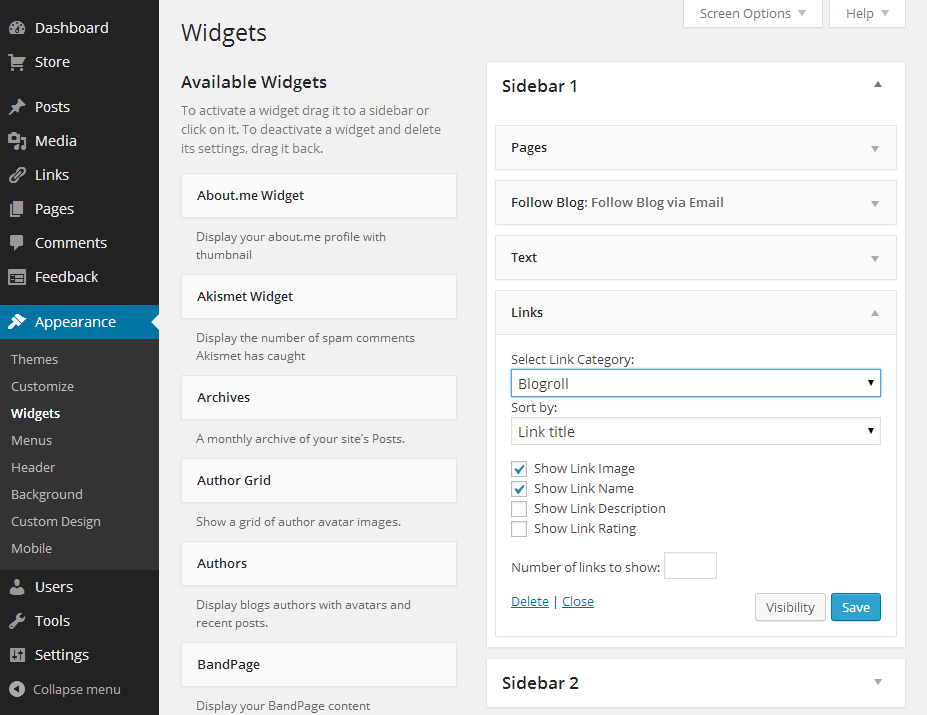
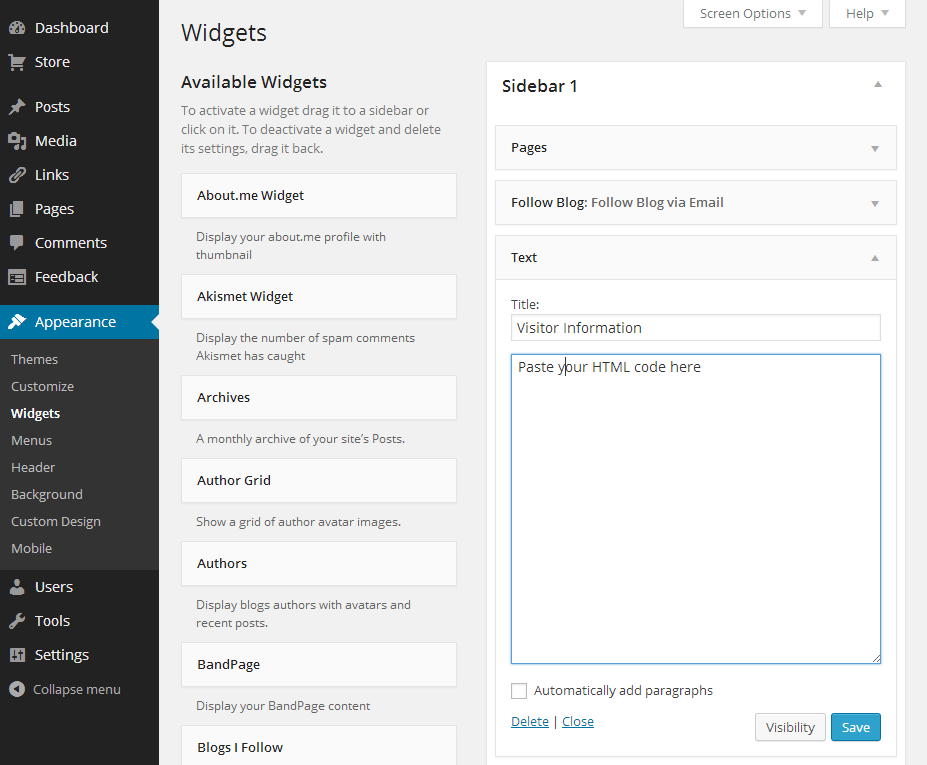
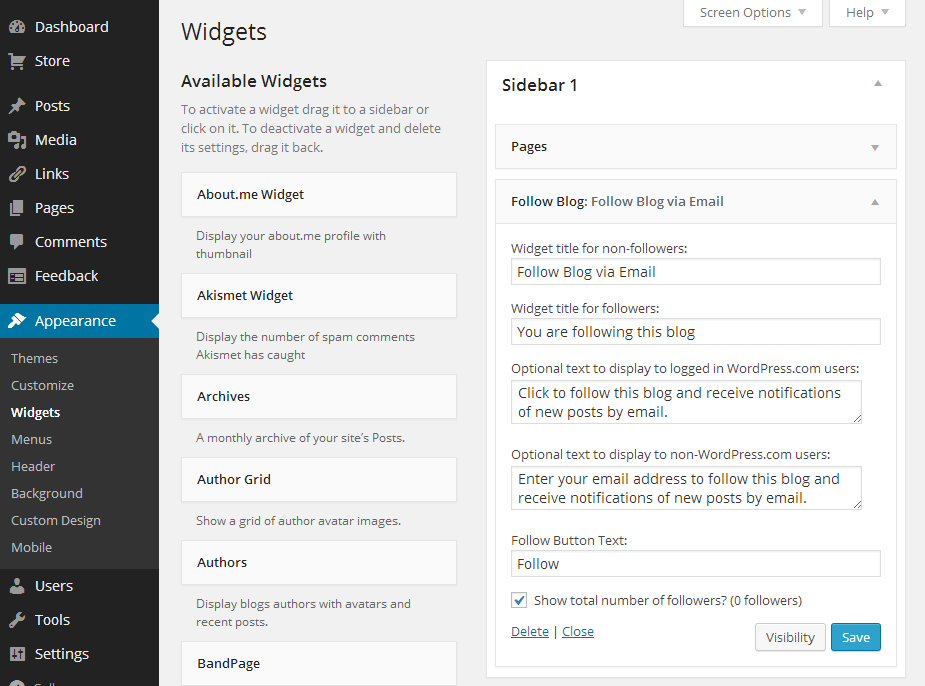
In addition to displaying a blogroll on your class blog with links to your students’ blogs, you can use the built-in RSS feed reader in WordPress to display short previews of new posts from your students’ blogs. In the administrator dashboard, navigate to “Appearance > Widgets,” and drag the “RSS” widget from the left-side column to the sidebar widget area to the left. In the first field, enter the full URL of the blog you want to share, and enter the name of the blog or another relevant title. Click “Save” to save the changes. The titles of the most recent posts from the linked blog will now be displayed in the sidebar of your blog. Repeat the process to add more copies of the RSS widget for each blog you want to add to your class blog.

classroom-22


Classroom Blogging Step 7 – Adding Student Blogs to the Blogroll

Once you start setting up separate blogs for your students, you’ll likely want to link them all together on your class blog, since doing so will let your original class blog act as a hub for your class’s online blogging community. A blogroll basically refers to a set of links to your student blogs on your class blog. Other bloggers frequently use blogrolls to list other blogs, such as affiliates and favourites, and they help to consolidate your class’s efforts and point readers towards other content which they might find interesting. To create your blog roll, you’ll be using links and widgets on your class blog, as explained in this chapter.

Adding and Editing Links and Categories to Your Blogroll

In your administrator dashboard, navigate to “Links > Add New”. Enter the full URL for the blog you want to add, and enter the student’s first name in the “Name” field. If you need to distinguish between two or more students with the same first name, try adding the initials of their surnames as well. The name of the blog will also be the clickable link which will take readers to that student’s blog. Under “Categories,” a little further down the page, be sure to check the box beside “Blogroll”. Finally, click “Add Link” to save the information.

You can further organize your blogroll by creating different categories, which can be particularly useful for educators with multiple classes. To add a new category, click “+Add New Category,” enter a name and click “Add”. Select the new category as required whenever you create a new link to one of your student’s blogs.

classroom-17

If you want to delete or edit existing links, you can do so by navigating to “Links > All Links,” moving the mouse over the link you wish to edit and clicking “Edit”. To save your changes, click on “Update Link”. If you want to delete multiple links, such as the default ones included with a standard blog hosted at wordpress.com, simply select the boxes beside the links you wish to remove and choose “Delete” from the dropdown box labelled “Bulk Actions”. Click “Apply” to make the changes.

classroom-18

Displaying Your Blogroll in Your Sidebar

Now that you’ve added the links to your students’ blogs to your administrator dashboard, you’ll want to have them appear on your blog itself so that your readers will be able to see them. We will be using the Links widget to display your blogroll, so you’ll need to navigate to “Appearance > Widgets” in the dashboard. Drag and drop the “Links” widget from the left-side column to the sidebar widget to the right.

Choose the category for the links which you want to add (such as Blogroll) from the dropdown box and click “Save”. If you want to display multiple categories, such as one for each class, you’ll need to add multiple instances of the widget, selecting categories as required for each one. Your blogroll will appear immediately on your class blog.

classroom-19


Classroom Blogging Step 6 – Setting Up Additional Student Blogs

While your class blog serves as a hub for the online community of your class as well as a great starting point for getting your students into blogging, creating separate student blogs mark an important stage in progression. Once your students have had a few months to get used to the class blog by publishing posts and comments on it, rewarding them with their own blogs provides a great deal of potential. Setting up separate blogs for your most valuable participants will help to motivate them greatly, while also providing more content to share with the class and the greater audience.

How to Set Up Blogs for Your Students

There’s no limitation to the number of free blogs you can set up at wordpress.com. The first thing to do is choose usernames and URLs for your student blogs, and one of the best practices is to use the student’s first name followed by a number which represents their class year. Although for the most part, these individual blogs will belong to your students themselves, you’ll still want to add yourself as administrator so that you can quickly edit or remove any unwanted or inappropriate posts or comments. To add both yourself and the individual student as an administrator, follow the steps outlined in Chapter 4, selecting the Administrator option when choosing a role.

Moderating Comments on Your Student Blogs

Only those with Administrator or Editor roles may moderate comments. If you would rather not give your students the responsibility of moderating the comments for themselves at this stage, then you’ll need to choose the Author role for them. The Author role will allow them to write and publish their own posts, but they will not be able to approve comments or make any modifications to the blog itself. If you are comfortable with allowing your students to moderate their own comments and have complete control over their blogs by having their own administrator accounts, you may want to consider using an RSS reader so that you will be alerted of new posts and comments whenever they are published. See Chapter 8 for more information on using RSS feeds.

Classroom Blogging Step 5 – Tracking Visitors

While tracking visitor statistics is absolutely crucial for any commercial blogging venture, it is still useful for any other blog, including your class blog. It doesn’t cost anything or take much time to set up, and by adding a tracking tool to your blog’s sidebar, both yourself and visitors will be able to learn a lot more about your blog’s popularity and readership. Assuming that your blog is open to the general public, which it should be, you’ll likely get visitors from all over the world. Displaying visitor numbers and the countries that they’re coming from can be very rewarding for your students, particularly when they start posting content for themselves.

Adding visitor track widgets to your blog requires embedding some HTML code into the text widget, but don’t worry – you don’t need to pay any attention to the actual code itself, as you’ll find out in this chapter. Though there are many free and paid visitor tracking tools available which you can embed into your blog (or any other website for that matter), we’ll take a look at three of the most popular.

1 – ClustrMaps

When you embed ClustrMaps into your class blog, a thumbnail will appear in the sidebar showing the geographical location of your visitors by way of dots on a world map. The larger the dot, the greater is the number of visitors coming from that particular location. Readers will also be able to click on the thumbnail map to view a larger version so that they can take a closer look at your traffic sources. Note that ClustrMaps is now a paid service, costing $20 per year for a subscription.

  1. Sign up at clustrmaps.com. Be sure to enter the full URL of your class blog during the signup process.
  2. Log in to your administrator page by clicking on the “Log In” button on the homepage.
  3. Choose your preferred widget style and highlight the HTML code which appears beneath to select it all. Copy it to the clipboard by pressing Ctrl+C on your keyboard.
  4. Log into your WordPress administrator dashboard and navigate to “Appearance > Widgets”.
  5. Drag the “Text” widget from the column to the left to the preferred widget area to the right.
  6. Click on the newly activated widget to open the text input. Paste the HTML code you just copied by pressing Ctrl+V and click “Save”. The visitor tracking widget will appear on your blog immediately.

classroom-14

2 – Feedjit

Feedjit is a live traffic feed which displays visitor information in real-time, including the country they’re coming from along with a few other useful details. The traffic feed is updated every time a new visitor comes to your website. Readers can click on the widget to find more detailed information.

  1. Visit Feedjit.com.
  2. Select a colour scheme from the drop-down box.
  3. Select a width for the widget. 150 to 170 is suitable for most blog sidebars.
  4. Change any other settings as required, and choose “WordPress.org Blog” in the dropdown box below.
  5. Click “Go” and copy the HTML code provided.
  6. Repeat steps 4 to 6 from the ClustrMaps installation guide to embed it into your class blog.

classroom-15

3 – Flag Counter

Flag Counter is a free visitor tracking service which displays a number of national flags (up to 250) and the number of visitors from those countries. The widget will display the flags in order of the number of visitors coming from the country.

  1. Visit flagcounter.com.
  2. Choose the maximum number of flags to show. The default of 12 should be ample for your class blog. Stick to using 2 columns of flags, since most WordPress themes will only display 2 columns correctly anyway.
  3. Customize the label and colour schemes if you wish as well as the other available options to further modify the widget.
  4. Click on “Get Flag Counter” and copy the HTML code from the “Code for websites” field.
  5. Repeat steps 4 to 6 from the ClustrMaps installation guide to embed it into your class blog.

classroom-16


Classroom Blogging Step 4 – Allowing Your Students to Write Posts

As your class blog begins to grow, you’ll probably want to start adding the most valuable commenters among your students to your blog so that they can start writing posts of their own. Once you have introduced your class to the world of blogging, you can either create accounts for them so that they can post on your class blog, or even have them set up blogs of their own. The process should ideally work in three steps: commenting, writing posts for the class blog and finally, setting up their own student blogs. This process allows your students to be progressively introduced to blogging so that they have an opportunity to familiarize themselves thoroughly with your rules and guidelines and the general best practices for publishing content online. We’ll take a look and creating additional blogs for your students in Chapter 6.

How to Add a New User to Your Class Blog

Adding a new user to your blog is a quick and easy process. Simply log into your administrator dashboard and navigate to “Users > Invite New”. Enter the email address for the user, and choose a role and an accompanying message before clicking “Send Invitation”. The recipient will receive an email from your WordPress blog including instructions on choosing a username and logging in for the first time.

classroom-11

Assigning Roles to Your Students

Before you jump into adding your students to your class blog, you’ll need to familiarize yourself with the various user roles available. WordPress provides five user rolls for new accounts: Admin, Editor, Author, Contributor and Follower. Since it is a class blog that you are operating, you’ll most likely want to use the roll of Contributor for your students. Those with Contributor accounts will not be able to change any settings on your blog or publish posts, but they will be able to write and edit their own posts before you decide to publish them. Typically, the only Administrator account will be your own, and you’ll have complete control over the blog, including the ability to add and remove user accounts, moderate comments and review and publish posts written by those with Contributor accounts.

You may want to reward a valuable contributor by upgrading his or her account to an Author account. Author accounts provide all of the same features as Contributor accounts other than the fact that they can publish content without it having to pass the review of an Editor or Admin account first. Those with Subscriber accounts will only be able to post comments. See the screenshot below for a full list of user roles and their capabilities (note that some of the more advanced admin-only capabilities are unavailable with free WordPress hosting):

When you create an account for a student, you will need to provide his or her email addresses, since this will be used in comment moderation, newsletters and password resets.

classroom-12

Organizing Your Students’ Posts

By default, the name of the poster should accompany the post itself. However, educators may also find it effective to assign categories to each individual student. To add a new category, navigate to “Posts > Categories,” and enter a name for the category, such as the name of the student, before clicking “Add New Category.” Alternatively, you can add each of your students as categories under a single parent category called “Students” or any other name you prefer. Once you have set up categories to help keep your posts organized, you should tell your students to select their names as categories whenever they create new posts.

classroom-13


Classroom Blogging Step 3 – Connecting with Parents

Not only should you be encouraging students to participate in your class blogging efforts; you should also get parents and other family members on-board. Even today, blogging still remains a fairly foreign notion to many patents and even students themselves sometimes. Since your class blog is ultimately designed to be a collaborative effort, you’ll need to showcase the value of the medium and make sure that both your students and their parents can easily find your blog.

Printing Handouts

One of the most effective ways to let parents and students know about your blog is to use the good old fashioned printed method. To create a handout promoting your blog, use a few sentences to describe your blog’s theme and purpose, provide its Web address, and outline the most important online safety rules. For best results, you should include a screenshot of your blog’s front page in the presentation. You can take a screenshot by using the PrtScn (Print Screen) button on your keyboard and pasting the screen capture into Microsoft Paint or any other image editing software. Alternatively, you can use the Snipping Tool in Windows Vista or later to capture only a specific area of the screen, and this way, you won’t need to do any further editing to remove other areas of the screen capture, such as the taskbar or other open applications.

Other useful information that you may want to consider providing on the handout includes instructions on how to subscribe to the blog, leave comments, share content and navigate the website more effectively.

Email Subscriptions

Email subscriptions help you to keep parents and other family members informed as to what your students are learning and how your class blogging efforts are going. It also makes it easier to keep in touch, since your subscribers will be automatically alerted when new posts are published on your blog. The option to subscribe is an essential feature to have on almost any blog – not just class and student blogs. Even with free hosting, the basic WordPress platform includes a widget which you can use to add an email signup form so that visitors, such as parents and students, can follow your blog.

To add the necessary widget, navigate to “Appearance > Widgets,” and open up the widget area you want to use to the right, such as “Sidebar”. Drag the “Follow Blog” widget over from the list of available widgets to the left and drop it into the desired widget area. Click on the widget name to open up the settings, and edit the text for each field as you require, though the default entries will probably suffice. Click “Save” once you are done. A new section in the sidebar of your blog entitled “Follow Blog via Email” will appear, and visitors will simply need to click “Follow” and enter their email addresses. The subscriber will receive a confirmation email shortly afterwards.classroom-10

In Chapter 8, we’ll also be taking a look at how to use RSS subscriptions to aggregate newly published content for quick and convenient access.